

What is video AV control?
The IoT-type serial port with AV camera input supports AV signal input display, commonly used in the beauty instrument industry for skin care, hair detection, etc.

For the video playback/AV input function of the M series, the video layer will always be displayed on top. At this time, if we overlay text or other graphics on the video control for display, the video layer will cover all other graphics, resulting in only the video being displayed, and other text and graphics superimposed on the video cannot be shown. To address this, our company has developed a corresponding M series video playback API interface for customers with such needs. The API function interface is as follows:
set_color_key(Min_Color,Max_Color,Match)
Function description:
- Min_Color: The minimum value of the 24-bit RGB color range, for example, 0x00BFBFBF, R-BF/G-BF/B-BF;
- Max_Color: The maximum value of the 24-bit RGB color range, for example, 0x00C8C8C8, R-C8/G-C8/B-C8;
- Match: A 6-bit comparison rule 101010 (2A); 10-R/10-G/10-B, representing that color values within the range of 0x00BFBFBF to 0x00C8C8C8 will be filtered after comparison. (Colors between 0x00BFBFBF <= color <= 0x00C8C8C8 will be filtered, and other colors will be displayed)
function on_init()
    set_color_key(0x00BFBFBF,0x00C8C8C8,0x0000002A)
end
Note: The set_color_key(Min_Color,Max_Color,Match) API interface function must be used in the on_init() system initialization function, and is configured by default at initialization.
Scope of application: M series
Relevant routine download link:
- "M Series AV Input" (click to jump)
20.1 Introduction to Video AV Control Attributes
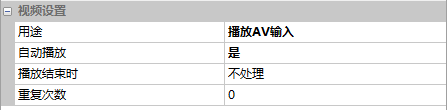
Usage
Select the video control and choose "Play AV Input" in the attribute window
20.2 AV Input Coordinate Display
[AV Input Coordinate Display] Screen, introducing AV applications that configure LUA scripts, combined with buttons to move up, down, left, and right, displaying a 'crosshair'
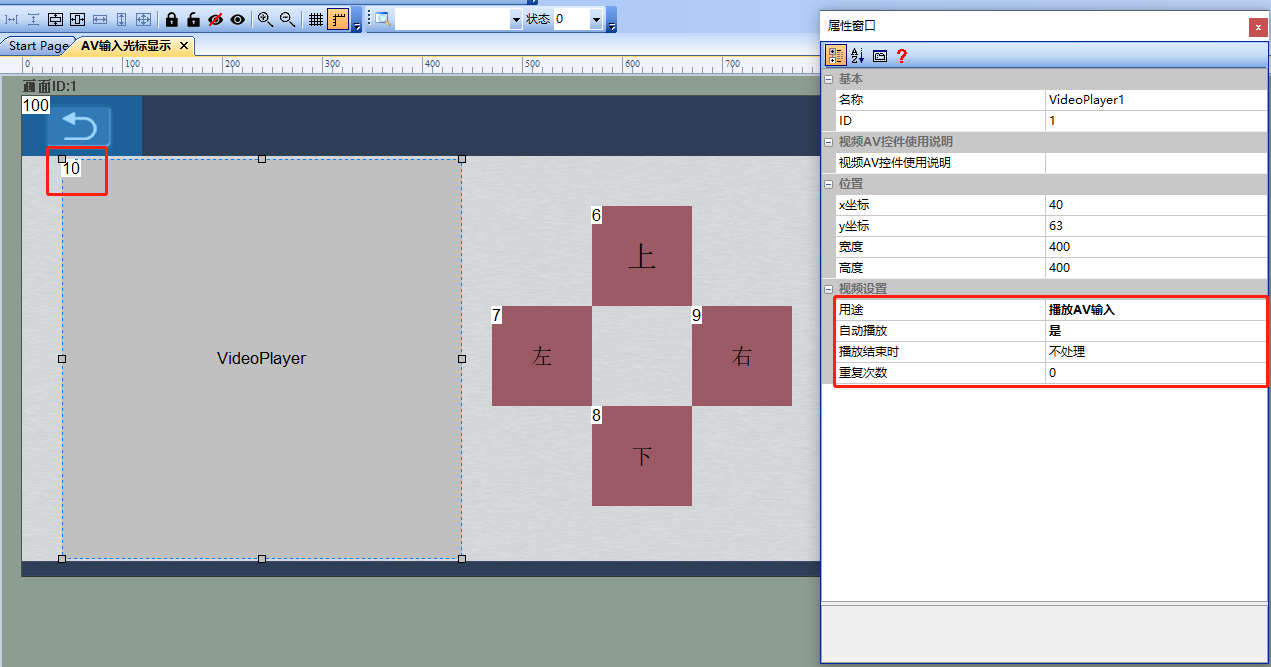
Attribute Configuration
Video Control Configuration
Video Control Configuration Drag to select the video control, with the usage selected as Play AV Input, as shown below
Button Configuration
Button Control Up (Control ID6): Controls the y-coordinate display of the crosshair to decrease
Button Control Down (Control ID8): Controls the y-coordinate display of the crosshair to increase
Button Control Left (Control ID7): Controls the x-coordinate display of the crosshair to decrease
Button control right (control ID9): Controls the display of the cross cursor coordinate x plus
attribute configuration as shown below
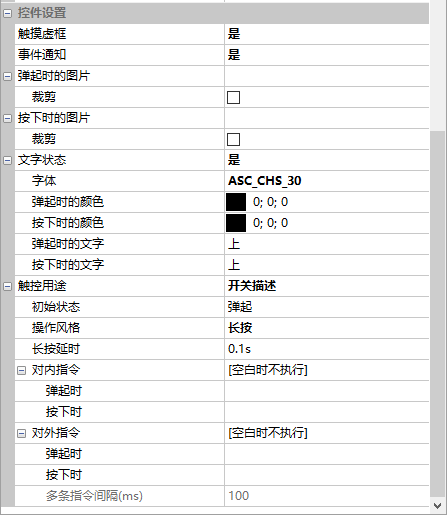
LUA script control
20.3 LUA script logic implementation
LUA script configuration implementation code:
-- 十字光标坐标显示点
local LineH_Y = 263                             --十字显示光标点y坐标
local LineV_X = 240                             --十字显示光标点x坐标
local TextH_X = LineV_X + 5                        --坐标text显示的坐标位置
local TextH_Y = LineH_Y - 40
local TextV_X = LineV_X + 5
local TextV_Y = LineH_Y - 20
function on_init()                             --初始化
    set_color_key(0x00BFBFBF,0x00C8C8C8,0x0000002A)             --设置颜色过滤属性(必须在on_init()中配置)
end

function on_draw(screen)                          --界面刷新回调函数,具体使用说明参考《LUA脚本API》
    if screen == 1 then
        set_pen_color(0x3666)                        --设置画笔颜色
        draw_line(40,LineH_Y,440,LineH_Y,1)                 --画十字线
        draw_line(LineV_X,63,LineV_X,440,1)
        local text_h = "LineH_Y:"..LineH_Y
        local text_v = "LineV_X:"..LineV_X
        draw_text(text_h,TextH_X,TextH_Y,90,20,4,0x3666,4)         --画坐标text显示
        draw_text(text_v,TextV_X,TextV_Y,90,20,4,0x3666,4)
    end
end

function on_control_notify(screen,control,value)              --触摸控件回调函数
    if screen == 1 then
        if control == 6 then --上
            if value == 1 then
                LineH_Y = LineH_Y - 1
                if LineH_Y < 63 then
                    LineH_Y = 63
                end
            elseif value == 2 then
                LineH_Y = LineH_Y - 5
                if LineH_Y < 63 then
                    LineH_Y = 63
                end
            end
        elseif control == 7 then --下
            if value == 1 then
                LineV_X = LineV_X - 1
                if LineV_X < 63 then
                    LineV_X = 63
                end
           elseif value == 2 then
                LineV_X = LineV_X - 5
                if LineV_X < 63 then
                    LineV_X = 63
                end
          end

        elseif control == 8 then --左
            if value == 1 then
               LineH_Y = LineH_Y + 1
               if LineH_Y > 440 then
                   LineH_Y = 463
               end
            elseif value == 2 then
                LineH_Y = LineH_Y + 5
                if LineH_Y > 440 then
                    LineH_Y = 463
                end
            end
        elseif control == 9 then --右
            if value == 1 then
                LineV_X = LineV_X + 1
                if LineV_X > 440 then
                    LineV_X = 440
                 end
            elseif value == 2 then
                LineV_X = LineV_X + 5
                if LineV_X > 440 then
                    LineV_X = 440
                end
            end
        end
        follow_pos(LineV_X,LineH_Y) --text显示坐标传入
        redraw()
    end
end

function on_press(state,x,y) --触摸屏点击回调函数
    if get_current_screen() == 1 then
        if state == 1 or state == 2 then
            if x >= 40 and x <= 440 then
                if y >= 63 and y <= 463 then
                    follow_pos(x,y)
                    LineV_X = x
                    LineH_Y = y
                    redraw()
                end
            end
        end
    end
end

function follow_pos(p_x,p_y) --text坐标显示
    if p_x < 240 and p_y < 263 then
        TextV_X = p_x + 5
        TextH_X = p_x + 5
        TextV_Y = p_y + 5
        TextH_Y = p_y + 25
     elseif p_x < 240 and p_y > 263 then
        TextV_X = p_x + 5
        TextH_X = p_x + 5
        TextV_Y = p_y - 40
        TextH_Y = p_y - 20
    elseif p_x >= 240 and p_y <= 263 then
        TextV_X = p_x - 85
        TextH_X = p_x - 85
        TextV_Y = p_y + 5
        TextH_Y = p_y + 25
    elseif p_x > 240 and p_y > 263 then
        TextV_X = p_x - 85
        TextH_X = p_x - 85
        TextV_Y = p_y - 40
        TextH_Y = p_y - 20
    end
end
20.4 Two-way AV switching
Command switching
M series with two-way AV can support back and forth switching, with commands as follows
| Frame header | Configuration command | Function code - AV channel switching | Screen ID | Control ID | Channel | Frame Tail |
|---|---|---|---|---|---|---|
| EE | B1 | 77 | 00 00 | 00 01 | 00/01 | FF FC FF FF |
When the channel is 00, it indicates switching to the AV signal input of channel 0. The current channel is 0x01, indicating switching to the AV signal input of channel 1
LUA API Switching
set_av_channel(channel)
Switch AV channel, only supported by M series
- channel = 0, switch to channel 0
- channel= 1, switch to channel 1


Leave a Reply