

🌐 This page is not yet available in English. Showing the Chinese version. Back to Chinese page.
本文目录
- 1. 什么是视频AVcontrol?
- 2. 20.1 视频AV控件属性介绍
- 3. 20.2 AV输入坐标显示
- 4. 20.3 LUA脚本逻辑实现
- 5. 20.4 两路AVSwitch
什么是视频AVcontrol?
带AV摄像头输入的物联型串口支持AV信号输入显示,常用于美容仪行业的皮肤护理、头发检测等

针对M型系列的视频播放/AV输入功能时,视频图层会一直显示在最上层,此时如果我们将文字等其他图形叠加放在视频控件上显示时,视频图层会将其他图形都覆盖,导致只能显示出视频,而无法显示视频上叠放的其他文字和图形。为此,我司针对有此类需求的客户开发了对应的M系列视频底层播放APIInterface,来满足此类客户的需求,api函数接口如下所示
set_color_key(Min_Color,Max_Color,Match)
函数说明:
- Min_Color:24位RGB颜色范围的最小值,例如0x00BFBFBF,R-BF/G-BF/B-BF;
- Min_Color:24位RGB颜色范围的最大值,例如0x00C8C8C8,R-C8/G-C8/B-C8;
- Match:6位的比较规则101010(2A);10-R/10-G/10-B,代表颜色范围在0x00BFBFBF—0x00C8C8C8之间的颜色值经过比较后会被过滤。(0x00BFBFBF <= color <= 0x00C8C8C8之间的颜色会被过滤,其他颜色会显示出来)
function on_init()
    set_color_key(0x00BFBFBF,0x00C8C8C8,0x0000002A)
end
注:set_color_key(Min_Color,Max_Color,Match),此API接口函数必须要放在on_init()系统初始化函数中使用,默认在初始时配置的属性
适用范围:M系列
相关例程下载链接:
- 《M系列 AV输入》(点击跳转)
20.1 视频AV控件属性介绍
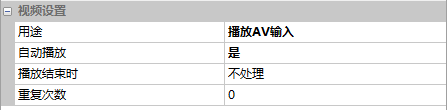
用途
选中视频控件,在属性窗口中选择“播放AV输入”
20.2 AV输入坐标显示
【AV输入坐标显示】画面,介绍配置LUA脚本的AV应用,结合按钮上下左右移动,显示‘十字线’
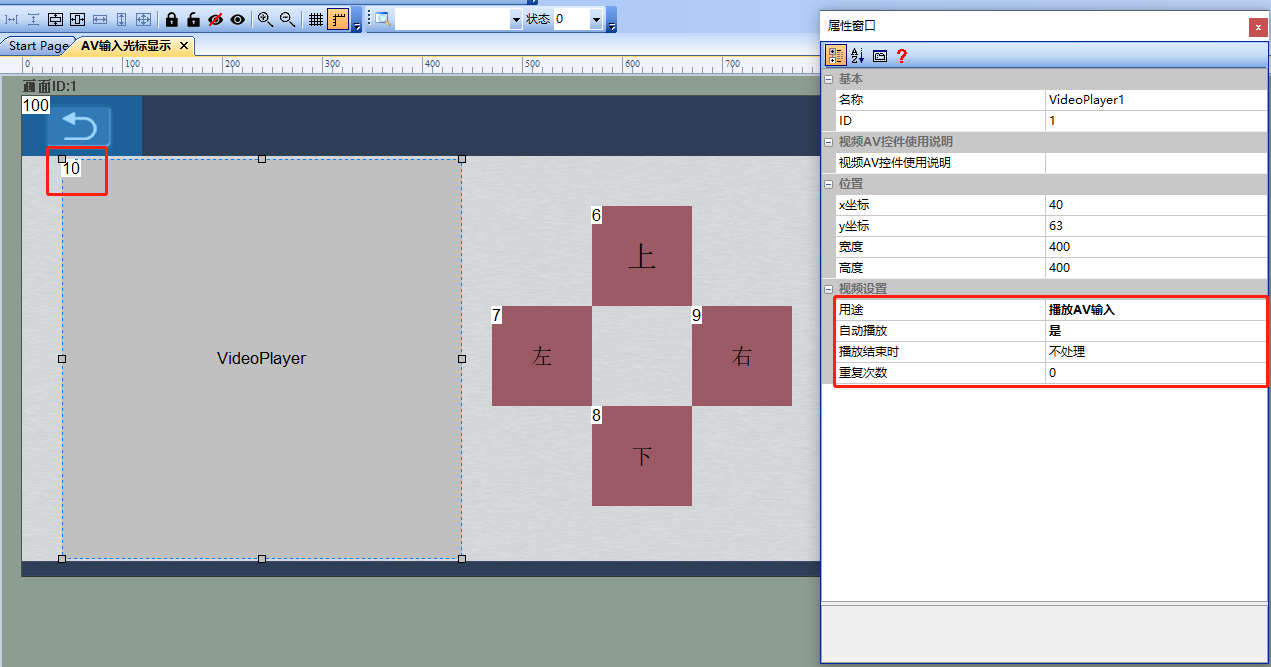
属性配置
视频控件配置
视频控件配置拖动选择视频控件,用途选择播放AV输入,如下所示
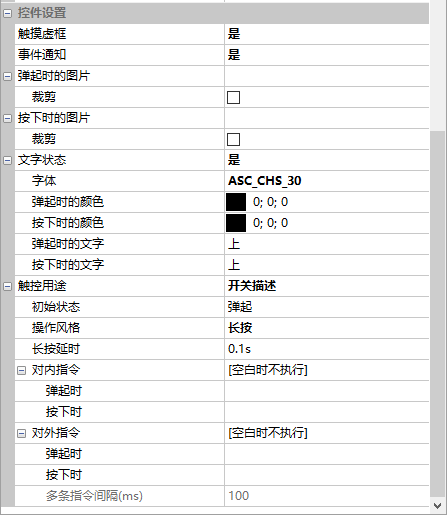
按钮配置
按钮控件上(controlID6):控制十字光标显示坐标y减
按钮控件下(controlID8):控制十字光标显示坐标y加
按钮控件左(controlID7):控制十字光标显示坐标x减
按钮控件右(controlID9):控制十字光标显示坐标x加
属性配置如下所示
LUA脚本控制
20.3 LUA脚本逻辑实现
LUA脚本配置实现代码:
-- 十字光标坐标显示点
local LineH_Y = 263                             --十字显示光标点y坐标
local LineV_X = 240                             --十字显示光标点x坐标
local TextH_X = LineV_X + 5                        --坐标text显示的坐标位置
local TextH_Y = LineH_Y - 40
local TextV_X = LineV_X + 5
local TextV_Y = LineH_Y - 20
function on_init()                             --初始化
    set_color_key(0x00BFBFBF,0x00C8C8C8,0x0000002A)             --设置颜色过滤属性(必须在on_init()中配置)
end

function on_draw(screen)                          --界面刷新回调函数,具体使用说明参考《LUAScriptAPI》
    if screen == 1 then
        set_pen_color(0x3666)                        --设置画笔颜色
        draw_line(40,LineH_Y,440,LineH_Y,1)                 --画十字线
        draw_line(LineV_X,63,LineV_X,440,1)
        local text_h = "LineH_Y:"..LineH_Y
        local text_v = "LineV_X:"..LineV_X
        draw_text(text_h,TextH_X,TextH_Y,90,20,4,0x3666,4)         --画坐标text显示
        draw_text(text_v,TextV_X,TextV_Y,90,20,4,0x3666,4)
    end
end

function on_control_notify(screen,control,value)              --触摸控件回调函数
    if screen == 1 then
        if control == 6 then --上
            if value == 1 then
                LineH_Y = LineH_Y - 1
                if LineH_Y < 63 then
                    LineH_Y = 63
                end
            elseif value == 2 then
                LineH_Y = LineH_Y - 5
                if LineH_Y < 63 then
                    LineH_Y = 63
                end
            end
        elseif control == 7 then --下
            if value == 1 then
                LineV_X = LineV_X - 1
                if LineV_X < 63 then
                    LineV_X = 63
                end
           elseif value == 2 then
                LineV_X = LineV_X - 5
                if LineV_X < 63 then
                    LineV_X = 63
                end
          end

        elseif control == 8 then --左
            if value == 1 then
               LineH_Y = LineH_Y + 1
               if LineH_Y > 440 then
                   LineH_Y = 463
               end
            elseif value == 2 then
                LineH_Y = LineH_Y + 5
                if LineH_Y > 440 then
                    LineH_Y = 463
                end
            end
        elseif control == 9 then --右
            if value == 1 then
                LineV_X = LineV_X + 1
                if LineV_X > 440 then
                    LineV_X = 440
                 end
            elseif value == 2 then
                LineV_X = LineV_X + 5
                if LineV_X > 440 then
                    LineV_X = 440
                end
            end
        end
        follow_pos(LineV_X,LineH_Y) --text显示坐标传入
        redraw()
    end
end

function on_press(state,x,y) --触摸屏点击回调函数
    if get_current_screen() == 1 then
        if state == 1 or state == 2 then
            if x >= 40 and x <= 440 then
                if y >= 63 and y <= 463 then
                    follow_pos(x,y)
                    LineV_X = x
                    LineH_Y = y
                    redraw()
                end
            end
        end
    end
end

function follow_pos(p_x,p_y) --text坐标显示
    if p_x < 240 and p_y < 263 then
        TextV_X = p_x + 5
        TextH_X = p_x + 5
        TextV_Y = p_y + 5
        TextH_Y = p_y + 25
     elseif p_x < 240 and p_y > 263 then
        TextV_X = p_x + 5
        TextH_X = p_x + 5
        TextV_Y = p_y - 40
        TextH_Y = p_y - 20
    elseif p_x >= 240 and p_y <= 263 then
        TextV_X = p_x - 85
        TextH_X = p_x - 85
        TextV_Y = p_y + 5
        TextH_Y = p_y + 25
    elseif p_x > 240 and p_y > 263 then
        TextV_X = p_x - 85
        TextH_X = p_x - 85
        TextV_Y = p_y - 40
        TextH_Y = p_y - 20
    end
end
20.4 两路AVSwitch
指令切换
M系列带两路AV的可以支持来回切换,指令如下所示
| 帧头 | 组态指令 | function code-AV通道切换 | 画面ID | controlID | 通道 | 帧尾 |
|---|---|---|---|---|---|---|
| EE | B1 | 77 | 00 00 | 00 01 | 00/01 | FF FC FF FF |
当通道为00,表示切换到通道0的AV信号输入,当前通道为0x01,表示切换到通道1的AV信号输入
LUA APISwitch
set_av_channel(channel)
SwitchAV通道,仅M系列支持
- channel = 0,切换到通道0
- channel= 1,切换到通道1


Leave a Reply