
1. Introduction to Timer
The timer function allows the device to trigger a set event within a preset time period after the timer is set. To set the timer, you need to set the timer event and timer variable. When the RTC clock reaches the preset trigger time, the preset timer event will be triggered. The timer can be preset with up to 5 groups.
2. How to Add a Timer Event
Step 1: Open or create a new project, select "Events" in the menu bar, click "Timer Event", and a timer event window will pop up. Click "Add" to add a timer event, as shown in Figure 2.1.
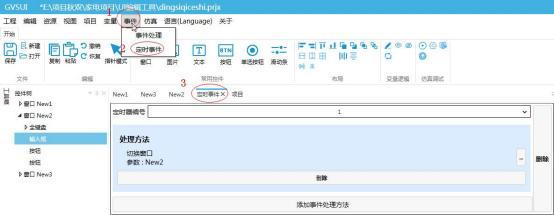 Figure 2.1 Add Timer Event
Step 2: Set the timer number. The timer numbers are 1-5, which correspond to the 5 sets of timer variables in the system time variable. When the timer number is set to 1, the first set of timer variables will be called, as shown in Figure 2.2.
Note: Setting the timer number corresponds to calling the timer variable
Figure 2.1 Add Timer Event
Step 2: Set the timer number. The timer numbers are 1-5, which correspond to the 5 sets of timer variables in the system time variable. When the timer number is set to 1, the first set of timer variables will be called, as shown in Figure 2.2.
Note: Setting the timer number corresponds to calling the timer variable
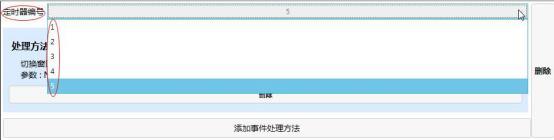 Figure 2.2 Timer Number
Step 3: Set the processing method. Click
Figure 2.2 Timer Number
Step 3: Set the processing method. Click
 on the right side, and a processing method window will pop up. Set the event content that will be triggered within the specified time.
For example, set the processing method to "Variable Operation - Variable Increment/Decrement - Bind Target Variable Var0 - Step Value is 1"
Note: A timer event can add multiple processing methods to trigger multiple events, such as sending custom commands while switching windows.
on the right side, and a processing method window will pop up. Set the event content that will be triggered within the specified time.
For example, set the processing method to "Variable Operation - Variable Increment/Decrement - Bind Target Variable Var0 - Step Value is 1"
Note: A timer event can add multiple processing methods to trigger multiple events, such as sending custom commands while switching windows.
 Figure 2.3 Setting Processing Methods
3. How to Set Timed Command Sending via Timer
Setting command sending at a specified time via timer involves two parts: setting a timed event and setting a timer variable binding. The specific steps are as follows.
3.1 Setting a Timed Event
Setting a timed event means setting a triggering event to perform a specified action at a specified time. For example, Timer 1 sends the custom protocol "AB CD EF 12 $BYTE(#3000) $CRC16MODBUS( 1,5)" when triggered at the set time. The specific steps are the same as in "How to Set a Timed Event", as shown in Figure 3.1.
Figure 2.3 Setting Processing Methods
3. How to Set Timed Command Sending via Timer
Setting command sending at a specified time via timer involves two parts: setting a timed event and setting a timer variable binding. The specific steps are as follows.
3.1 Setting a Timed Event
Setting a timed event means setting a triggering event to perform a specified action at a specified time. For example, Timer 1 sends the custom protocol "AB CD EF 12 $BYTE(#3000) $CRC16MODBUS( 1,5)" when triggered at the set time. The specific steps are the same as in "How to Set a Timed Event", as shown in Figure 3.1.
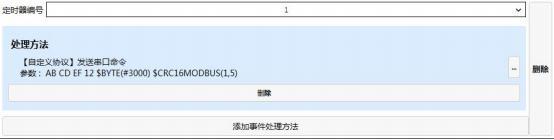 Figure 3.1 Timed Event
3.2 Setting a Timer On/Off Switch
Set the timer switch, add a radio button, select the radio button, add a variable binding, with the bound control property set to "Selected State", data source bound to "Timer1Enable", conversion mode set to "Bidirectional", and conversion method set to "Default", as shown in Figure 3.2.
Figure 3.1 Timed Event
3.2 Setting a Timer On/Off Switch
Set the timer switch, add a radio button, select the radio button, add a variable binding, with the bound control property set to "Selected State", data source bound to "Timer1Enable", conversion mode set to "Bidirectional", and conversion method set to "Default", as shown in Figure 3.2.
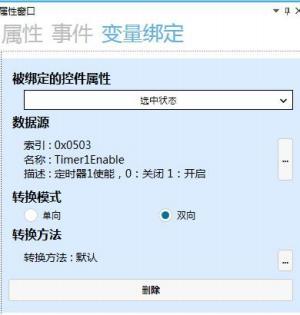 Figure 3.2 Timer On/Off Switch Setting
Note: The Timer1Enable variable controls the on/off switch of timer number 1. When it is 0, it is off, and when it is 1, it is on.
The Timer1Enable variable is
Figure 3.2 Timer On/Off Switch Setting
Note: The Timer1Enable variable controls the on/off switch of timer number 1. When it is 0, it is off, and when it is 1, it is on.
The Timer1Enable variable is
 3.3 Setting the Timer Time Input Box
Set Timer Time Input Box: The trigger time of the timer can be set freely. Add an input box and a full keyboard. Select the input box and add variable binding. The bound control property is "Text", the data source is bound to "Timer1Trigger", the conversion mode is "Bidirectional", the conversion method is "DateTime", and the conversion parameter is "hh:mm", as shown in Figure 3.3.
3.3 Setting the Timer Time Input Box
Set Timer Time Input Box: The trigger time of the timer can be set freely. Add an input box and a full keyboard. Select the input box and add variable binding. The bound control property is "Text", the data source is bound to "Timer1Trigger", the conversion mode is "Bidirectional", the conversion method is "DateTime", and the conversion parameter is "hh:mm", as shown in Figure 3.3.
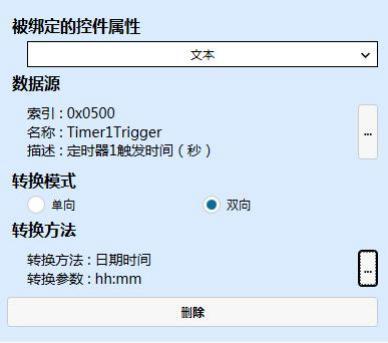 Figure 3.3 Set Timer Time Input Box
3.4 Set Timer Trigger Mode
There are three options for setting the timer trigger mode: "Daily", "Weekdays", and "Custom Interval". Add three button controls, each with an event set to "Click". The handling method for each is "Variable Operation - Variable Setting - Target Variable Binding Timer1Mode - Set Value to Use Constant". The first button control has a constant of 0, meaning that when clicked, the timer trigger mode is set to daily. The second button control has a constant of 1, and the third button control has a constant of 2, as shown in Figure 3.4.
Figure 3.3 Set Timer Time Input Box
3.4 Set Timer Trigger Mode
There are three options for setting the timer trigger mode: "Daily", "Weekdays", and "Custom Interval". Add three button controls, each with an event set to "Click". The handling method for each is "Variable Operation - Variable Setting - Target Variable Binding Timer1Mode - Set Value to Use Constant". The first button control has a constant of 0, meaning that when clicked, the timer trigger mode is set to daily. The second button control has a constant of 1, and the third button control has a constant of 2, as shown in Figure 3.4.
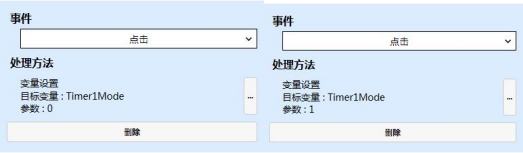
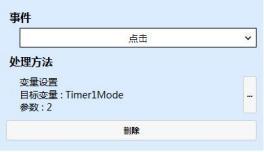 Figure 3.4 Timer Trigger Mode Settings
3.5 Timer Trigger Interval
The timer trigger interval needs to be set only when the timer trigger mode is set to custom interval. The default trigger interval is 1 day, and the time interval setting is calculated in seconds. Add an input box, select the input box, add variable binding, and the bound control property is "Text". The data source is bound to "Timer1Int", the conversion mode is "Bidirectional", and the conversion method is default, as shown in Figure 3.5.
Figure 3.4 Timer Trigger Mode Settings
3.5 Timer Trigger Interval
The timer trigger interval needs to be set only when the timer trigger mode is set to custom interval. The default trigger interval is 1 day, and the time interval setting is calculated in seconds. Add an input box, select the input box, add variable binding, and the bound control property is "Text". The data source is bound to "Timer1Int", the conversion mode is "Bidirectional", and the conversion method is default, as shown in Figure 3.5.
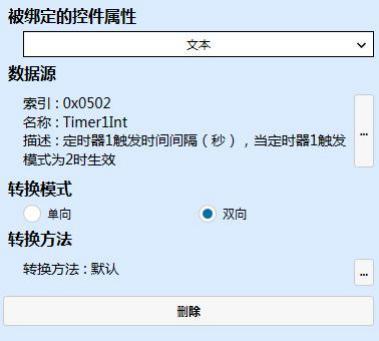 Figure 3.3 Set Timer Trigger Interval Input Box
3.6 View Simulation Effect
Click the "Run Simulator" button in the simulation debugging module
Figure 3.3 Set Timer Trigger Interval Input Box
3.6 View Simulation Effect
Click the "Run Simulator" button in the simulation debugging module
 to view the simulation effect.
When the timer trigger time is set to 9:01 and the trigger mode is set to daily, clicking "Start Timer" will trigger the timer at 9:01 every day, sending a command, as shown in Figure 3.6.
to view the simulation effect.
When the timer trigger time is set to 9:01 and the trigger mode is set to daily, clicking "Start Timer" will trigger the timer at 9:01 every day, sending a command, as shown in Figure 3.6.
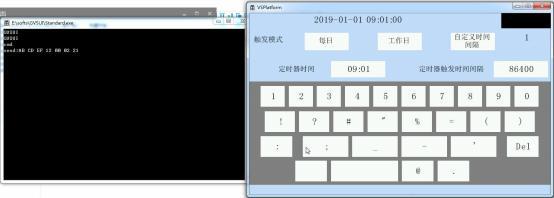 Figure 3.6 Simulation Effect
If you find it helpful, please give a thumbs up


Leave a Reply