
Software Description
1.1 Software Introduction
The GUI Designer software is used in conjunction with the Teli embedded development platform device to achieve 0-code visual editing of device UI interfaces and protocols.
Through the GUI Designer software, all interfaces of the embedded device GUI can be edited, such as control layout, images, and text, as well as control dragging and deletion, creating new windows and controls, and simulating operation.
This software can be used by non-professional software developers, but it requires a certain degree of logical thinking and a foundation in science.
1.2 Installation Environment
System: Windows 7, Windows 8, Windows 10.
Software required for computers: Microsoft Excel
Software Installation
2.1 Software Installation
This document takes GUI_Designer as an example to introduce the installation process and usage method
(1) Double-click to open the GUI_Designer.exe installation package and follow the prompts to install, as shown in Figure 0-1
 Figure 0-1 Installation Method
(2) A shortcut for the software can be seen on the desktop, and you can directly double-click it to open the software later.
Figure 0-1 Installation Method
(2) A shortcut for the software can be seen on the desktop, and you can directly double-click it to open the software later.
 Figure 0-2 Shortcut
New, Open, Save Project
3.1 New Project
Double-click the desktop shortcut icon to open the GUI Designer, click "New" on the main interface, and set the corresponding hardware parameters in the pop-up custom device window (the relevant parameters can be found in the corresponding hardware manual). As shown in Figure 3-1, click "Confirm" after setting to enter the editing interface.
Figure 0-2 Shortcut
New, Open, Save Project
3.1 New Project
Double-click the desktop shortcut icon to open the GUI Designer, click "New" on the main interface, and set the corresponding hardware parameters in the pop-up custom device window (the relevant parameters can be found in the corresponding hardware manual). As shown in Figure 3-1, click "Confirm" after setting to enter the editing interface.
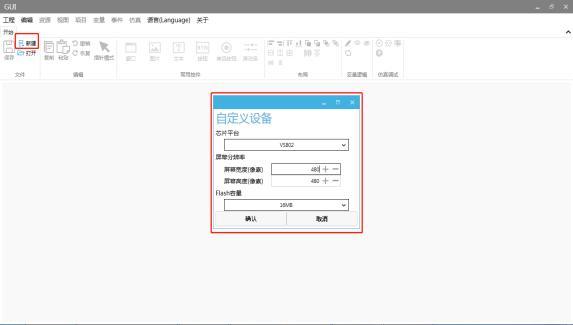 Figure 3-1
3.2 Open Project
Click "Open" on the main interface, find and select the project file with the .prjx extension in the pop-up window, and click "Open" to enter the original project editing interface. As shown in Figure 3-2.
Figure 3-1
3.2 Open Project
Click "Open" on the main interface, find and select the project file with the .prjx extension in the pop-up window, and click "Open" to enter the original project editing interface. As shown in Figure 3-2.
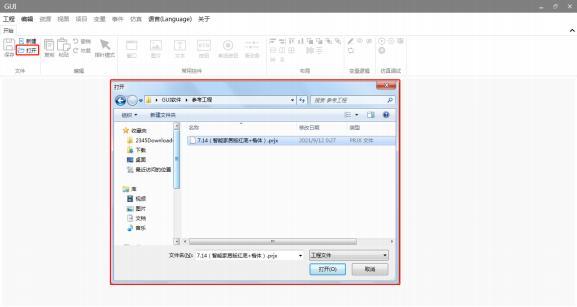 Figure 3-2
3.3 Save Project
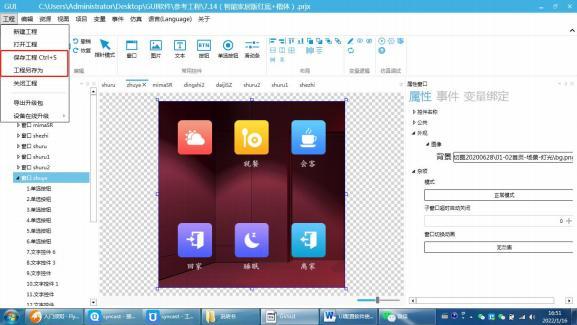
Click "Project" in the menu bar to save the project as a new one. In the pop-up box, you can choose the save location and name the project. The name is not limited and can be in both Chinese and English
Figure 3-2
3.3 Save Project
Click "Project" in the menu bar to save the project as a new one. In the pop-up box, you can choose the save location and name the project. The name is not limited and can be in both Chinese and English
 Editing Interface
4.1 Editing Interface
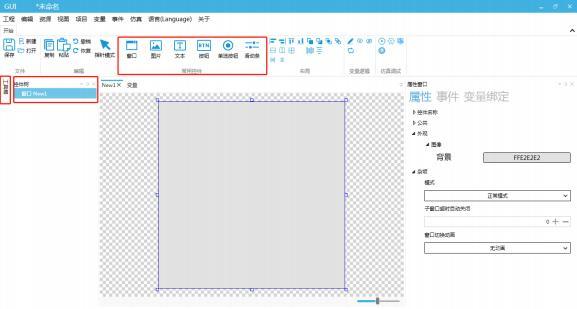
In the common controls or toolbox, you can create new windows, add controls, and display them in the control tree. First, click on the control to select it, and then click the left mouse button in the window to add it. Clicking the right mouse button or switching to pointer mode can return to pointer mode.
Editing Interface
4.1 Editing Interface
In the common controls or toolbox, you can create new windows, add controls, and display them in the control tree. First, click on the control to select it, and then click the left mouse button in the window to add it. Clicking the right mouse button or switching to pointer mode can return to pointer mode.
 4.2 Editing Controls
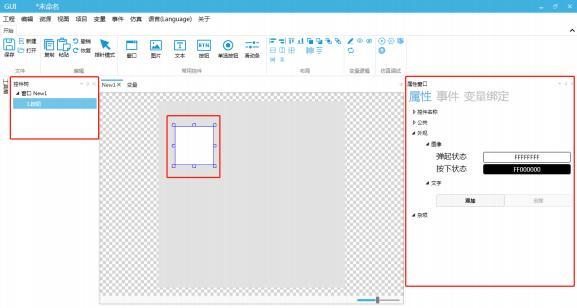
After selecting a control in the control tree or window with the left mouse button, you can manipulate the control's properties, events, and variables in the property window.
4.2 Editing Controls
After selecting a control in the control tree or window with the left mouse button, you can manipulate the control's properties, events, and variables in the property window.
 4.3 Control Layout
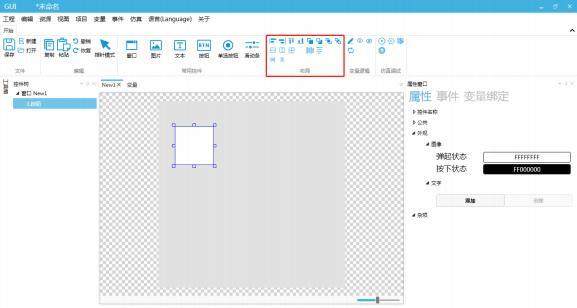
After editing the interface, you can use the layout function to arrange the controls.
4.3 Control Layout
After editing the interface, you can use the layout function to arrange the controls.
 4.4 Resource Addition
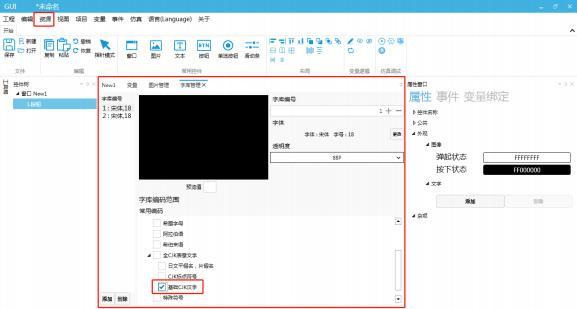
Click on "Resources" in the menu bar to import the images and fonts you need. Due to limited Flash resources, add as needed, otherwise the project may exceed the Flash size limit and fail to import. If Chinese input is required, check "CJK Characters"
4.4 Resource Addition
Click on "Resources" in the menu bar to import the images and fonts you need. Due to limited Flash resources, add as needed, otherwise the project may exceed the Flash size limit and fail to import. If Chinese input is required, check "CJK Characters"
 4.5 Variable Addition
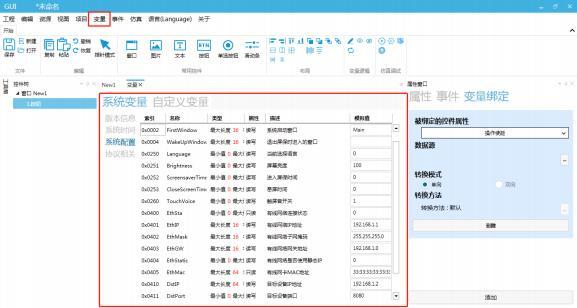
Click on "Variables" in the menu bar to add or delete custom variables. System variables can only be called, not added or deleted.
4.5 Variable Addition
Click on "Variables" in the menu bar to add or delete custom variables. System variables can only be called, not added or deleted.
 4.6 Project Settings
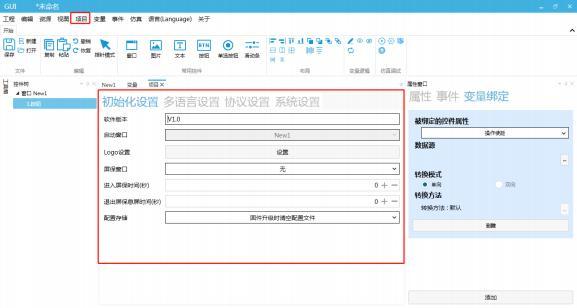
Click "Project" in the menu bar to set initialization, multiple languages, protocols, and systems. Set the relevant parameters according to your needs.
4.6 Project Settings
Click "Project" in the menu bar to set initialization, multiple languages, protocols, and systems. Set the relevant parameters according to your needs.
 Export program and upgrade
5.1 Export upgrade package
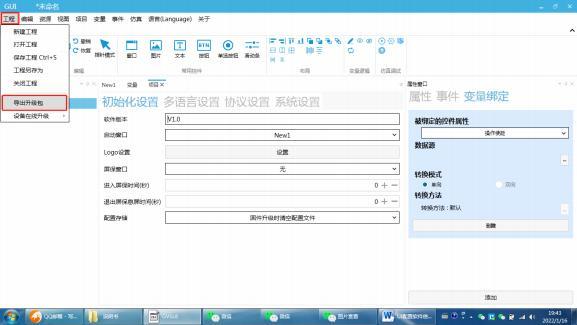
Click "Project" in the menu bar, select "Export upgrade package", and choose a storage location and name in the pop-up window. The name can be in both Chinese and English according to your needs.
After exporting the upgrade package, copy it to the TF card (the TF must be in FAT32 format and can only have one upgrade package). Insert the TF card into the device when it is turned off, power it on to upgrade, and remove the TF card after the upgrade is complete.
Export program and upgrade
5.1 Export upgrade package
Click "Project" in the menu bar, select "Export upgrade package", and choose a storage location and name in the pop-up window. The name can be in both Chinese and English according to your needs.
After exporting the upgrade package, copy it to the TF card (the TF must be in FAT32 format and can only have one upgrade package). Insert the TF card into the device when it is turned off, power it on to upgrade, and remove the TF card after the upgrade is complete.
If you have gained something, please give a like


Leave a Reply