
What is an icon control?
An icon control is a file in GIF or ICON format, with the default index starting from 0. Using icon controls, different states of a variable can be visually displayed or the background image can be modified.
This routine introduces common applications of icon controls, and describes the configuration of each application in conjunction with the screen in the project. Common applications are as follows:
- State display: Implementing 4 state displays.
- Modifying background icons: Implementing the switching of 4 background images.
Scope of application: Full series.
Routine download link: "ICON Control Application" (click to jump).
8.1 Icon control properties.
This section focuses on the properties of the icon control. The property window is shown below.
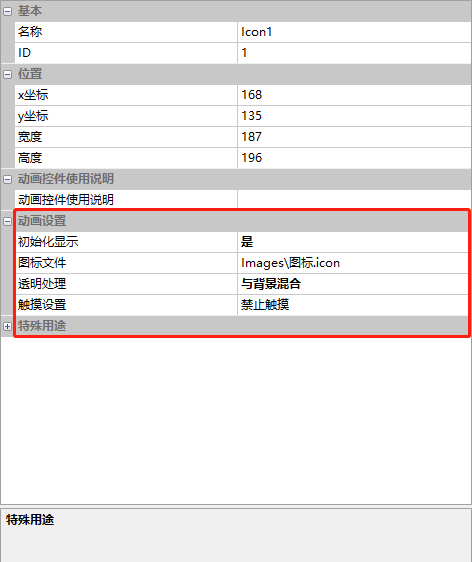
Initial display.
Select "Yes" or "No".
Icon file
Select the path of the icon file
Transparency processing
Can be selected as "Use transparent color" or "Blend with background"
Touch settings
Set touch settings, with the following options available
- Disable touch: No touch allowed
- Allow touch: Notifications and beeps when touched
- Frame change when sliding horizontally: Frame changes when sliding horizontally left and right
- Frame change when sliding vertically: Frame changes when sliding vertically up and down
8.2 Icon file creation
Our company's VisualTFT host computer software integrates a tool for creating icon files "ICON". This section introduces how to produce "ICON" files
- In the menu bar of the VisualTFT software, select "Tools" → "Icon Generation", as shown below
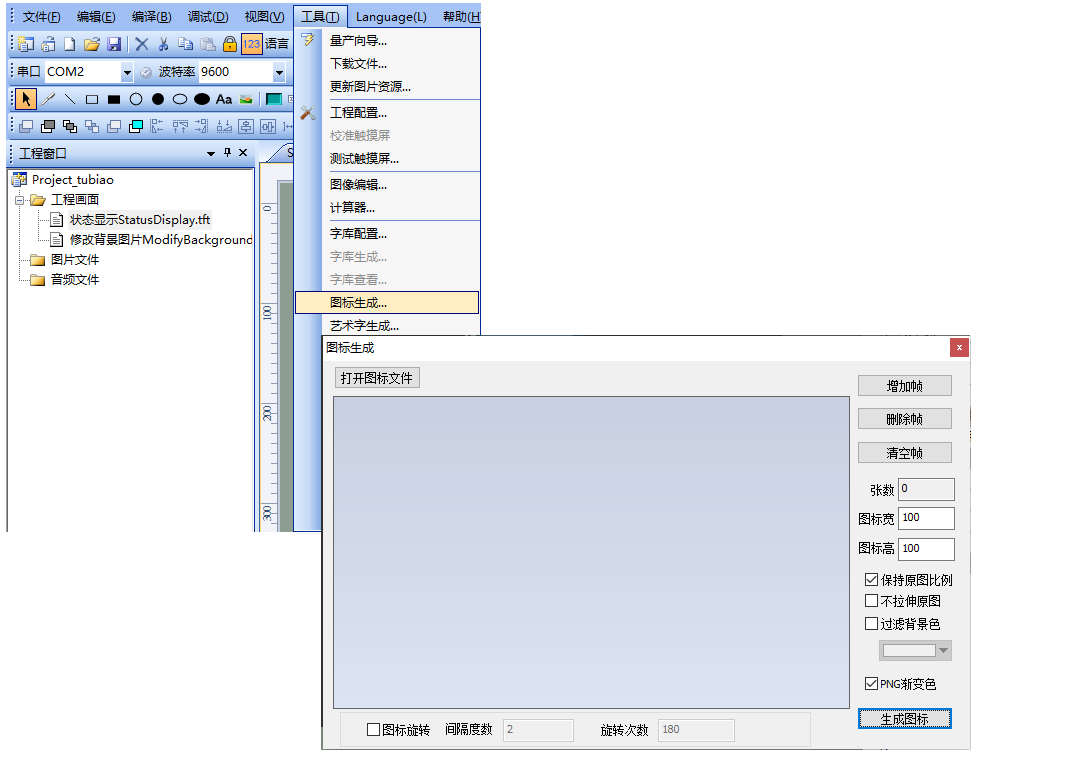
- Click "Add Frame" to add the prepared material. The imported image will be displayed in its original width and height by default. You can also adjust the width and height slightly and drag it freely to change its position. Finally, click "Generate Icon". The operation is as follows:
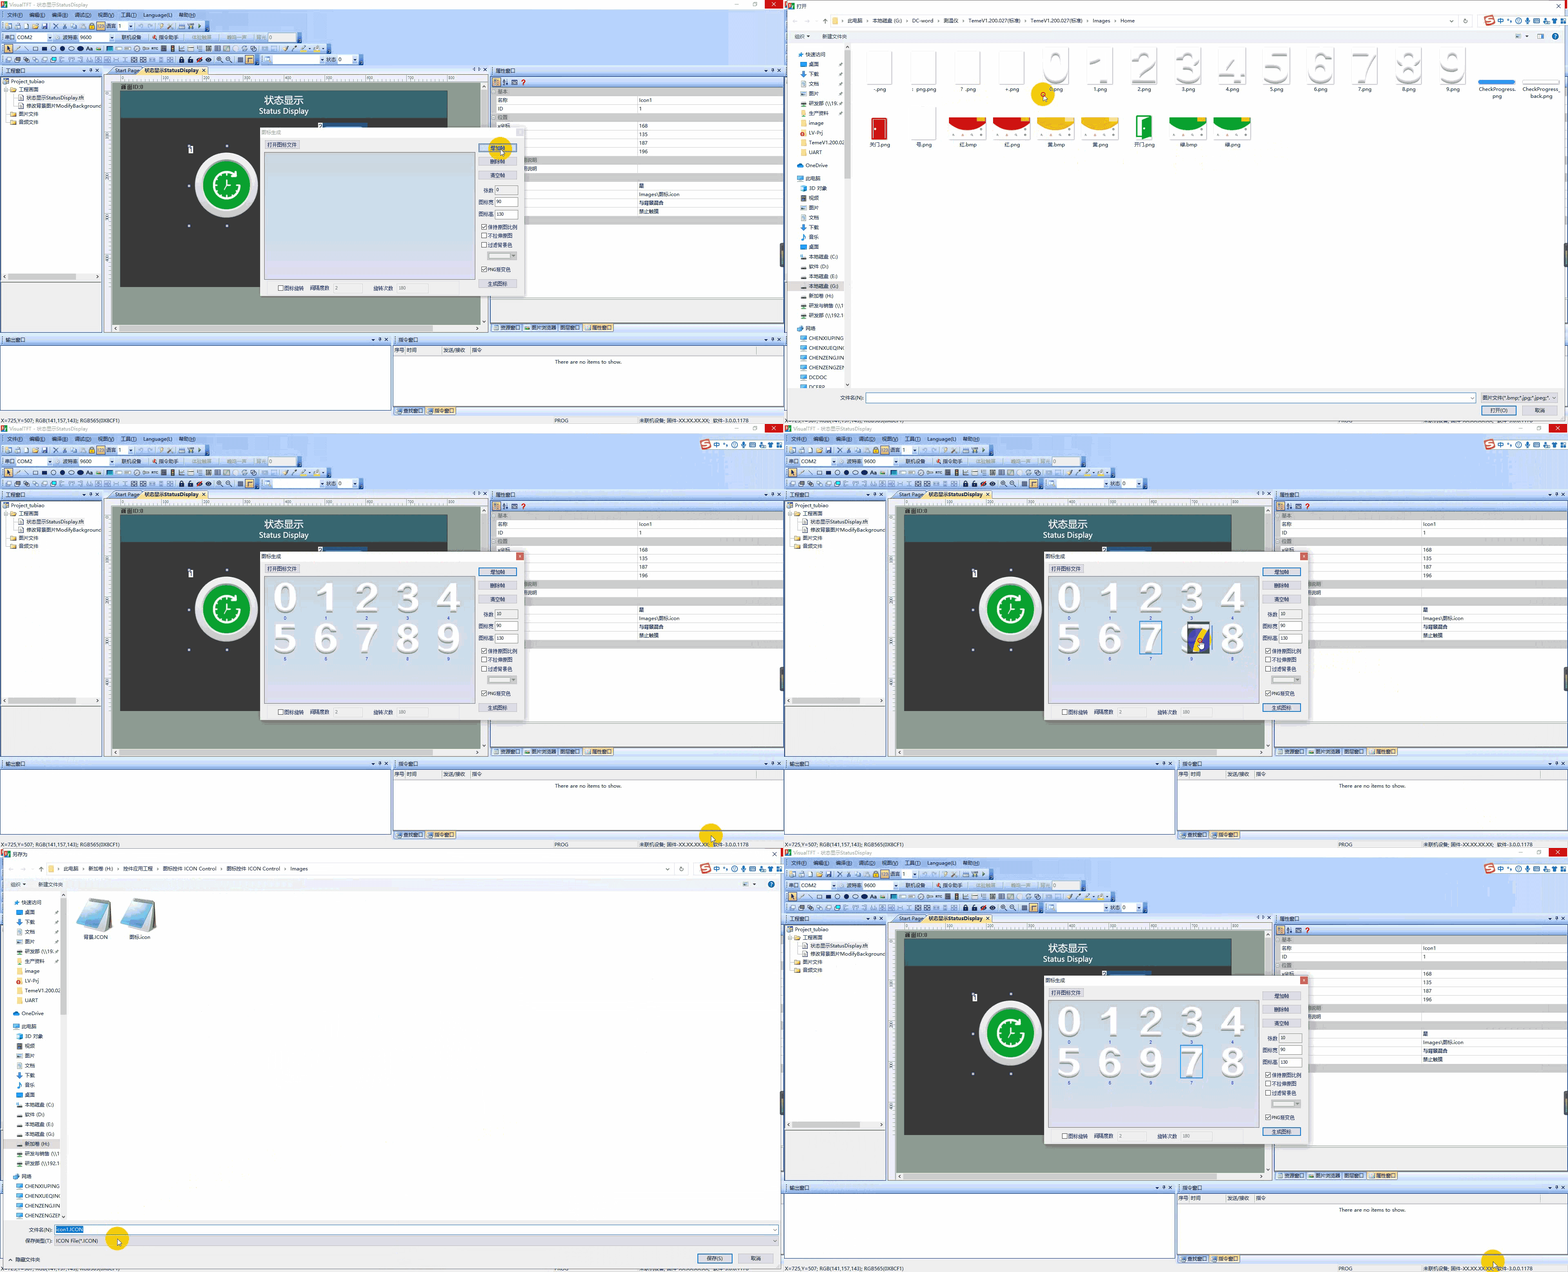
8.3 Status Display
In the "Status Update" screen, when the user device communicates with the serial port screen, the user device sends instructions to update the frame of the icon control.
Screen Configuration
Import the corresponding artwork image in the "Background Image" of the "Status Update" screen. Add one icon control (Control ID: 1) and three button controls (Control ID: 2-6) to the screen.
Attribute Configuration
Icon Attributes
Set the "Icon File" to the path of the material. Set "Transparent Processing" to "Blend with Background". The configuration is as follows:
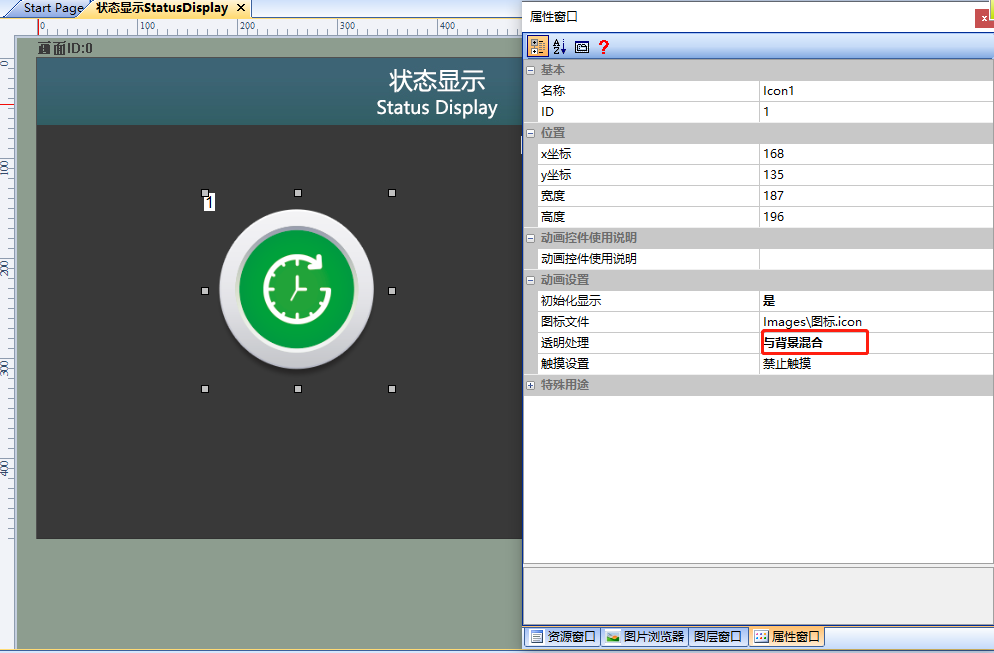
"Working" Button Attributes
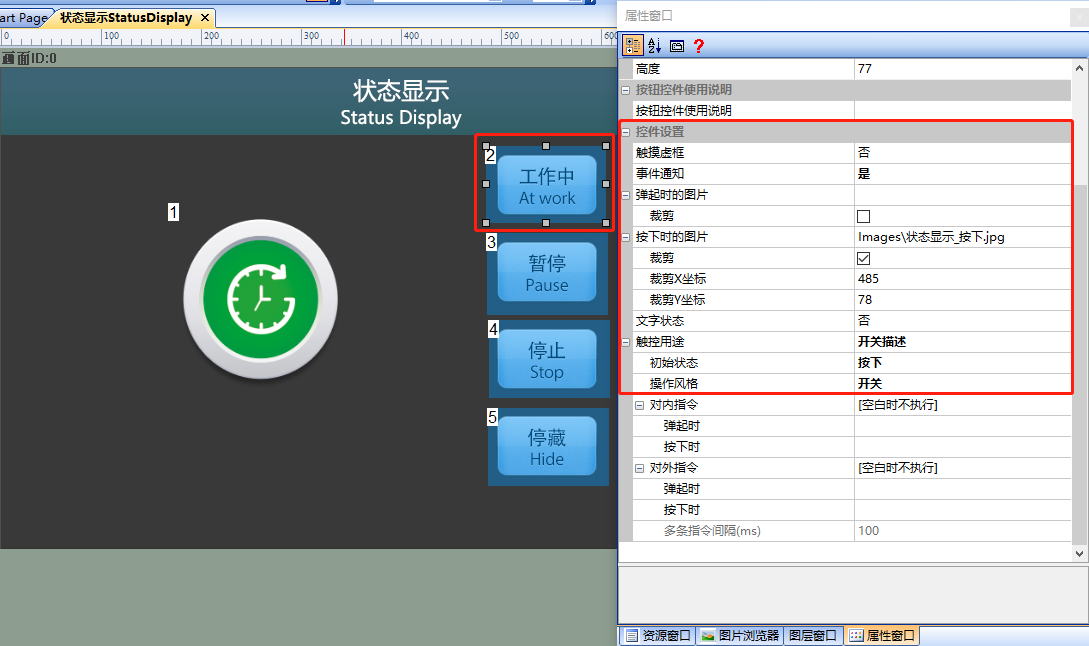
Used to display the icon at frame 0 in the "Working" state. In the attribute window of the button control (Control ID: 2), set "Touch Virtual Box" to "No", "Image when pressed" to the corresponding material path, "Crop" to "Checked", "Initial State" to "pressed", and "Operation Style" to "Switch". The operation is as follows:
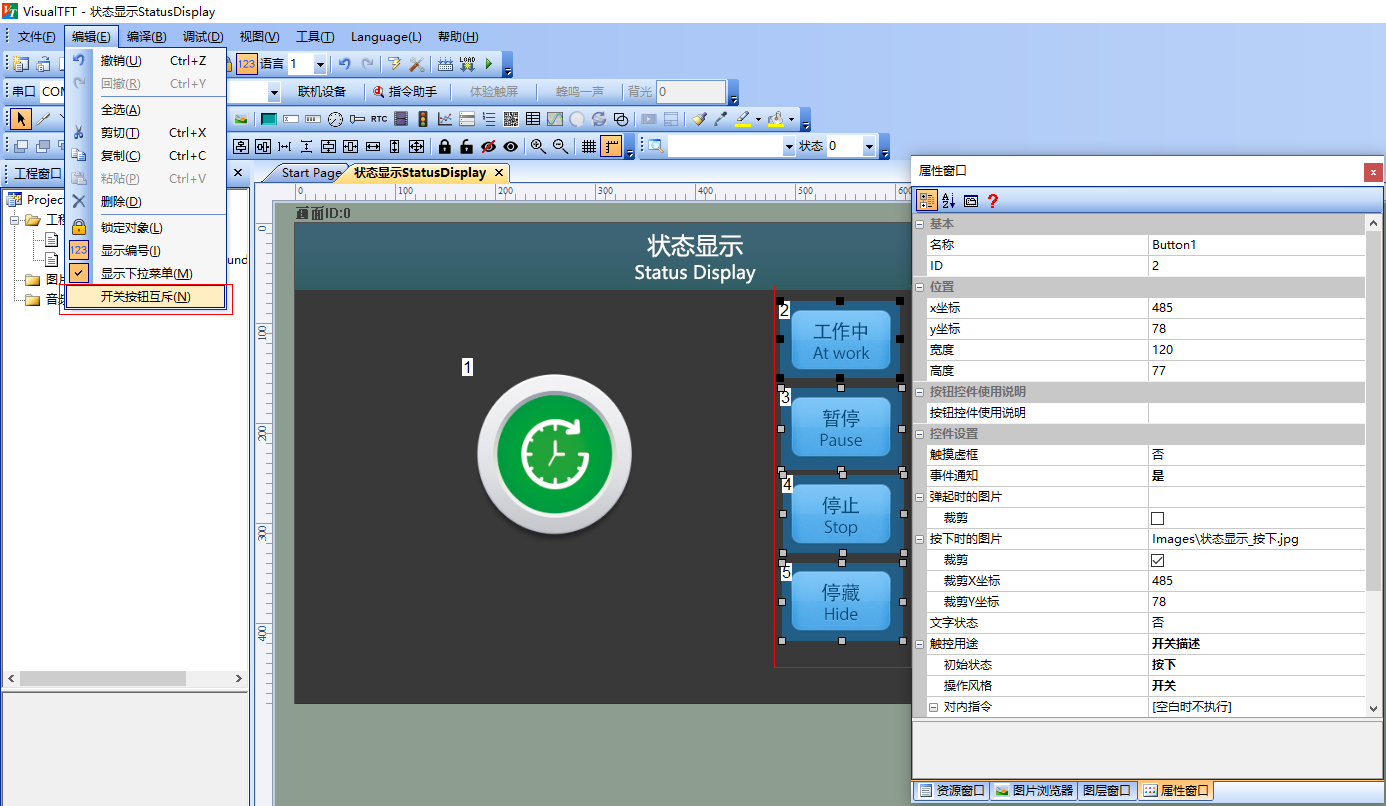
Implement mutual exclusion effects for buttons such as "Working", "Pause", "Stop", and "Hide": Select the above buttons simultaneously, and in the menu bar, click "Edit" - "Switch Button Mutual Exclusion (N)". The corresponding button "Internal Command" - "When pressed" will automatically fill in a mutual exclusion command. The operation is as follows:
Fill in the icon internal command
- Click on "Internal Command" → "When pressed"
- to pop up the command filling box. Select "Command Assistant"
- in the Command Assistant interface. On the left navigation bar, select "Icon Control"
- to set the command parameters in the "Icon Control Display" area. As in the example routine, set the icon control display in the "Status Display" screen to frame 0
- . Copy the command and fill it in the internal command box as shown below
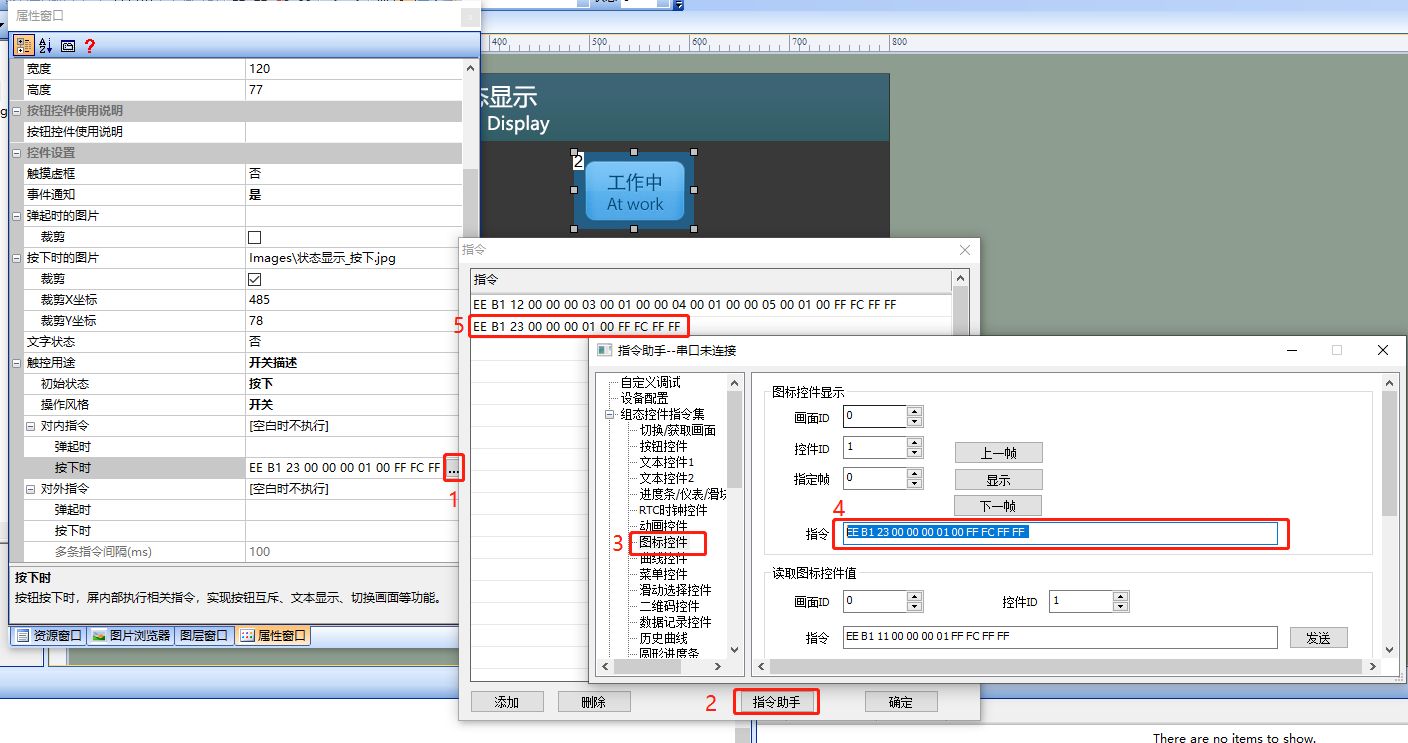
. Run the preview
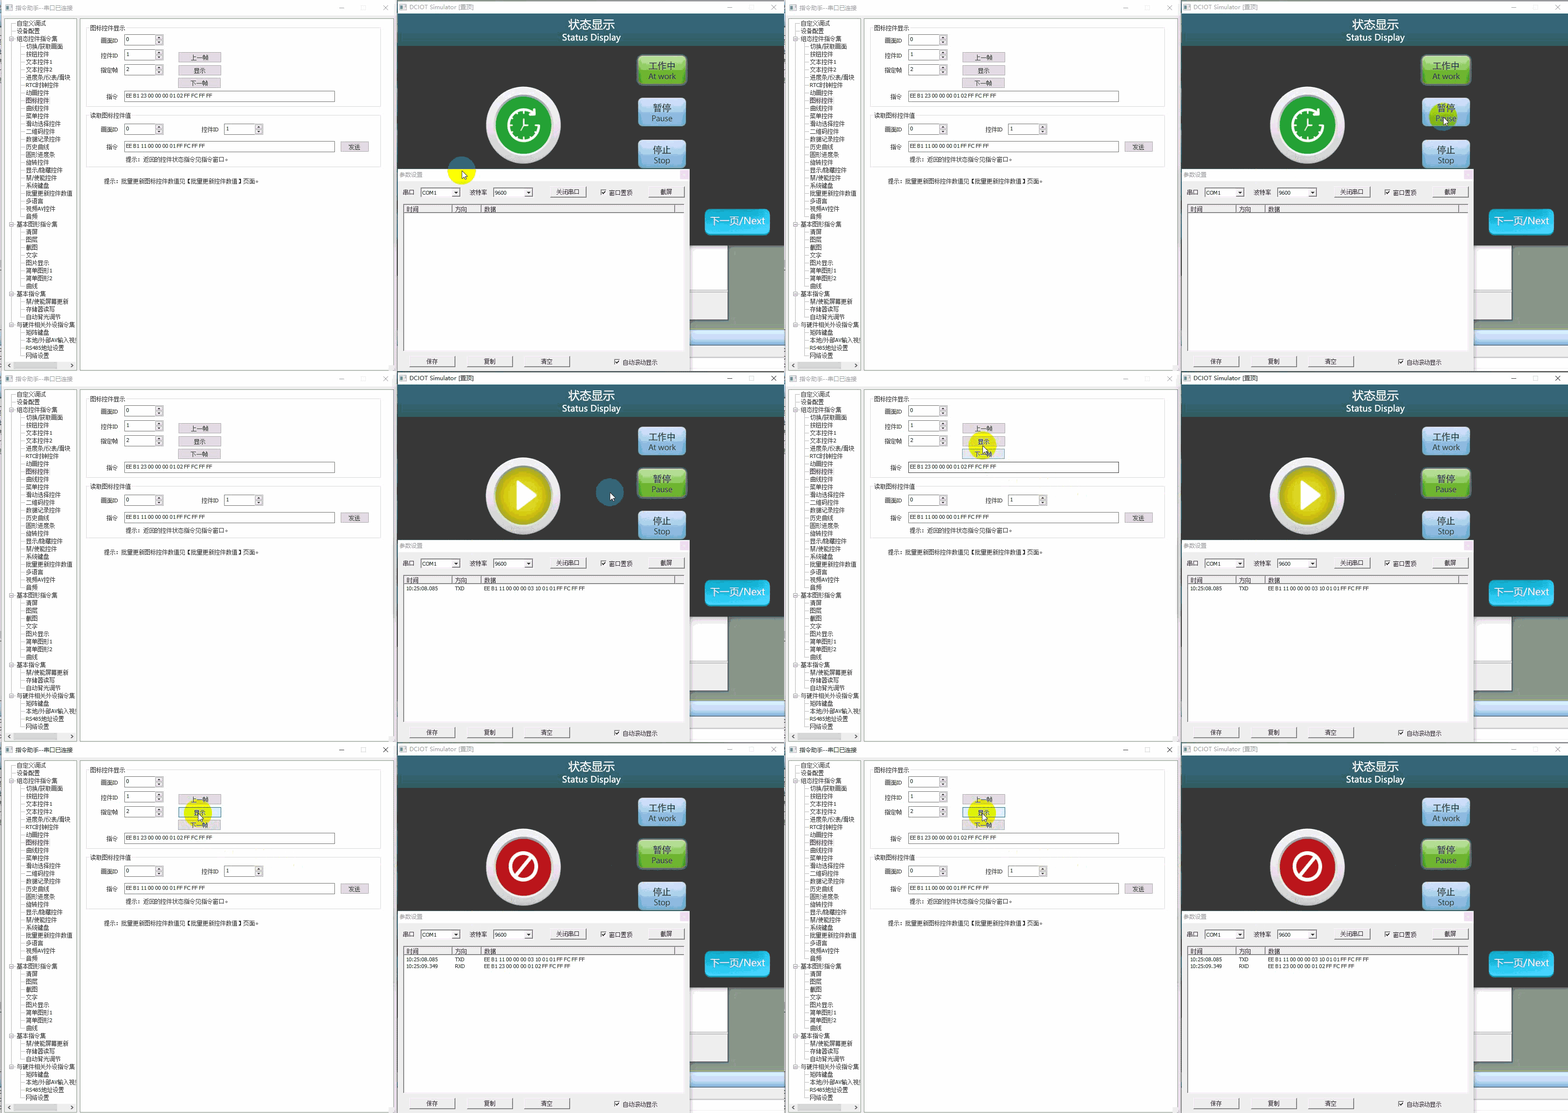
. Run the virtual screen, and establish a connection between the VisualTFT software and the virtual screen using "Virtual Serial Port". Press the "Pause" button, and the icon control displays the corresponding paused frame. For the icon control (Control ID: 1) in the "Status Display" screen, fill in the corresponding screen ID and control ID. If you want to display a specified frame "2", click "Display". Then, in the virtual screen, the "Stop Frame" is displayed, and the running effect is as shown below
. External MCU control
refers to the function declaration in the him.dever.h file and the definition in the him.dever.c file in the development package Keil program
. MUC controls the display of specified frames
. For example, if the user wants to display the first frame of the icon control, they can directly call the text font string display function AnimationPlayFrame() as shown in the code below
/************************************************************************
** Function name:    void AnimationPlayFrame(uint16 screen_id,
**                                           uint16 control_id,
**                                           uint8 frame_id)
** Descriptions    : 指定帧显示
** input parameters: screen_id:   画面ID
**                   control_id:  控件ID
**                   frame_id:    指定帧
** output parameters: 无
** Returned value   : 无
************************************************************************/
{
    ……
    AnimationPlayFrame (0, 1, 1) //画面ID0,控件ID1,显示图标控件第1帧
    ……
}
. 8.3 Modify the background image
Screen Configuration
Import the corresponding artwork image in the "Background Image" section of the "Modify Background Image" screen. Add one icon control (Control ID: 1) and three button controls (Control IDs: 2-4) to the screen, as shown below
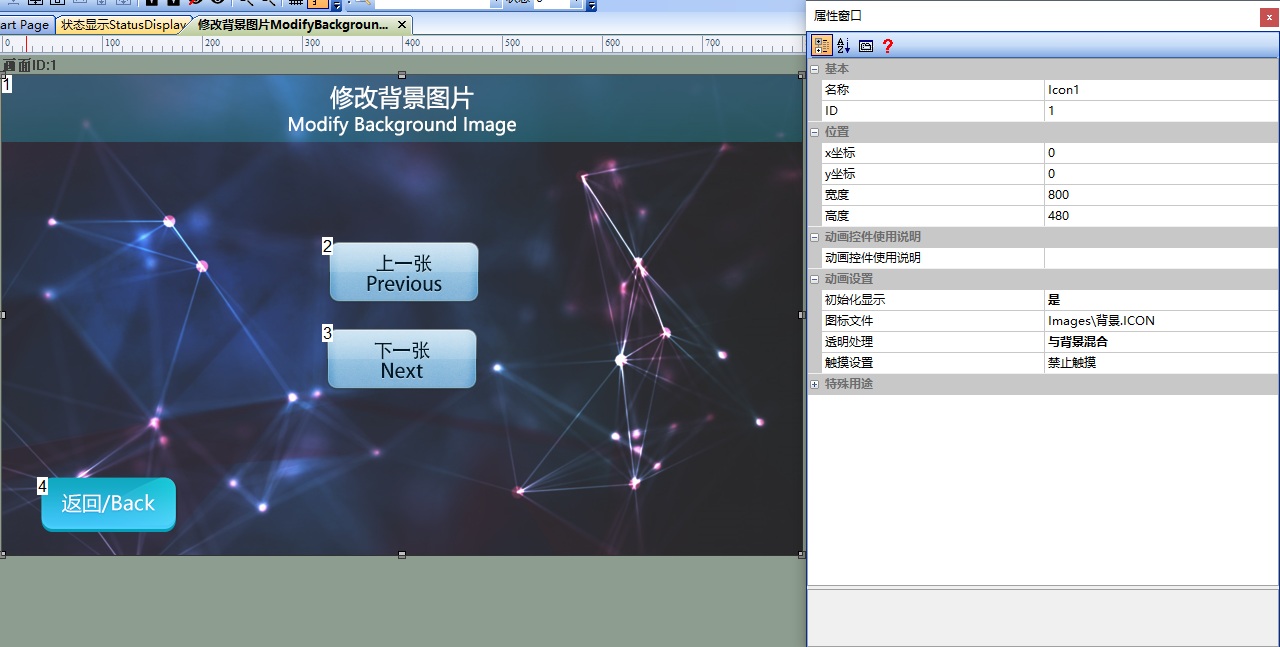
Attribute Configuration
Icon Attributes
Set the "Icon File" to the path of the material, and set "Transparent Processing" to "Blend with Background". The configuration is as follows
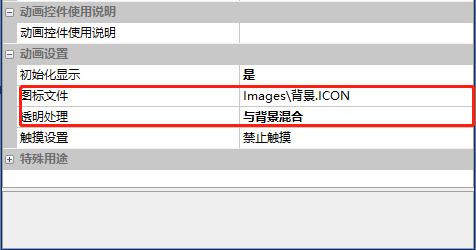
"Previous" button control attribute
Control Attribute Configuration
Used to display the previous frame of the icon. In the attribute window of the button control (Control ID: 2), set "Touch Dotted Box" to "No", "Pop-up Image" to the corresponding material path, "Crop" to "Checked", "Image when pressed" to the corresponding material path, and "Crop" to "Checked". The attribute configuration is as follows
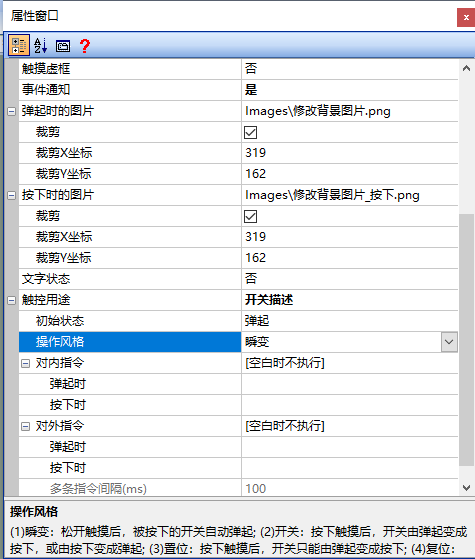
Fill in the internal command for the previous frame
- Click "Internal Command" → "When pressed", the command filling box pops up
- Select "Command Assistant"
- In the Command Assistant interface, select "Icon Control" from the left navigation bar
- Set the instruction parameters in the "Icon Control Display" area, as in the example routine, by setting the icon control display in the "Modify Background Image" screen to display the previous frame
- . Copy this instruction, close the instruction assistant, and paste the instruction into the instruction box. The operation is as follows
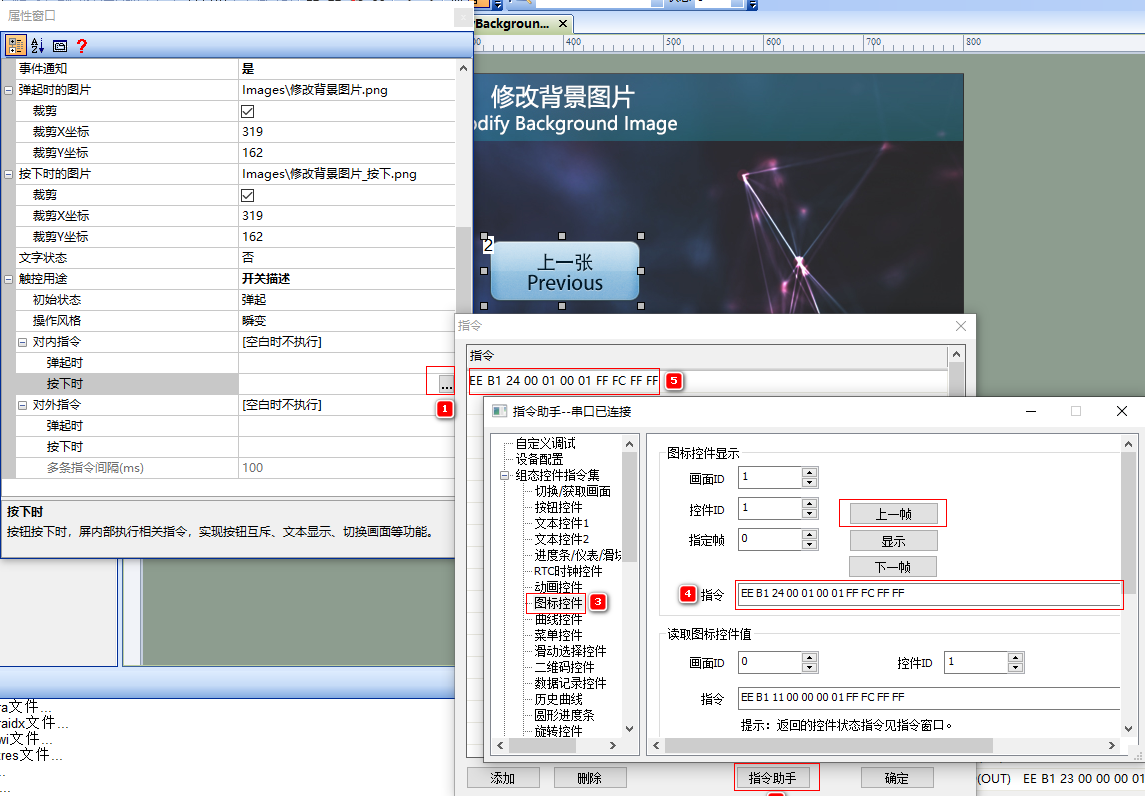
. Similarly, the settings for the "Next Frame" button are similar to those for the "Previous Frame" button. Simply select the next frame in the instruction assistant and copy the instruction into the corresponding button's inline instruction.
Run the preview
. Run the virtual screen, and establish a connection between the VisualTFT software and the virtual screen using a "virtual serial port". Press the "Next" button, and the icon control will switch to display the next frame accordingly. For the icon control (control ID: 1) in the "Modify Background Image" screen, fill in the corresponding screen ID and control ID, and click "Next Frame". Then, in the virtual screen, the icon control will display the next background effect. The running effect is as follows
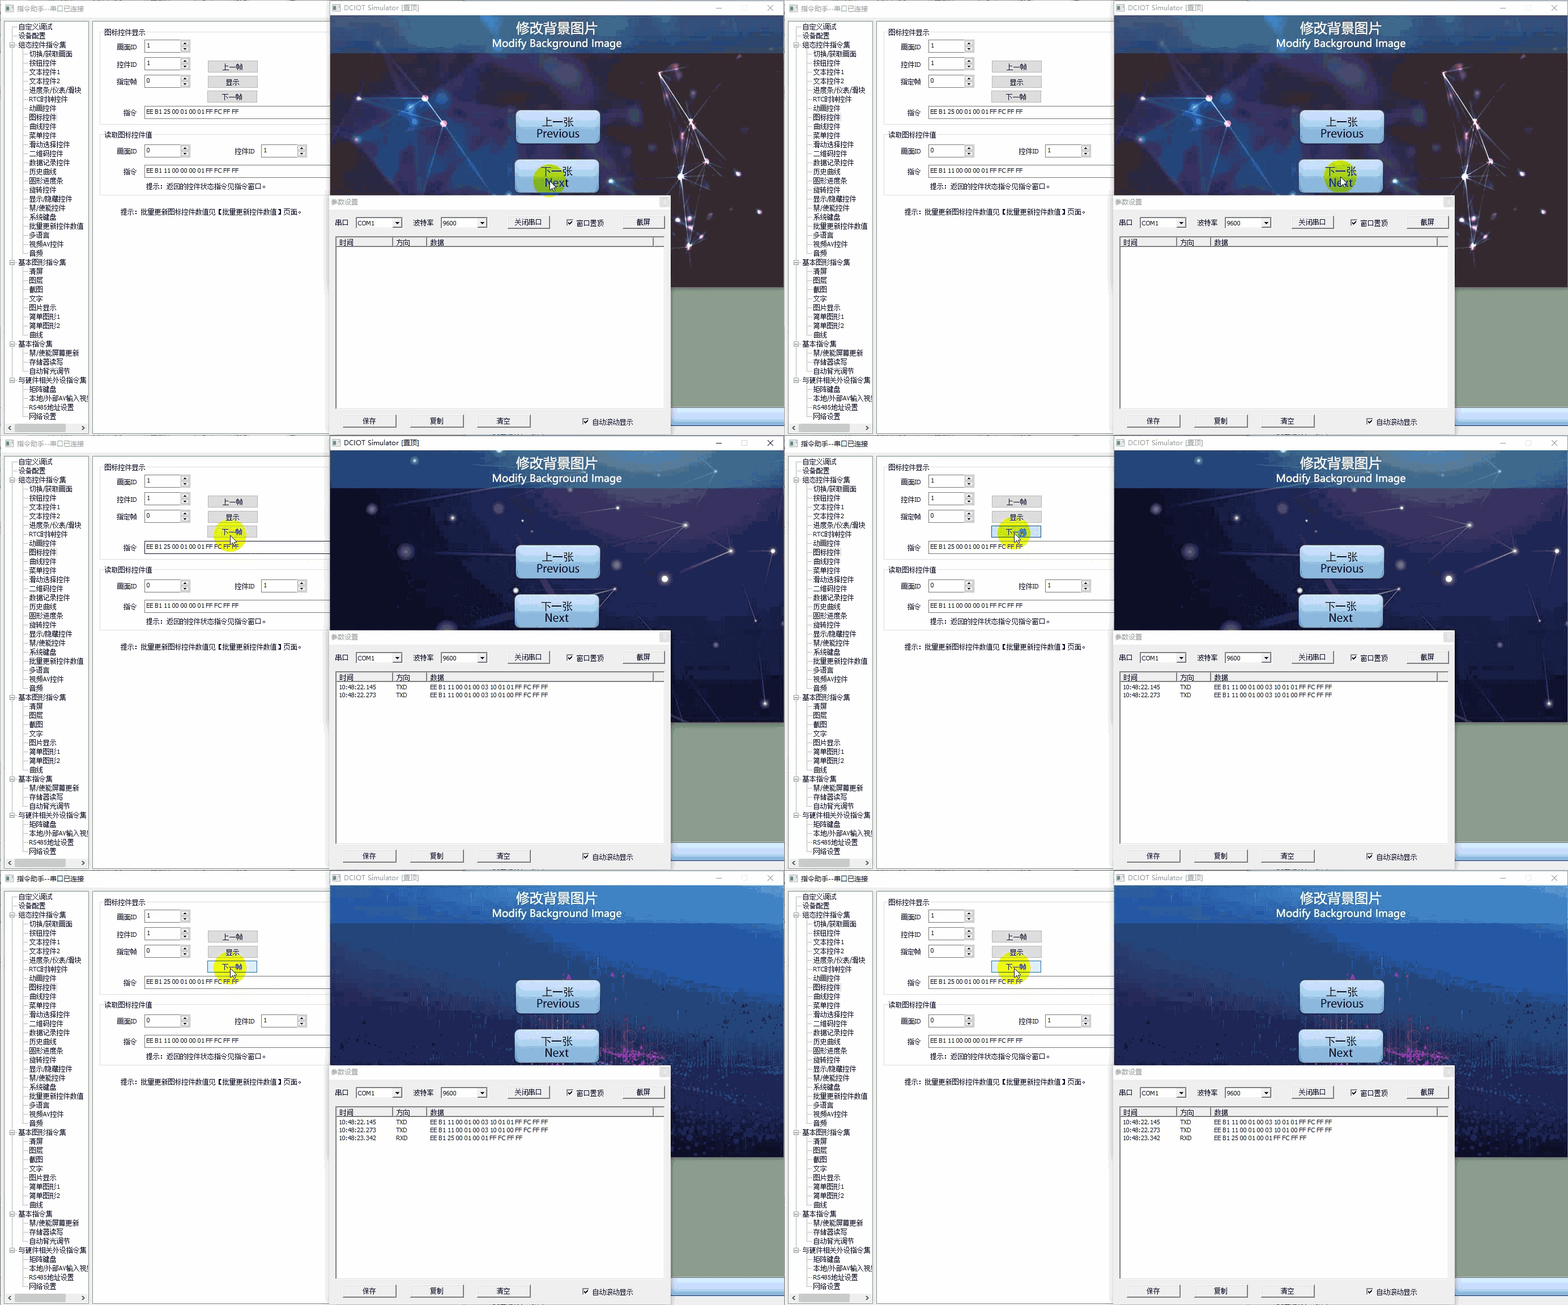
. External MCU control
. Refer to the function declaration in the him.dever.h file and the definition in the him.dever.c file in the Keil development package
. MUC controls the display of the previous frame
. For example, if the user needs to control the icon control to display the previous frame, they can directly call the API function AnimationPlayPrev() with the following code
/***********************************************************************
** Function name:    void AnimationPlayPrev(uint16 screen_id,
**                                          uint16 control_id)
** Descriptions     : 上一帧显示
** input parameters : screen_id:画面ID
** control_id       : 控件ID
** output parameters: 无
** Returned value   : 无
***********************************************************************/
{
    ……
    AnimationPlayPrev (0, 1) //设置画面ID0控件ID1的图标控件显示上一帧
    ……
}
. MUC controls the next frame
. For example, if the user needs to control the icon control to display the next frame, they can directly call the API function AnimationPlayNext() with the following code
/***********************************************************************
** Function name:    void AnimationPlayNext (uint16 screen_id,
**                                           uint16 control_id)
** Descriptions     : 上一帧显示
** input parameters : screen_id:  画面ID
**                    control_id:  控件ID
** output parameters: 无
** Returned value   : 无
***********************************************************************/
{
    ……
    AnimationPlayNext (0, 1) //设置画面ID0控件ID1的图标控件显示下一帧
    ……
}

Leave a Reply