
1. Introduction to Interface Layout
In the same window, the placement of controls may appear disorganized. Interface layout and network layout controls in TDFHUI can be used for interface layout.
2. How to Perform Interface Layout
2.1 How to Add Controls
Open or create a new project, click the button icon in the common controls module, add six button controls, and add text display to the button controls. For specific steps and methods, refer to the "Button Type User Manual", as shown in Figure 2.1.
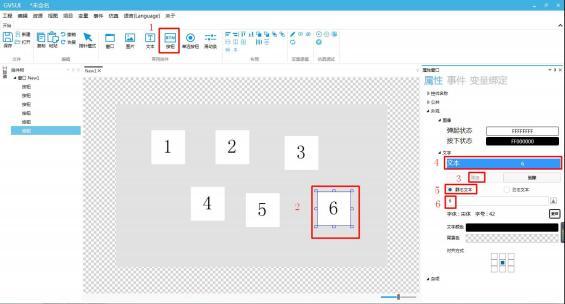 Figure 2.1 Adding Controls
2.2 How to Set Top Alignment
After selecting a control, long press the "Ctrl" key and then select other controls. This method allows you to select multiple controls or directly select multiple controls with the mouse. Select two or more controls, click Top Alignment in the layout module, and align the selected controls to the top, with the topmost control as the reference, as shown in Figure 2.2.
Figure 2.1 Adding Controls
2.2 How to Set Top Alignment
After selecting a control, long press the "Ctrl" key and then select other controls. This method allows you to select multiple controls or directly select multiple controls with the mouse. Select two or more controls, click Top Alignment in the layout module, and align the selected controls to the top, with the topmost control as the reference, as shown in Figure 2.2.
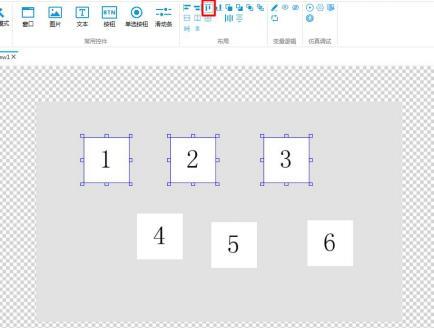 Figure 2.2 Top Alignment
2.3 How to Set Bottom Alignment
Select multiple controls, click Bottom Alignment in the layout module, and align the selected controls to the bottom, with the bottommost control as the reference, as shown in Figure 2.3.
Figure 2.2 Top Alignment
2.3 How to Set Bottom Alignment
Select multiple controls, click Bottom Alignment in the layout module, and align the selected controls to the bottom, with the bottommost control as the reference, as shown in Figure 2.3.
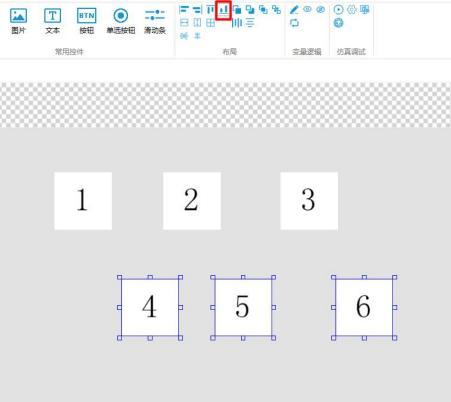 Figure 2.3 Bottom Alignment
2.4 How to Set Left Alignment
Select multiple controls and click "Left Alignment" in the layout module to align the selected controls to the left, with the leftmost one as the reference, as shown in Figure 2.4.
Figure 2.3 Bottom Alignment
2.4 How to Set Left Alignment
Select multiple controls and click "Left Alignment" in the layout module to align the selected controls to the left, with the leftmost one as the reference, as shown in Figure 2.4.
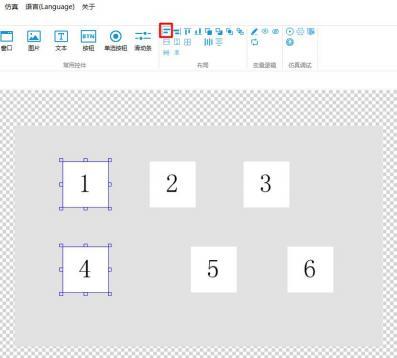 Figure 2.4 Left Alignment
2.5 How to Set Right Alignment
Select multiple controls and click "Right Alignment" in the layout module to align the selected controls to the right, with the rightmost one as the reference, as shown in Figure 2.4.
Figure 2.4 Left Alignment
2.5 How to Set Right Alignment
Select multiple controls and click "Right Alignment" in the layout module to align the selected controls to the right, with the rightmost one as the reference, as shown in Figure 2.4.
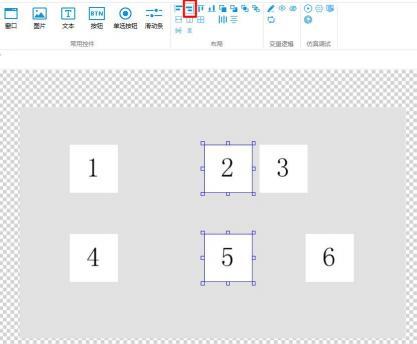 Figure 2.5 Right Alignment
2.6 How to Set Horizontal Equal Spacing
Select multiple controls and click "Horizontal Equal Spacing" in the layout module to adjust the horizontal equal spacing of the selected controls, with the spacing between the middle controls and the controls on both sides remaining unchanged, as shown in Figure 2.6.
Figure 2.5 Right Alignment
2.6 How to Set Horizontal Equal Spacing
Select multiple controls and click "Horizontal Equal Spacing" in the layout module to adjust the horizontal equal spacing of the selected controls, with the spacing between the middle controls and the controls on both sides remaining unchanged, as shown in Figure 2.6.
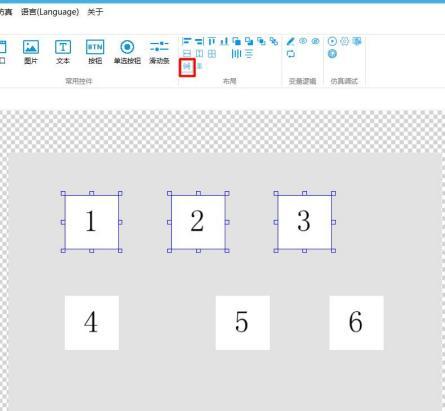 Figure 2.6 Horizontal Equal Spacing
2.7 How to Set Horizontal Centering
Select multiple controls and click "Horizontal Centering" in the layout module to adjust the horizontal centering of the selected controls, with the position of the selected controls adjusted to be equidistant from the midpoint and the left and right sides of the window, as shown in Figure 2.7.
Figure 2.6 Horizontal Equal Spacing
2.7 How to Set Horizontal Centering
Select multiple controls and click "Horizontal Centering" in the layout module to adjust the horizontal centering of the selected controls, with the position of the selected controls adjusted to be equidistant from the midpoint and the left and right sides of the window, as shown in Figure 2.7.
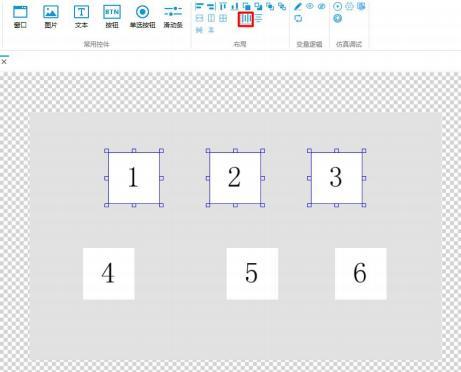 Figure 2.7 Horizontal Centering
2.8 How to set vertical equal spacing
Select multiple controls and click "Vertical Equal Spacing" in the layout module to adjust the vertical equal spacing of the selected controls. The controls on both sides remain unchanged, and the position of the middle control is adjusted to achieve horizontal equal spacing between the middle control and the controls on both sides, as shown in Figure 2.8.
Figure 2.7 Horizontal Centering
2.8 How to set vertical equal spacing
Select multiple controls and click "Vertical Equal Spacing" in the layout module to adjust the vertical equal spacing of the selected controls. The controls on both sides remain unchanged, and the position of the middle control is adjusted to achieve horizontal equal spacing between the middle control and the controls on both sides, as shown in Figure 2.8.
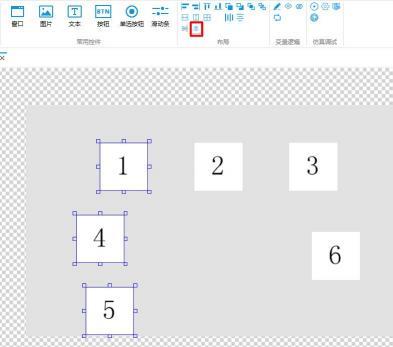 Figure 2.8 Vertical Equal Spacing
2.9 How to set vertical centering
Select multiple controls and click "Vertical Centering" in the layout module to adjust the vertical centering of the selected controls. The position of the selected controls is adjusted to achieve equal distance between the midpoint position and the left and right sides of the window, as shown in Figure 2.9.
Figure 2.8 Vertical Equal Spacing
2.9 How to set vertical centering
Select multiple controls and click "Vertical Centering" in the layout module to adjust the vertical centering of the selected controls. The position of the selected controls is adjusted to achieve equal distance between the midpoint position and the left and right sides of the window, as shown in Figure 2.9.
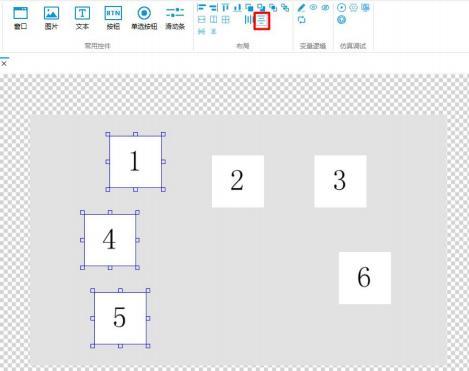 Figure 2.9 Vertical Centering
3. How to use network layout
Add a network layout, and you can directly lay out the added controls. Compared to interface layout, it is faster and simpler.
3.1 How to add a network layout
Click the container-type controls in the toolbox and select the network layout control to add a network layout control, as shown in Figure 3.1.
Figure 2.9 Vertical Centering
3. How to use network layout
Add a network layout, and you can directly lay out the added controls. Compared to interface layout, it is faster and simpler.
3.1 How to add a network layout
Click the container-type controls in the toolbox and select the network layout control to add a network layout control, as shown in Figure 3.1.
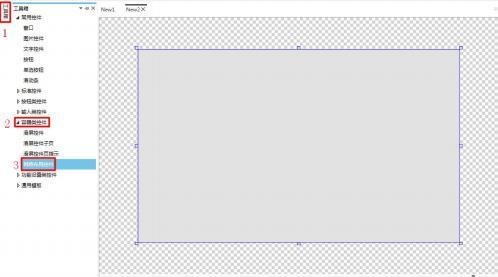 Figure 3.1 Add a network layout control
3.2 How to replace images
Select the network layout control and click on the image in the property window on the right to set the image replacement for its background. Setting the background means setting the display of the network layout, as shown in Figure 3.2.
Figure 3.1 Add a network layout control
3.2 How to replace images
Select the network layout control and click on the image in the property window on the right to set the image replacement for its background. Setting the background means setting the display of the network layout, as shown in Figure 3.2.
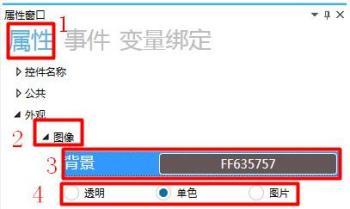 Figure 3.2 Image Replacement
3.3 How to Set Miscellaneous Items
Select the network layout control and click on "Miscellaneous" in the property window on the right to set the height and width of the grid, as well as the alignment method of the grid, as shown in Figure 3.3.
Figure 3.2 Image Replacement
3.3 How to Set Miscellaneous Items
Select the network layout control and click on "Miscellaneous" in the property window on the right to set the height and width of the grid, as well as the alignment method of the grid, as shown in Figure 3.3.
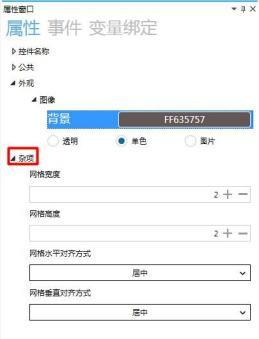 Figure 3.3 Setting Miscellaneous Items
3.3.1 How to Set Grid Height and Width
Select the input box under "Grid Width and Height" and set the grid height and width using the keyboard or the "+" and "-" buttons. The grid width and height set by the network layout control will divide the control into equal parts. A grid width of 2 and a grid height of 2 will divide the network layout control into 4 grids, allowing for the addition of 4 controls, as shown in Figure 3.4.
Figure 3.3 Setting Miscellaneous Items
3.3.1 How to Set Grid Height and Width
Select the input box under "Grid Width and Height" and set the grid height and width using the keyboard or the "+" and "-" buttons. The grid width and height set by the network layout control will divide the control into equal parts. A grid width of 2 and a grid height of 2 will divide the network layout control into 4 grids, allowing for the addition of 4 controls, as shown in Figure 3.4.
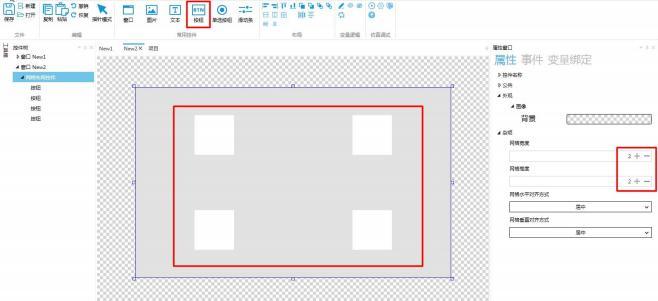 Figure 3.4 Grid Settings
3.3.2 How to Set Grid Alignment
Click the button under "Grid Horizontal and Vertical Alignment" to pop up a dropdown box with options including Center, Left Align, and Right Align. Selecting Center aligns the control horizontally and vertically in the center, Left Align aligns it to the left, and Right Align aligns it to the right, as shown in Figure 3.5.
Figure 3.4 Grid Settings
3.3.2 How to Set Grid Alignment
Click the button under "Grid Horizontal and Vertical Alignment" to pop up a dropdown box with options including Center, Left Align, and Right Align. Selecting Center aligns the control horizontally and vertically in the center, Left Align aligns it to the left, and Right Align aligns it to the right, as shown in Figure 3.5.
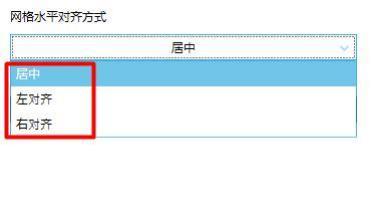 Figure 3.5 Grid Alignment
If you find this helpful, please give a thumbs up


Leave a Reply