
1. Introduction to List Controls
List controls are used for content that is uncertain but shares the same control and display, such as message lists, record lists, account lists, etc.
2. How to Add a List Control
In an opened or newly created project, click on the standard controls in the toolbox, select the list control, and add it, as shown in Figure 2.1.
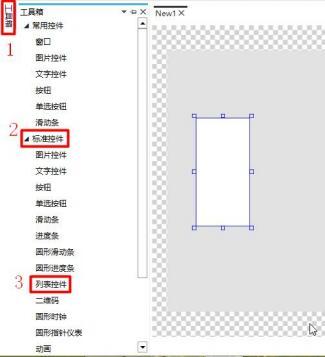 Figure 2.1 Adding Controls
3. How to Set the Position, Size, and Image Replacement of the List
3.1 How to Set the Position and Size of the List
Select the list control, and use the mouse or click on the public modifiable controls in the property window on the right to set the position and size, as shown in Figure 3.1.
Figure 2.1 Adding Controls
3. How to Set the Position, Size, and Image Replacement of the List
3.1 How to Set the Position and Size of the List
Select the list control, and use the mouse or click on the public modifiable controls in the property window on the right to set the position and size, as shown in Figure 3.1.
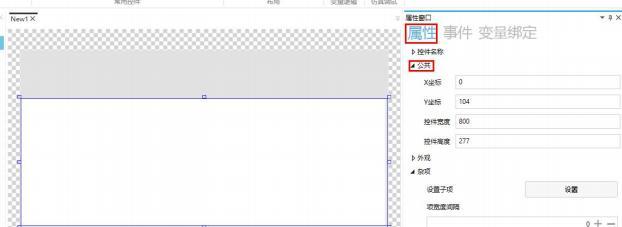 Figure 3.1 Setting Position and Size
3.1 How to Set the Image Replacement of the List
Select the list control, click on the property window on the right, and make image modifications. The background is displayed as the bottom image of the list control, as shown in Figure 3.2.
Figure 3.1 Setting Position and Size
3.1 How to Set the Image Replacement of the List
Select the list control, click on the property window on the right, and make image modifications. The background is displayed as the bottom image of the list control, as shown in Figure 3.2.
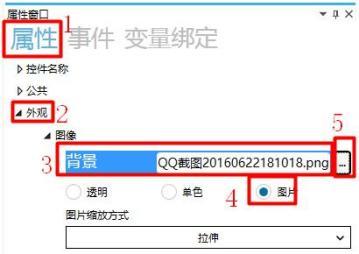 Figure 3.2 Image Replacement
4. How to Set Miscellaneous Items
Click
Figure 3.2 Image Replacement
4. How to Set Miscellaneous Items
Click
 in the property window on the right to set the sub-items, item spacing, and item arrangement of the list control, as shown in Figure 4.1.
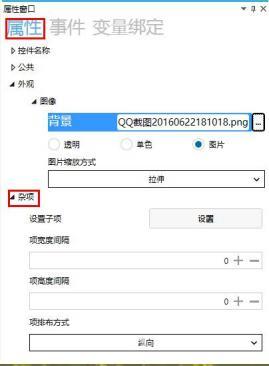 Figure 4.1 Set Miscellaneous Items
4.1 How to Set Sub-Items
Click the "Set" button to pop up the sub-item setting window, as shown in Figure 4.2.
Figure 4.1 Set Miscellaneous Items
4.1 How to Set Sub-Items
Click the "Set" button to pop up the sub-item setting window, as shown in Figure 4.2.
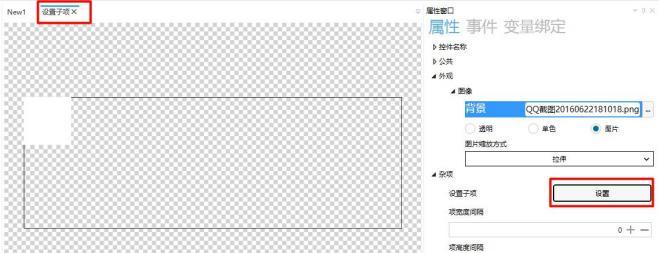 Figure 4.2 Set Sub-Items
1. How to Set Sub-Item Position and Size
Click on the sub-item to adjust its position and size using the mouse or by clicking on the public settings in the property window on the right, as shown in Figure 4.3.
Figure 4.2 Set Sub-Items
1. How to Set Sub-Item Position and Size
Click on the sub-item to adjust its position and size using the mouse or by clicking on the public settings in the property window on the right, as shown in Figure 4.3.
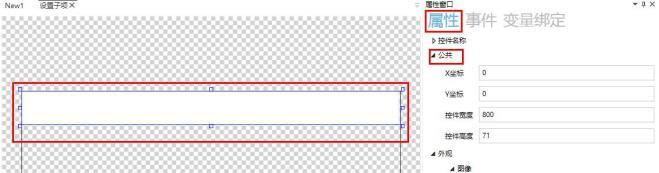 Figure 4.3 Set Sub-Item Position and Size
2. How to Set Image Replacement for Sub-Items
Select the sub-item and click on the property window on the right to modify the image. Click "Add" to display the image when the list is not operated, and the image displayed when the list is pressed, as shown in Figure 4.3.
Figure 4.3 Set Sub-Item Position and Size
2. How to Set Image Replacement for Sub-Items
Select the sub-item and click on the property window on the right to modify the image. Click "Add" to display the image when the list is not operated, and the image displayed when the list is pressed, as shown in Figure 4.3.
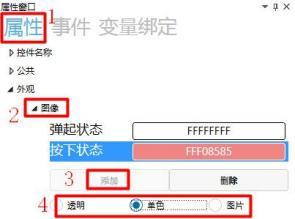 Figure 4.3 Image Replacement
Note: Select monochrome for image display
3. How to set sub-item content
Select the sub-item and add text controls, button controls, and other controls to display the list content. Add two text controls as shown in Figure 4.4.
Figure 4.3 Image Replacement
Note: Select monochrome for image display
3. How to set sub-item content
Select the sub-item and add text controls, button controls, and other controls to display the list content. Add two text controls as shown in Figure 4.4.
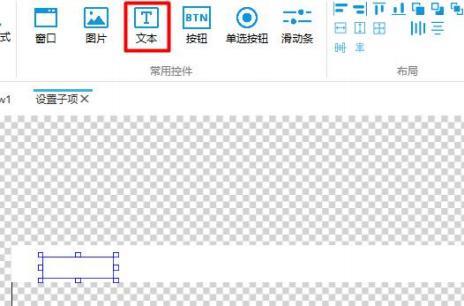 Figure 4.4 Adding Text Controls
4. How to set text controls
Select the text control, click Variable Binding in the property window on the right → click Add → the bound control property is "Text 1" → bind the data source to "Var0" → select "member1" for the struct member (select member2 for the second text control, and the rest are the same) → set the conversion mode to "One-way" → set the conversion method to "Default", as shown in Figure 4.5.
Figure 4.4 Adding Text Controls
4. How to set text controls
Select the text control, click Variable Binding in the property window on the right → click Add → the bound control property is "Text 1" → bind the data source to "Var0" → select "member1" for the struct member (select member2 for the second text control, and the rest are the same) → set the conversion mode to "One-way" → set the conversion method to "Default", as shown in Figure 4.5.
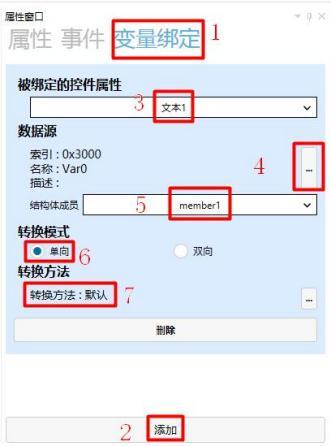 Figure 4.5 Adding Variable Binding
Note: Var0 is
Figure 4.5 Adding Variable Binding
Note: Var0 is
 4.2 How to set item spacing
Click the input box under Item Width/Height Spacing and set the item width/height spacing using the keyboard or the "+" and "-" buttons. The item width spacing is the width spacing between each item in the list, and the item height spacing is the height spacing between each item in the list, as shown in Figure 4.6.
4.2 How to set item spacing
Click the input box under Item Width/Height Spacing and set the item width/height spacing using the keyboard or the "+" and "-" buttons. The item width spacing is the width spacing between each item in the list, and the item height spacing is the height spacing between each item in the list, as shown in Figure 4.6.
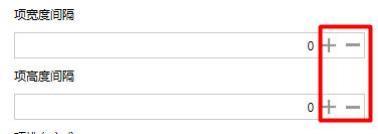 Figure 4.6 Setting Item Spacing
4.3 How to set the item layout
Click the dropdown box under "Item Layout", and you can choose between "Vertical" and "Horizontal", as shown in Figure 4.7.
Figure 4.6 Setting Item Spacing
4.3 How to set the item layout
Click the dropdown box under "Item Layout", and you can choose between "Vertical" and "Horizontal", as shown in Figure 4.7.
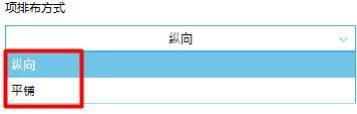 Figure 4.7 Item Layout
5. How to set list display
Display dynamically in list form through the list control.
1. How to add a list control
The specific adding method is the same as above, and will not be repeated here.
2. How to set sub-items
The specific setting method is the same as above, and will not be repeated here.
3. How to set variable binding for the list
Select the list control, click "Variable Binding" in the property window on the right → click "Add" → the bound control property is "Data Source" → bind the data source to "Var0" → set the conversion mode to "One-way" → set the conversion method to "Default", as shown in Figure 5.1.
Figure 4.7 Item Layout
5. How to set list display
Display dynamically in list form through the list control.
1. How to add a list control
The specific adding method is the same as above, and will not be repeated here.
2. How to set sub-items
The specific setting method is the same as above, and will not be repeated here.
3. How to set variable binding for the list
Select the list control, click "Variable Binding" in the property window on the right → click "Add" → the bound control property is "Data Source" → bind the data source to "Var0" → set the conversion mode to "One-way" → set the conversion method to "Default", as shown in Figure 5.1.
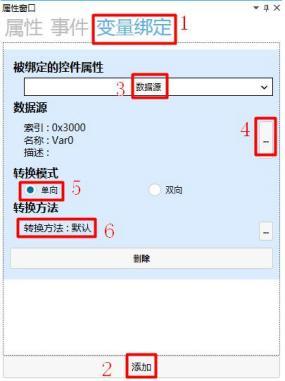 Figure 5.1 Variable Binding
4. Simulation Demonstration
Click the simulation run button to pop up the simulation run window. When the list shows no operation, it is displayed as shown in Figure 5.2
Figure 5.1 Variable Binding
4. Simulation Demonstration
Click the simulation run button to pop up the simulation run window. When the list shows no operation, it is displayed as shown in Figure 5.2
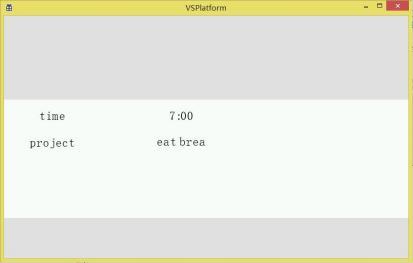 Figure 5.2 Display when no operation
Display when the list is pressed, as shown in Figure 5.3
Figure 5.2 Display when no operation
Display when the list is pressed, as shown in Figure 5.3
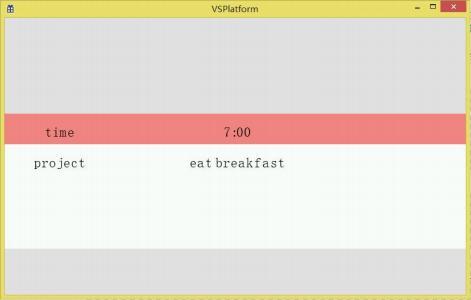
If you have gained something, please give a thumbs up


Leave a Reply