

What is an RTC control?

Time can be displayed through an RTC control. The RTC control can be modified by the user host, or a system keyboard can be popped up for input and editing of time, which will then be displayed on the serial port screen. This section introduces common applications of the RTC control, combining screen images from engineering projects to describe the configuration of each application. Common applications are as follows:
- Time display: Display the current time.
- Timer function: Set a timer, display the timing on the screen, and send a notification through the serial port when the set value is reached.
Scope of application: Full series.
Routine download link: "<RTC Control Application>" (click to jump)
6.1 Introduction to RTC control properties.
The RTC control can display the current time and countdown, as shown below:
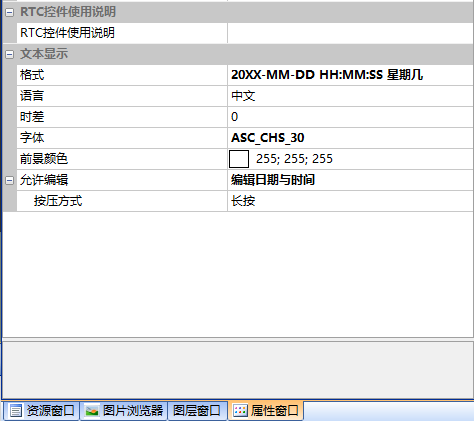
Display time.
Display current time
Format
Time display format, as follows
- HH:MM:SS, displaying hours, minutes, and seconds
- 20XX-MM-DD, displaying year, month, and day
- 20XX-MM-DD HH:MM:SS, displaying year, month, day, hours, minutes, and seconds
- 20XX-MM-DD HH:MM:SS Day of the week, displaying year, month, day, time, and day of the week
- Day of the week (Chinese + English), displaying the Chinese and English names of the day of the week;
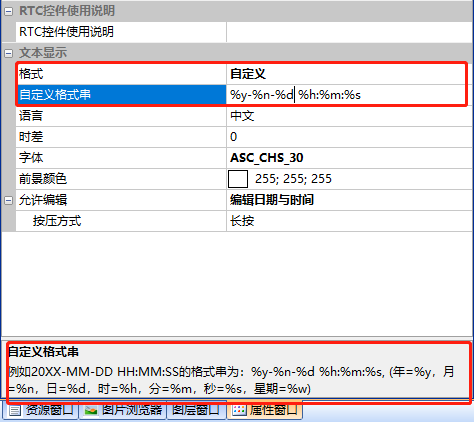
- Custom format. For example, the format of "Year-Month-Day, Hour-Minute-Second, Day of the Week" is: %y-%n-%d,%h:%m:%s,%w (Year=%y, Month=%n, Day=%d, Hour=%h, Minute=%m, Second=%s, Day of the Week=%w), as shown below
Language
Chinese, English
Time difference
The difference from the current system time, with a range of [-12~+12]
Font
Font Size and Font Style
Foreground Color
Font Color
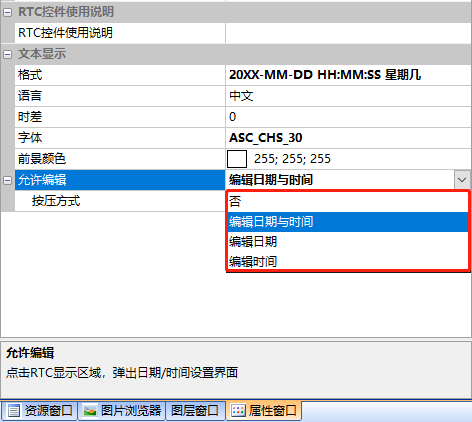
Allow Editing
Click on the RTC display area to pop up the date/time setting interface, as shown below
Pressing Method
- Long Press
- Click to Enter Editing
Timing
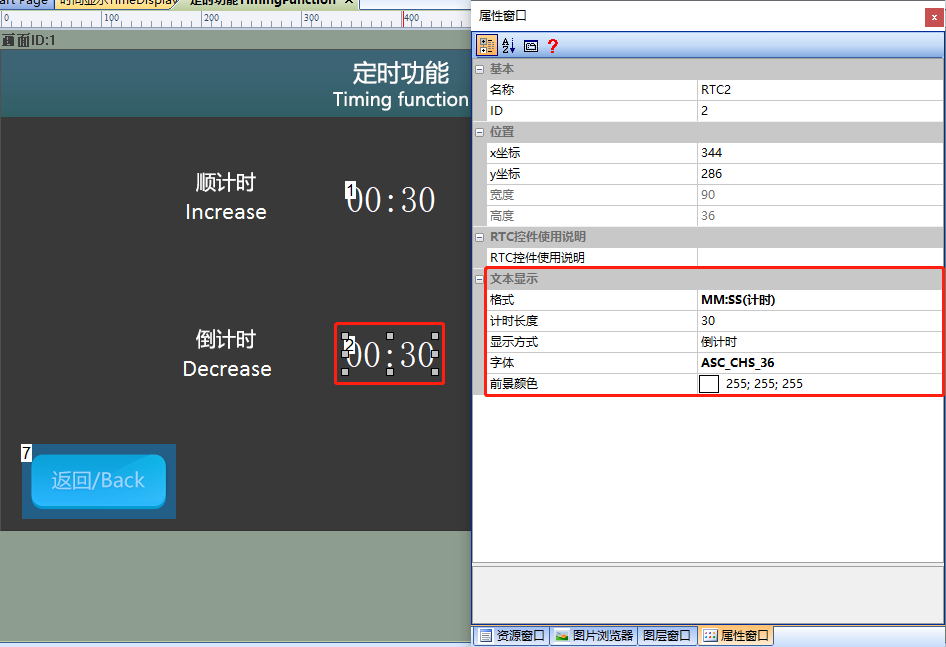
Format
Display format of timing time, as shown below
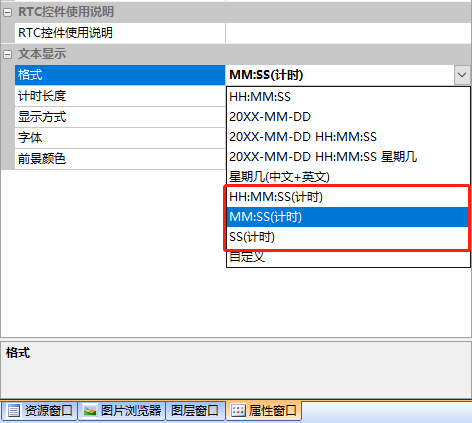
Timing Length
Timing Duration (seconds)
Display Mode
Countdown, Countup
Font
Font Size
Foreground Color
Font Color
6.2 Time Display
[Time Display] screen, introducing the method to set and display the current time
Screen Configuration
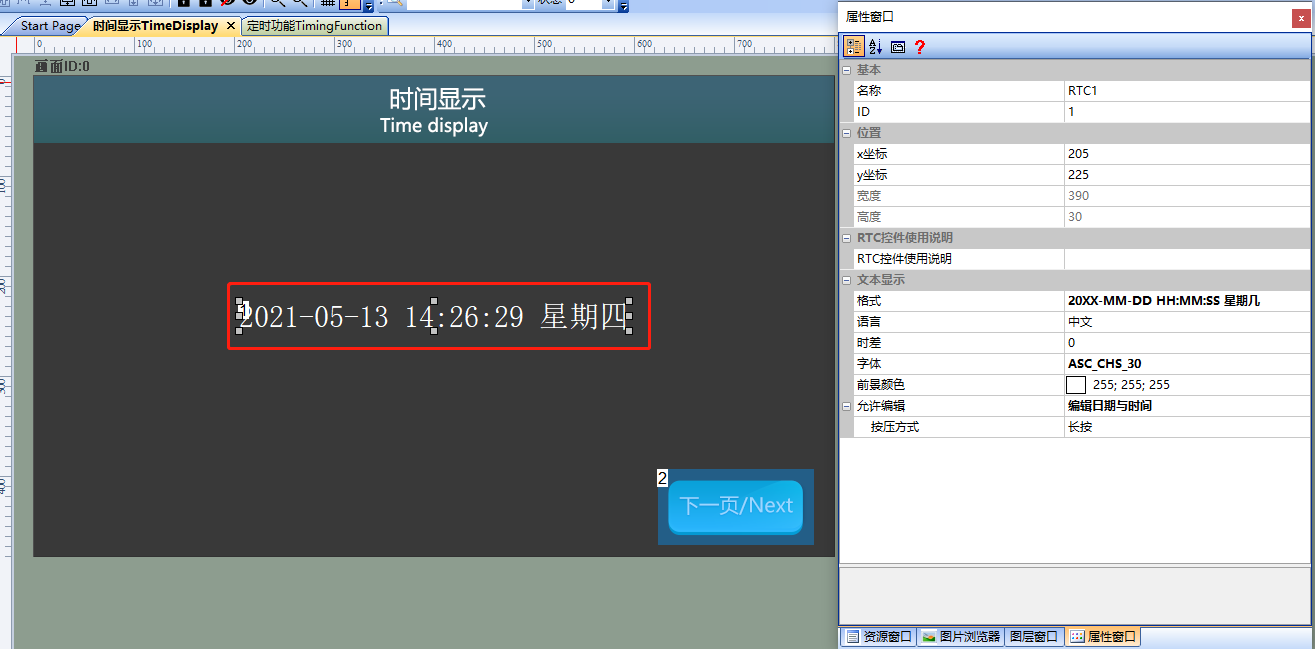
Import the corresponding artwork image for the "Background Image" in the [Time Display] screen. Add the RTC control in this screen as shown below
Attribute Configuration
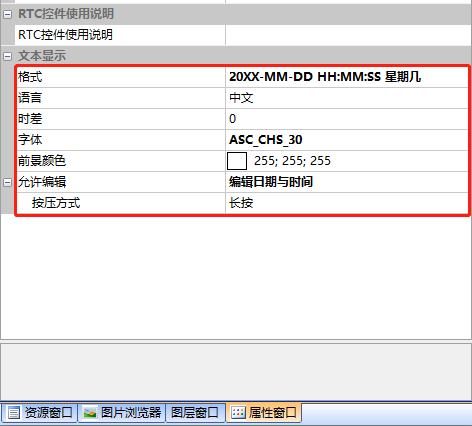
Taking the RTC control with a control ID of 1 as an example, set the [Format] to "20XX-MM-DD HH:MM:SS Day of Week", the [Font] to "ASC_CHS_30", and the [Foreground Color] to white. The configuration is shown below
Run Preview
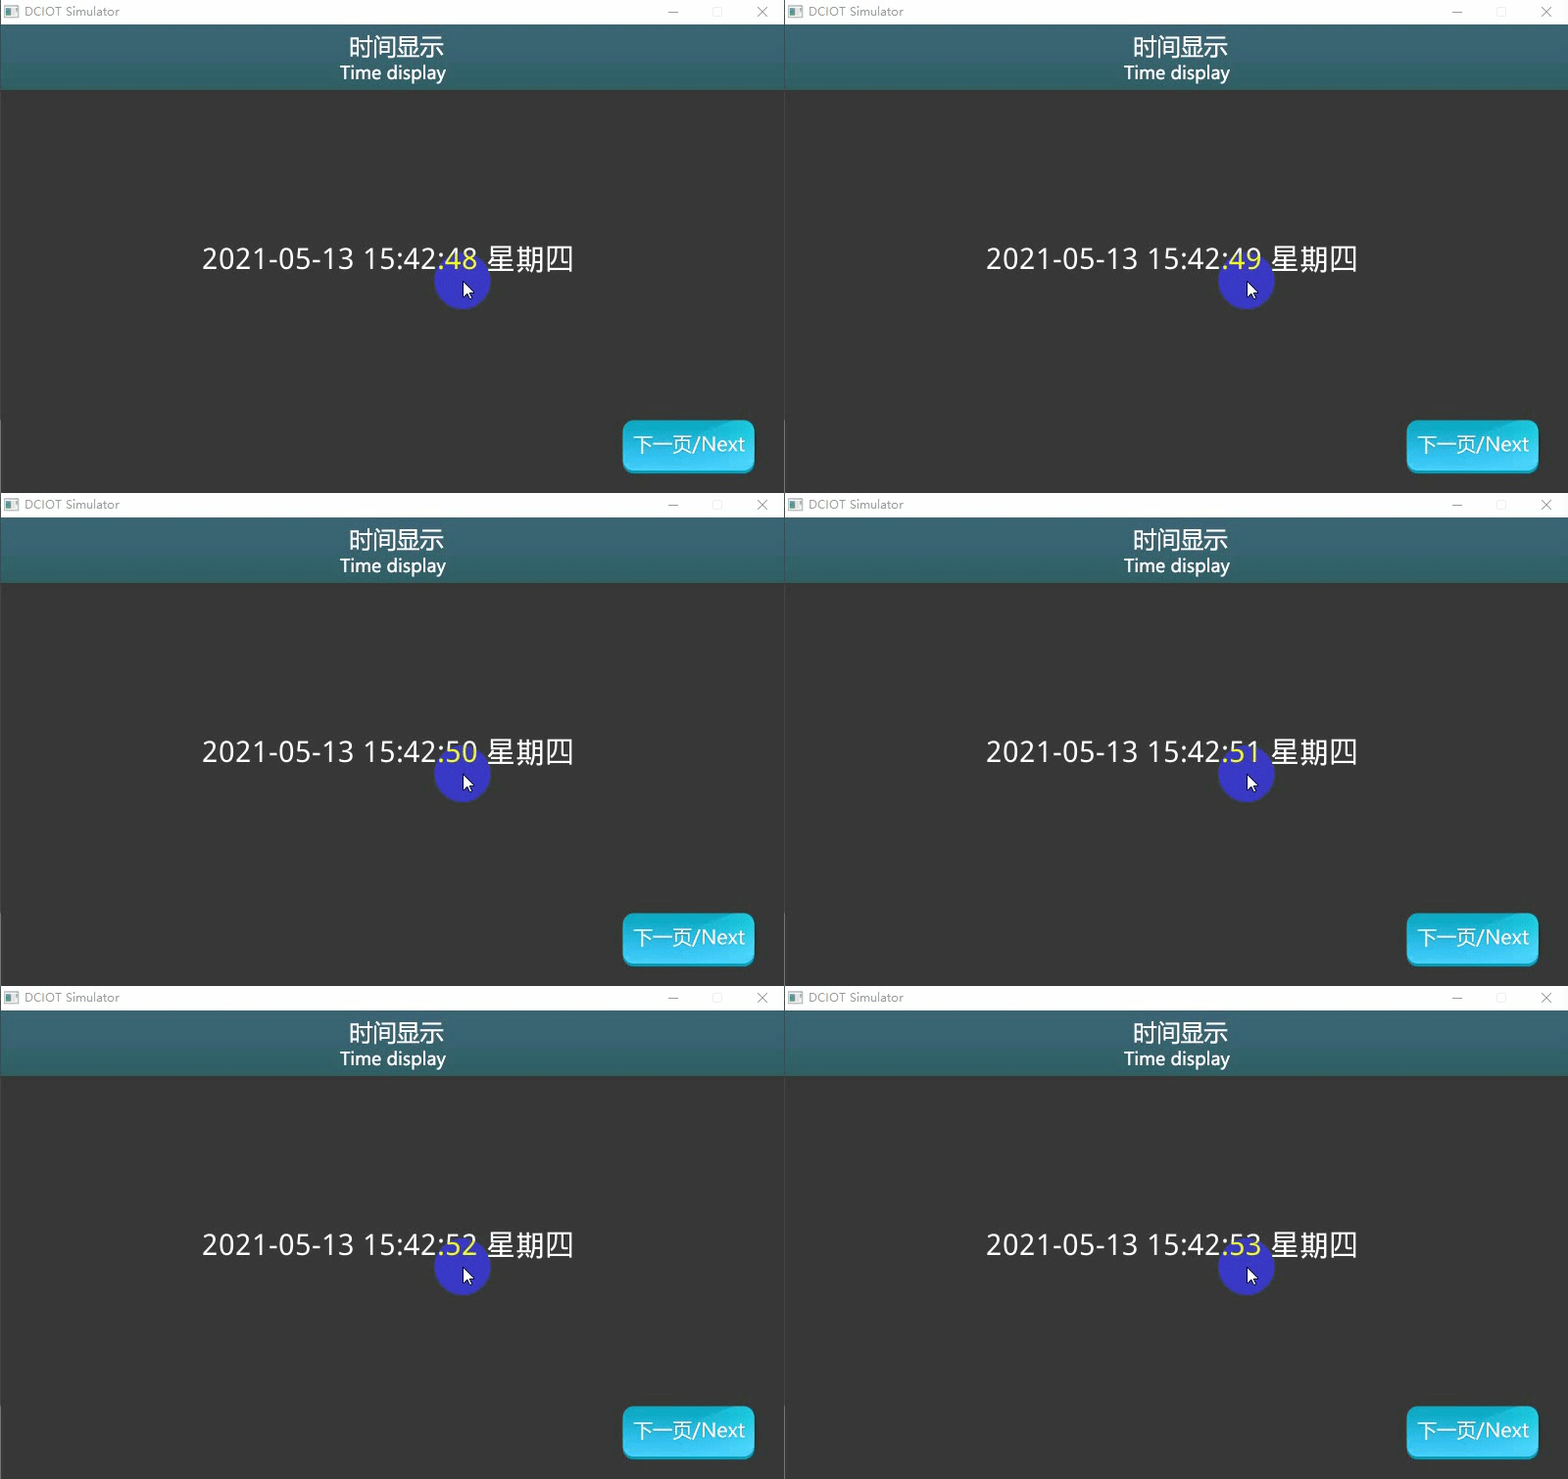
Run the virtual screen, and the RTC control in the virtual screen displays the current system time. The running effect is shown below
PS: The virtual screen directly displays the computer time and does not support modification. If you need to modify the RTC application, download it to the physical screen for experience
MCU obtains the RTC system time
Refer to the function declaration in the him.dever.h file and the definition in the him.dever.c file in the development package Keil program. For example, if the user needs to obtain the system time of the serial port screen, they can directly call the GetRTC function ReadRTC() with the code shown below
/*********************************************************************
** Function name    : void ReadRTC(void);
** Descriptions     : 获取串口屏中的系统时间
** input parameters : 无
** output parameters: 无
********************************************************************/
{
    ……
    ReadRTC();
    ……
}
6.3 Timer Function
The [Timer Function] screen introduces the functions of starting and pausing the timer after pressing the button
Screen Configuration
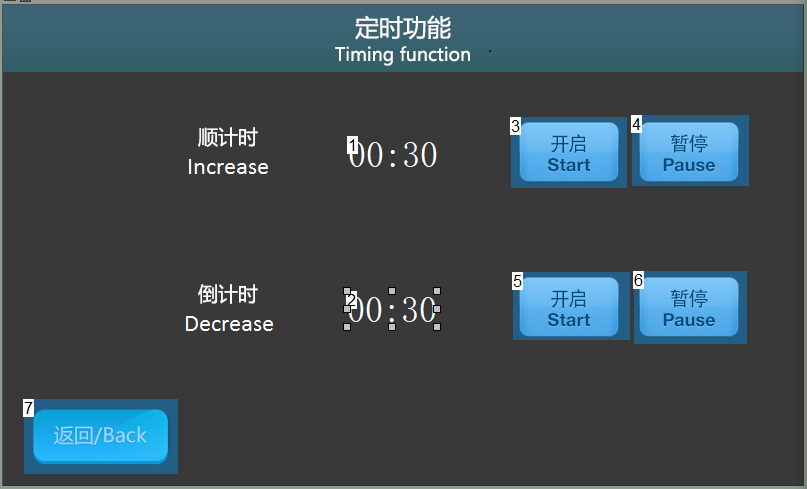
In the "Background Image" section of the "Timing Function" screen, import the corresponding artwork images. In this screen, the RTC control ID1 and button controls ID3 and ID4 serve as the forward timing function; the RTC control ID2 and button controls ID5 and ID6 serve as the countdown function, as shown below
Attribute Configuration
Taking the forward timing as an example, the countdown can be configured by referring to the instructions for forward timing.
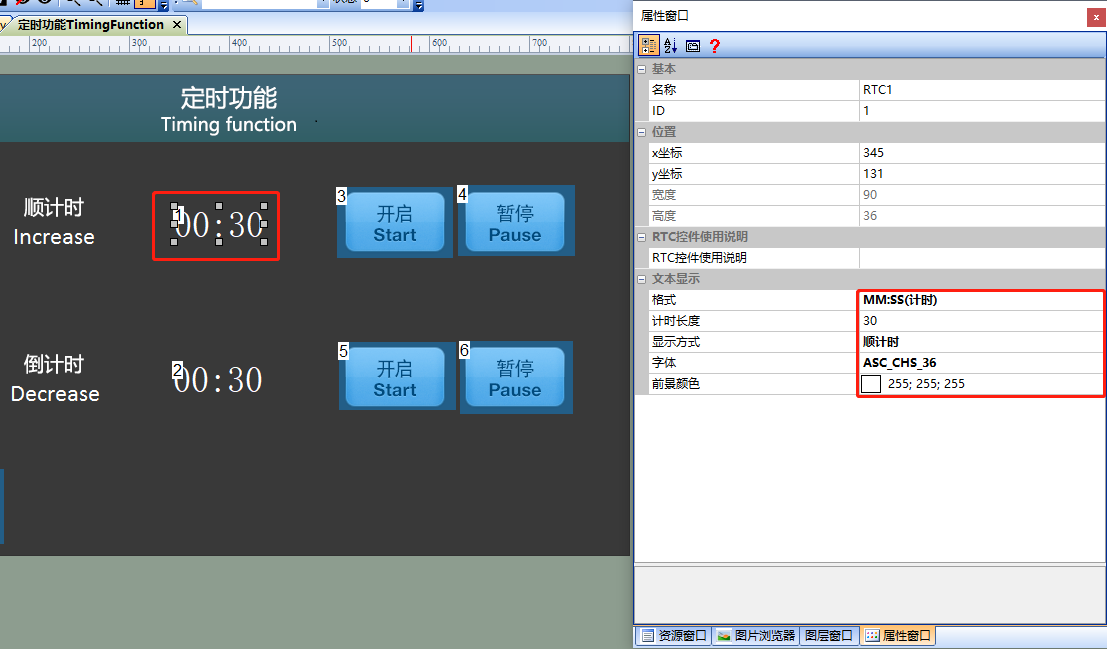
Set the `Format` of RTC control ID1 to `MM:SS(Timing)`, `Timing Length` to `30`, `Display Mode` to `Forward Timing`, and `Font` to `ASC_CHS_36`. The configuration is shown below.
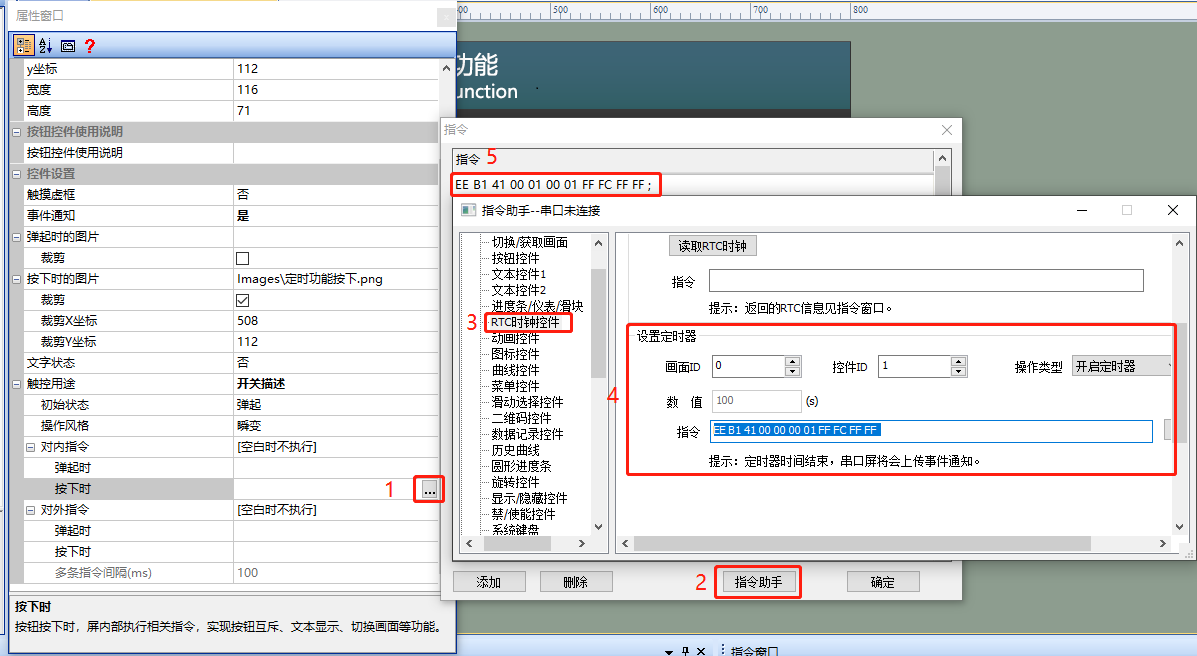
Set button control ID3 for the start timing function, set its `Touch Dotted Box` to `No`, select a set image for `Image When Pressed`, and check `Crop`; fill in the internal command for button press as `Start Timer`. The operation is shown below.
Similarly, set button control ID4 for the start/pause timing function. The configuration process is similar to that of `Start Timer`, except that the internal command should be changed to `Pause Timer`.
Run Preview.
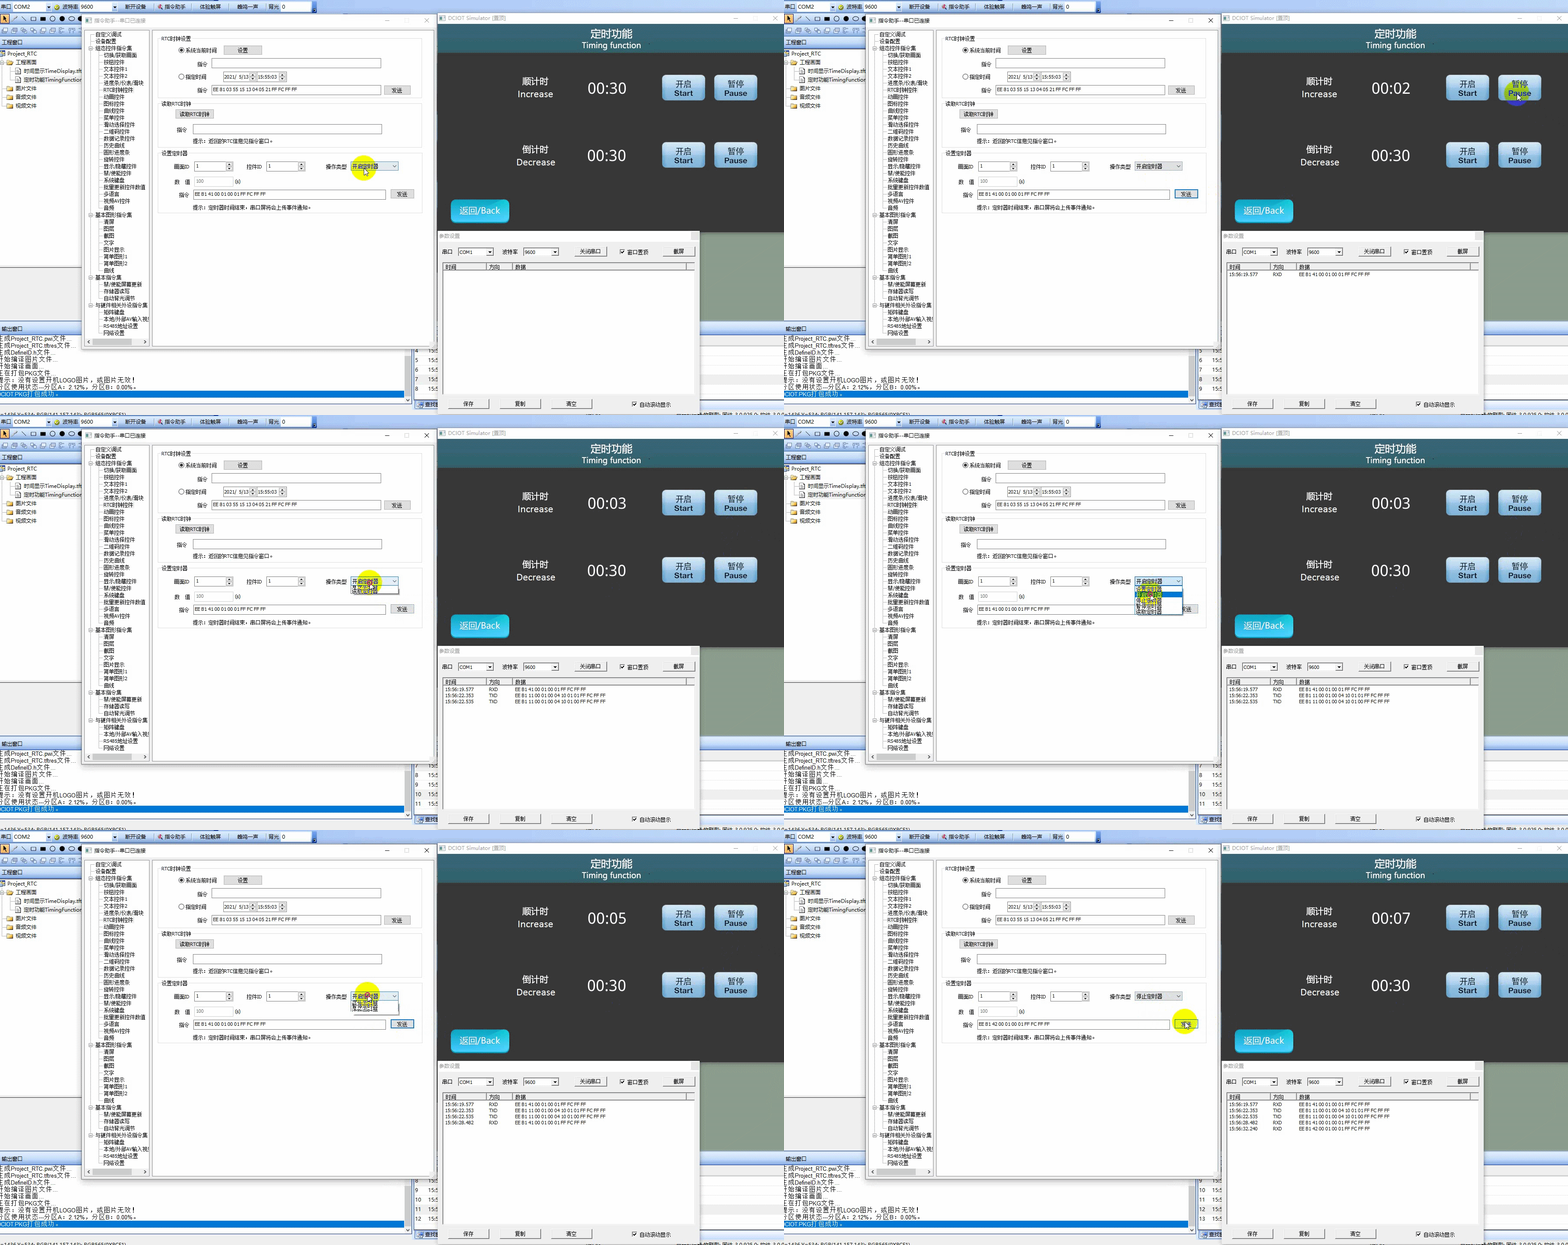
Run the virtual screen, and establish a connection between the VisualTFT software and the virtual screen using a `Virtual Serial Port`. Open the `Command Assistant`, select `RTC Clock Control` from the left navigation bar, and choose `Set Timer` from the operation types in `Set Timer`. As in the example routine, control the RTC control (control ID: 2) in the control screen (screen ID: 1), fill in the `Value` as the desired value, and click `Send`. The RTC control on the virtual screen will display `00:30`, and the running effect is shown below.
External MCU Control.
Refer to the function declaration in the him.dever.h file and the definition in the him.dever.c file in the development package Keil program.
MCU sets the timing time.
For example, if the user needs to set the timing time of the serial port screen, they can directly call the function SeTimer() to set the RTC timing. The function definition is shown below.
/*********************************************************************
** Function name    : void SeTimer(uint16 screen_id,
**                                uint16 control_id,
**                                uint32 timeout);
** Descriptions     : 设置计时控件
** input parameters :  screen_id  画面ID
**                    control_id 控件ID
**                    timeout   倒计时(秒)
** output parameters:  无
*********************************************************************/
{
    ……
    SeTimer(1,1,50);  //设置画面1的RTC控件1的值为50S
    ……
}
MCU starts timing.
For example, if the user needs to start the timing of the serial port screen, they can directly call the function StartTimer() to start the RTC timing. The function definition is shown below
/*********************************************************************
** Function name    : void StartTimer(uint16 screen_id,
**                                uint16 control_id);
** Descriptions     : 开启计时控件
** input parameters : screen_id  画面ID
**                    control_id 控件ID
** output parameters: 无
*********************************************************************/
{
    ……
    StartTimer(1,1);  //开启画面1的RTC计时控件1
    ……
}

Leave a Reply