
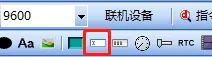
What is a text control?
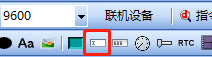
Variables such as characters and numerical values can be displayed through a text control. They can be inputted by the user's host computer (controlled by the user's microcontroller), or through setting up a pop-up system keyboard or a custom keyboard for input and editing operations on the text control
This section introduces the properties and common applications of text controls, and combines the screens in engineering to introduce the configuration of each application. Common applications are as follows
- Text control update: Implement the display of strings, decimals, positive/negative numbers
- Text control input: Click the text box to pop up a small keyboard or full keyboard for input
- Artistic font display: Use artistic fonts to display font effects
- Text increment adjustment: Control the increment adjustment of text decimals and integers through button controls
2.1 Text control properties
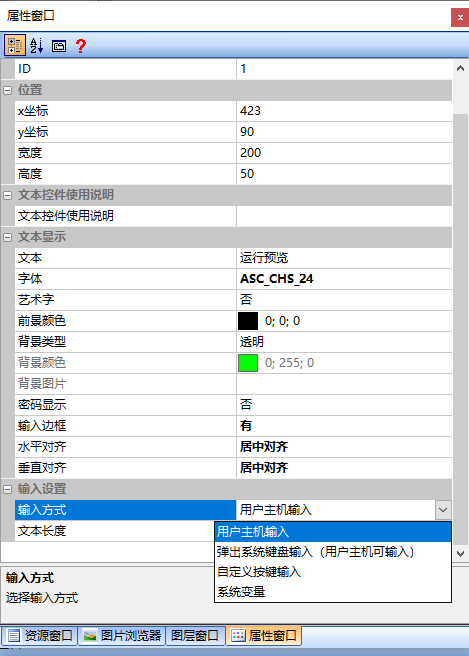
This section focuses on the properties of text controls. The property window is as follows
Text
Content displayed in the user's initial state
Font
Select the font size and style for text display
- Supported font encodings for serial port displays: ASCII, GB2312, GBK, UNICODE
- ASCII: English letters, numbers, symbols, etc., no Chinese characters
- GB2312: Simplified Chinese characters, no traditional characters, no ASCII characters
- GBK: Simplified and traditional Chinese characters, ASIIC, Japanese and Korean characters, etc.
- UNICODE: Supports multiple international languages, such as French, Russian, Persian, etc.
1. F/M/H series, IoT platform
The fonts generated by this platform are all vector fonts, and the actual size of the font can be scaled arbitrarily without distortion. It supports up to 32 font styles. If the user selects the default font style "ASC_CHS_24" as follows, ASC represents the ASCII font, CHS represents the GBK2312 font, and 24 indicates that the display font height occupies 24 pixels.
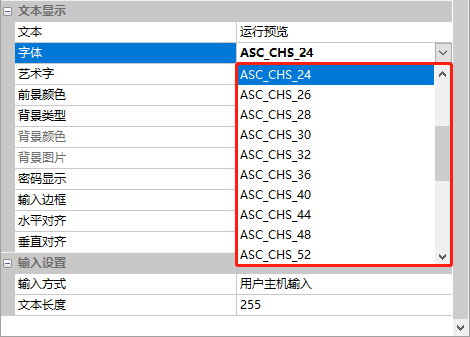
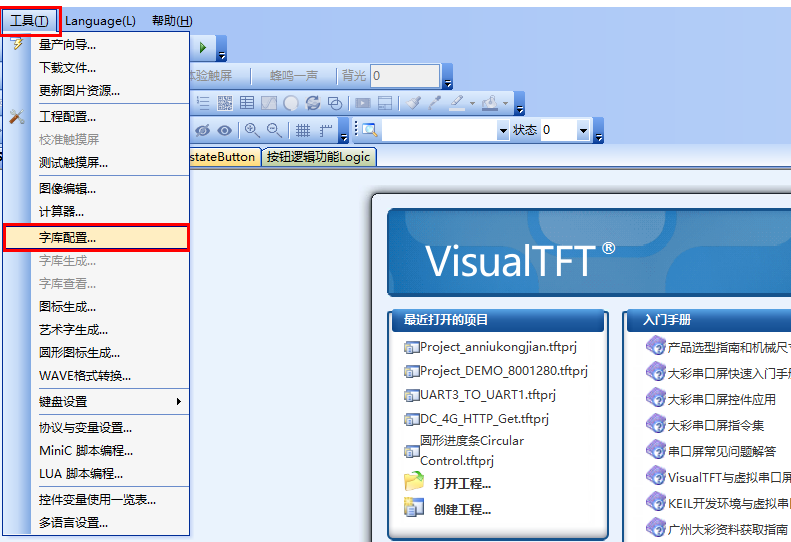
The system provides common font styles, and users can also customize their own font library. In the menu bar of the VisualTFT software, on the F/M series and IoT platforms, select "Tools" → "Font Library Configuration", as shown below. For detailed instructions, please refer to the document "Engineering Notes - How to Customize Vector Font Library"
2. Basic platform
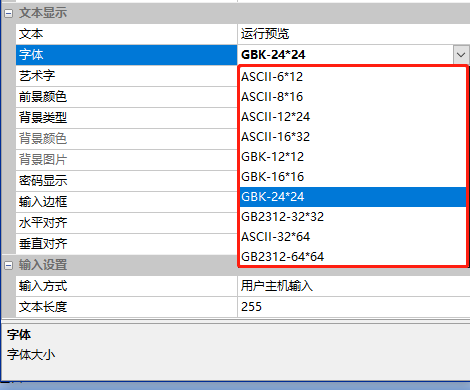
The font styles that come with VisualTFT are shown below. ASCII 612 indicates that only English letters, numbers, and symbols are displayed, and the font size is 612 pixels. The ASCII style is in half-width format; GBK2312 indicates that only simplified Chinese characters are displayed, and the font size is 32*32 pixels. The GBK2312 style is in half-width format; GBK1212 indicates that simplified and traditional Chinese characters, ASIIC, Japanese and Korean characters are displayed, and the font size is 1212 pixels. The GBK style is in half-width format.
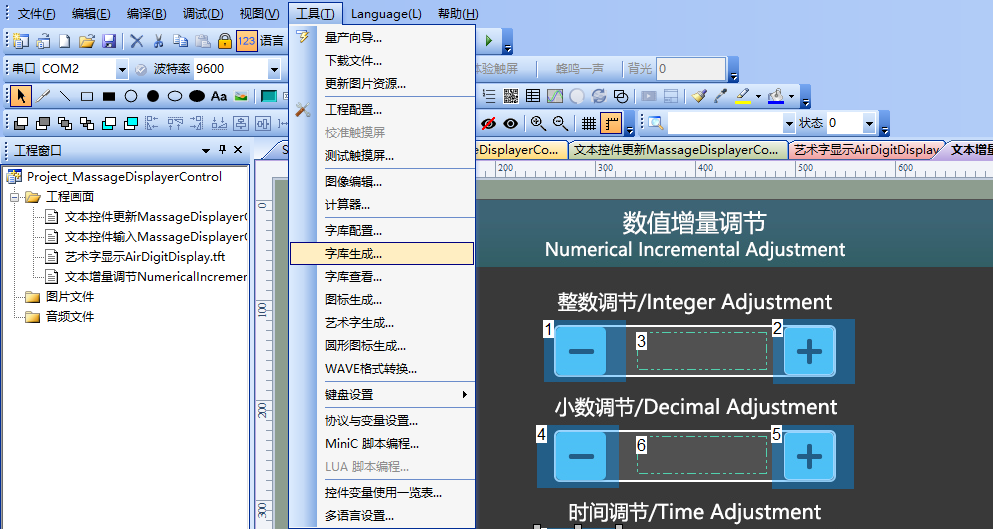
In the basic platform, besides the font styles provided by the system, users can also customize their own font library. In the menu bar of VisualTFT software, select "Tools" → "Font Library Generation", and configure the parameters according to your needs, as shown below
Artistic Font
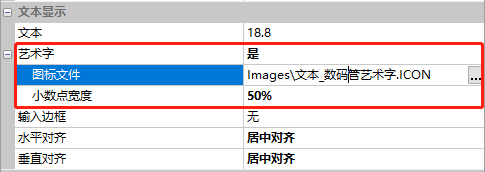
is used to display custom or special fonts
- Icon File: Insert the icon file for the artistic font
- Decimal Point Width: The proportion of the decimal point width
Foreground Color
Set the color of the font as shown below
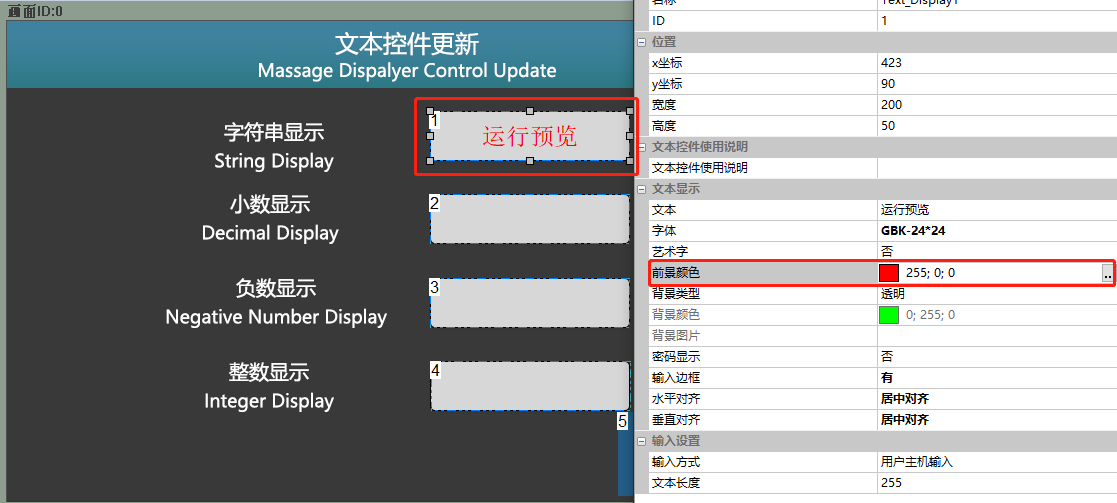
During the operation of the serial port screen, it can also be modified through commands. Detailed commands can be found in the Command Assistant or the "Serial Port Screen Command Set V5.0.pdf" document
Background Type
The background type of the text control can be selected from transparent, monochrome, image, and monochrome (displayed when selected), as shown below
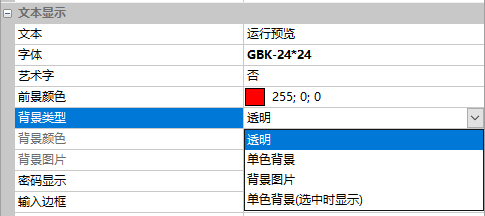
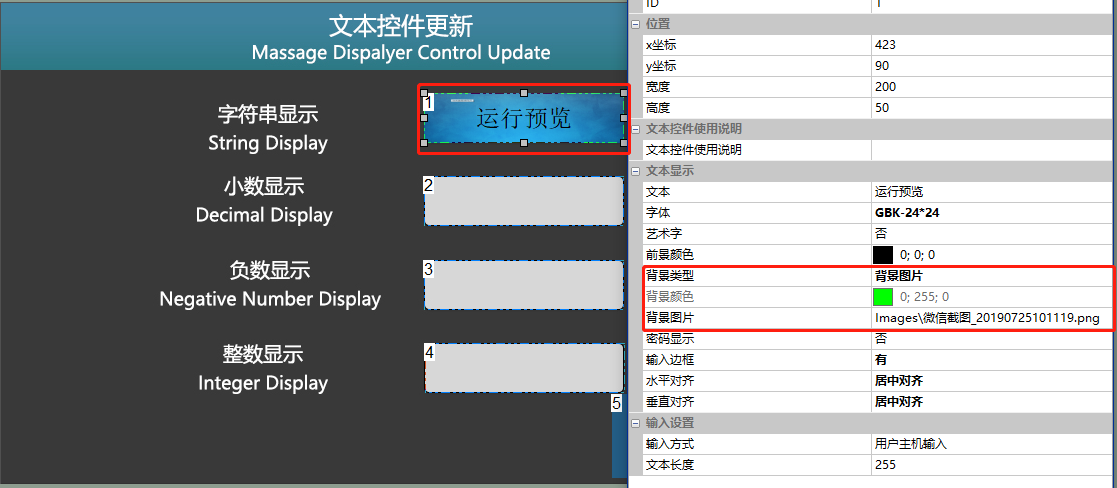
1. Transparent: Make the background of the text control transparent.
2. Monochrome: A background consisting of only one color, also known as a "pure color background".
3. Image: Insert an image into the background of the text control, as shown below
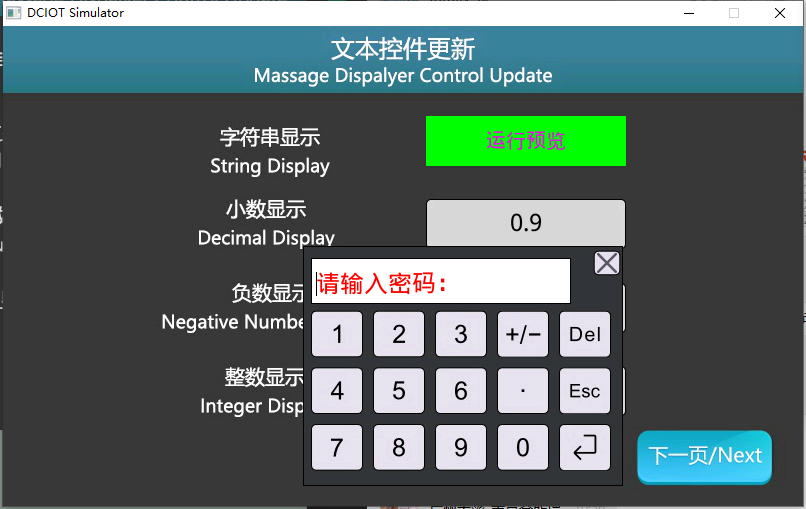
4. Monochrome (displayed when selected): Click the text control to pop up the keyboard. If the background color of the control is transparent, it will display as a monochrome background. To implement this feature, the [Input Method] must be set to "Pop up system keyboard input (user host can input)". If the [Background Color] is set to green, it will be displayed as shown below.
Password Display
When enabled, the input text will be displayed as. For example, if the text is "0.9", it will display as "*", as shown below.
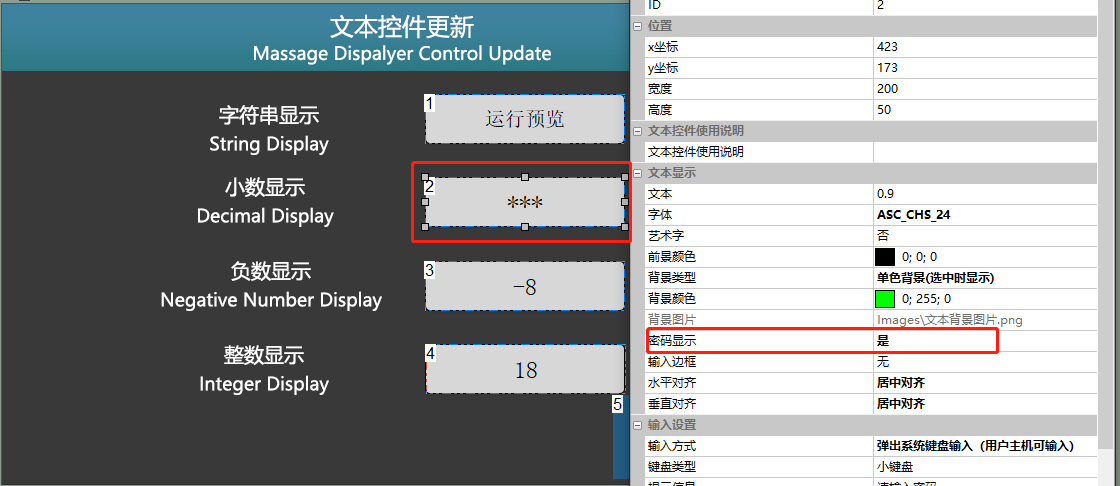
Input Border:
When enabled, a border will be displayed when text is entered in the text control.
Horizontal/Vertical Alignment
Set the alignment of the text.
Input Method
is divided into "User Host Input", "Pop up System Keyboard Input", "Custom Key Input", and "System Variable". As shown below.
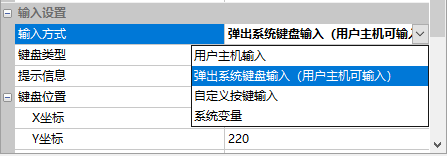
User Host Input
The text is inputted by the user's host computer, and the instructions are transmitted to the serial port screen through the serial port, displaying the data on the screen. As shown below

Pop up system keyboard for input (user's host computer can input)
Pop up system keyboard for text input, with keyboard types including numeric keypad and full keyboard
- Numeric keypad can input numbers, as shown below
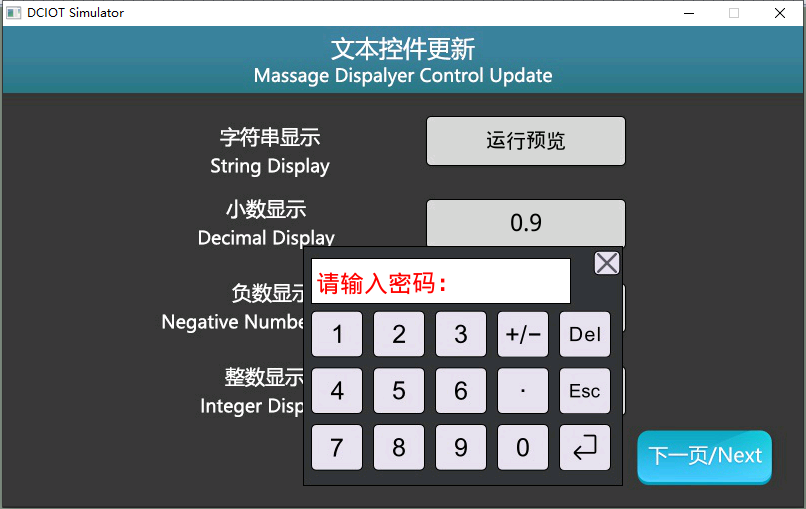 Full keyboard can input numbers, English uppercase/lowercase letters, and Chinese, as shown below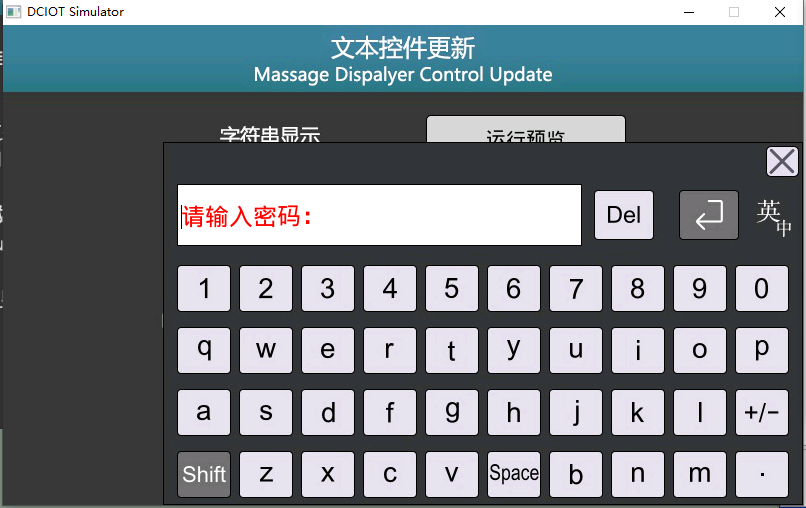
- Prompt information When the user clicks the text box, a prompt message appears in the input box of the pop-up keyboard, such as "Please enter password", as shown below
- Keyboard position When the text box is touched, the keyboard position is displayed, which includes automatic and specified modes. In specified mode, as shown below
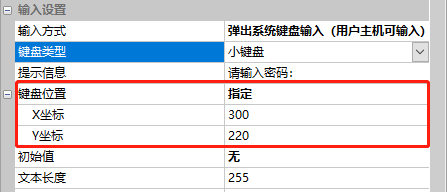
- Initial value When the keyboard pops up, whether the current text value is displayed in the input display field of the keyboard
- Maximum text length Keyboard input is limited to 255 bytes
- Value limit When the keyboard pops up, the threshold for limiting keyboard input is displayed, as shown below
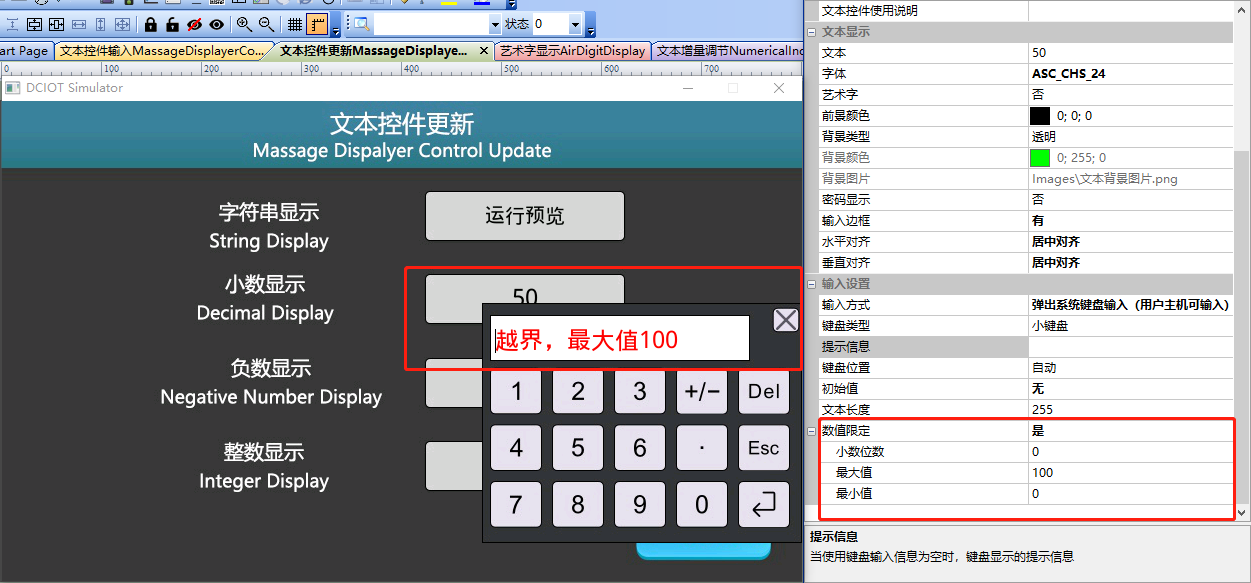
Custom key input
The text is inputted by the user in combination with the customization of the button control, as shown below. If the user modifies the keyboard style, they can refer to the document "How to Customize the Keyboard V_1.0 for [Serial Port Screen].".

The system variable
can be used to display the firmware version number, communication baud rate, etc. of the serial port screen, as shown below
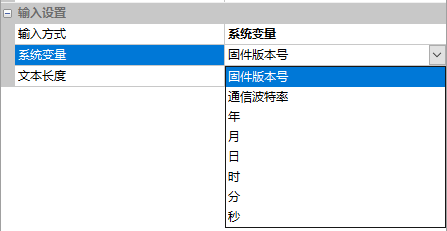
Text Length
The maximum length of text input is 255 bytes.
2.2 Text Control Update Application
[Text control update] screen, which introduces how the user device sends instructions to the serial port screen to update the content of the text control during communication between the user device and the serial port screen
Screen Configuration
Import the corresponding artwork image for the "Background Image" in the "Text Control Update" screen. Add a text control in this screen as shown below:
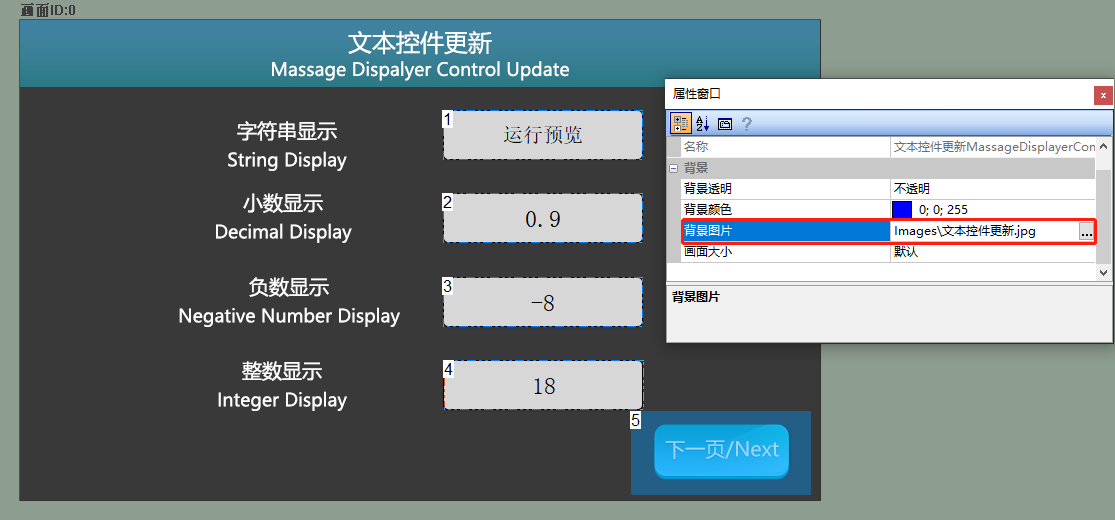
Property Configuration
Taking the string display bar as an example, set the [Text] to "Guangzhou Dacai", the [Font] to "ASC_CS24", the [Vertical Alignment] to "Vertical Center", and the [Input Method] to "User Host Input". The configuration is as follows
Similarly, for the decimal display column, negative number display column, and integer display column, set the initial values of [Text] to "0.8", "-8", and "18" respectively.
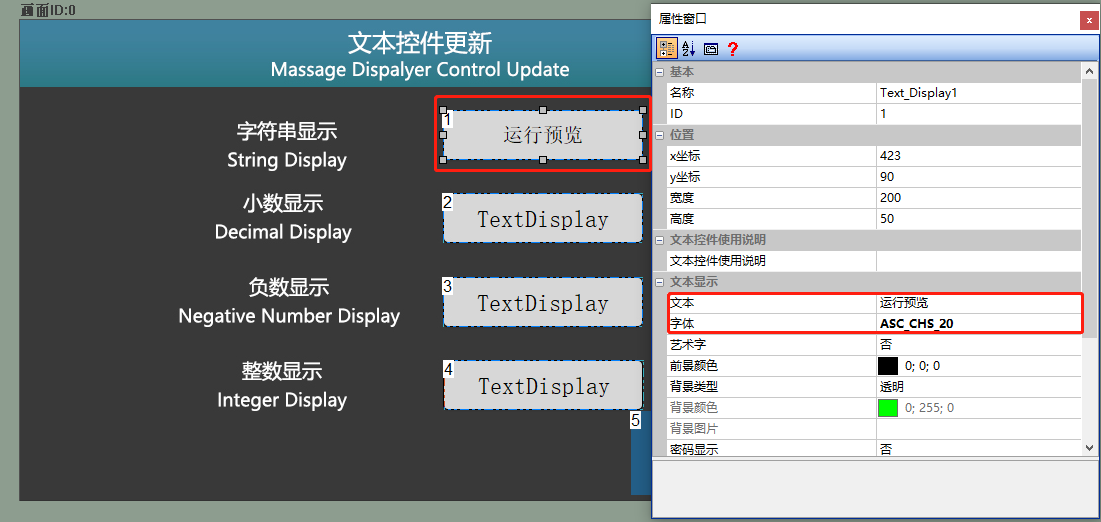
Run Preview
Run the virtual screen and establish a connection between VisualTFT software and the virtual screen using a "virtual serial port". Open the Command Assistant, select Text Control 1 on the left navigation bar, and set the command parameters for 'Update Text Control'.
String Display
Fill in the text control (control ID: 1) in the screen (screen ID: 0) with the text "Run Preview", and click "Send". Then, in the virtual screen, the text control will change from the default "jitter symbol" display to "Run Preview". The running effect is shown as follows
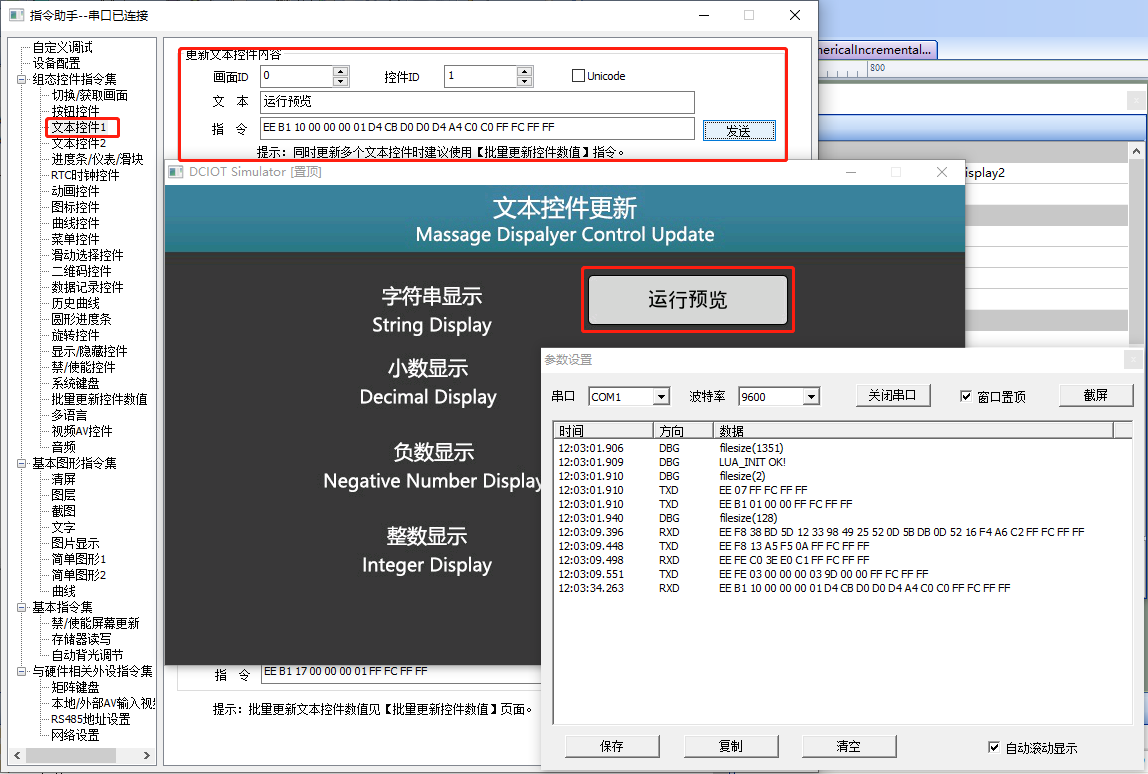
decimal display
Fill in the text control (control ID: 2) in the screen (screen ID: 0) with "0.9" as the [Text], click "Send", and the running effect is shown below
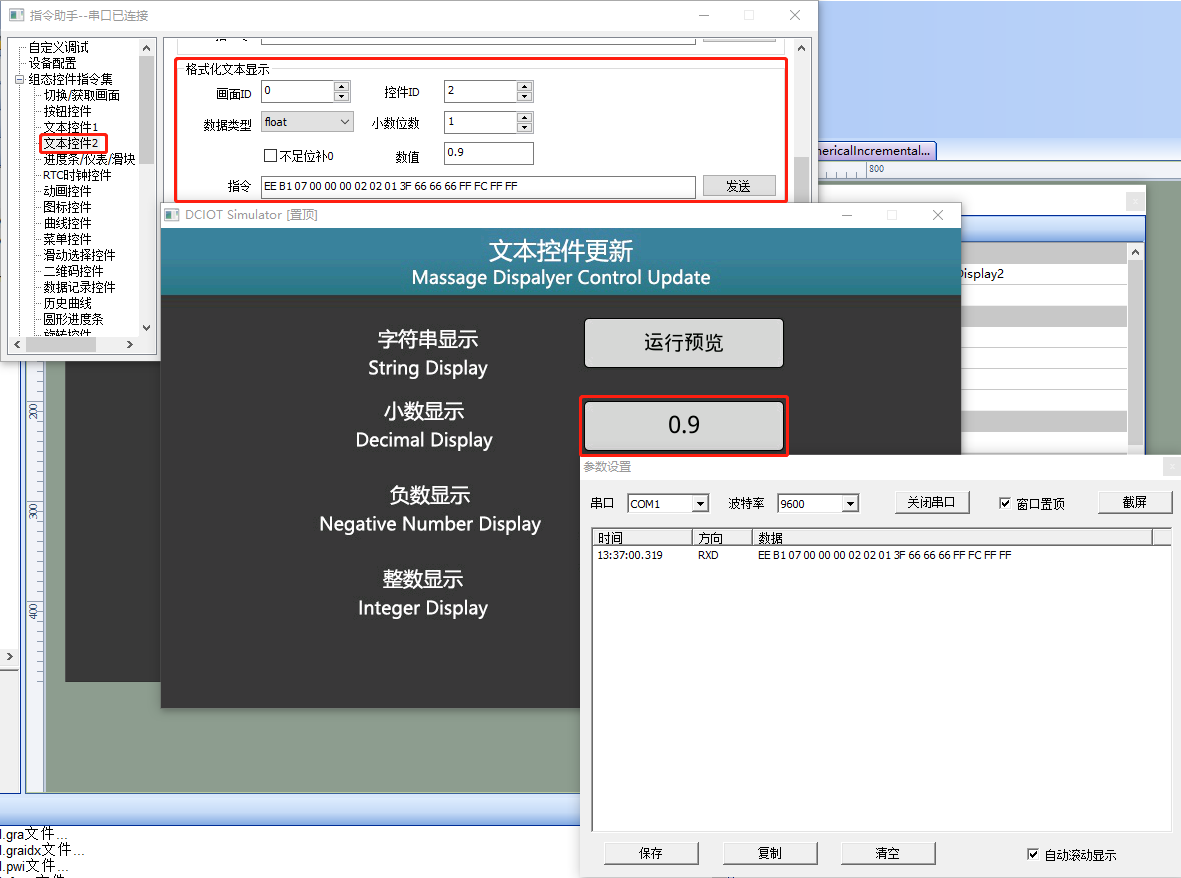
negative number display
Fill in the text control (control ID: 3) in the screen (screen ID: 0) with the text "-9", click "Send", and the running effect is shown below
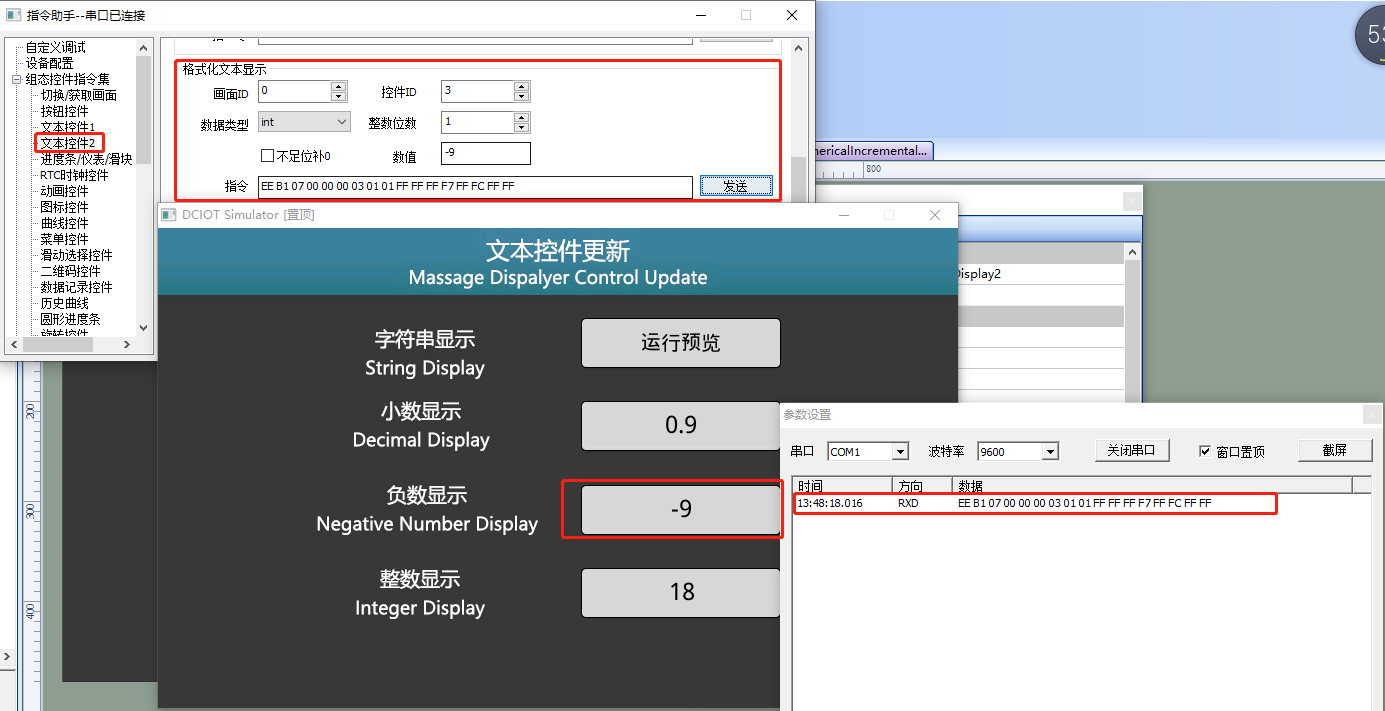
integer display
Fill in the text control (control ID: 4) in the screen (screen ID: 0) with the text "19", click "Send", and the running effect is shown below
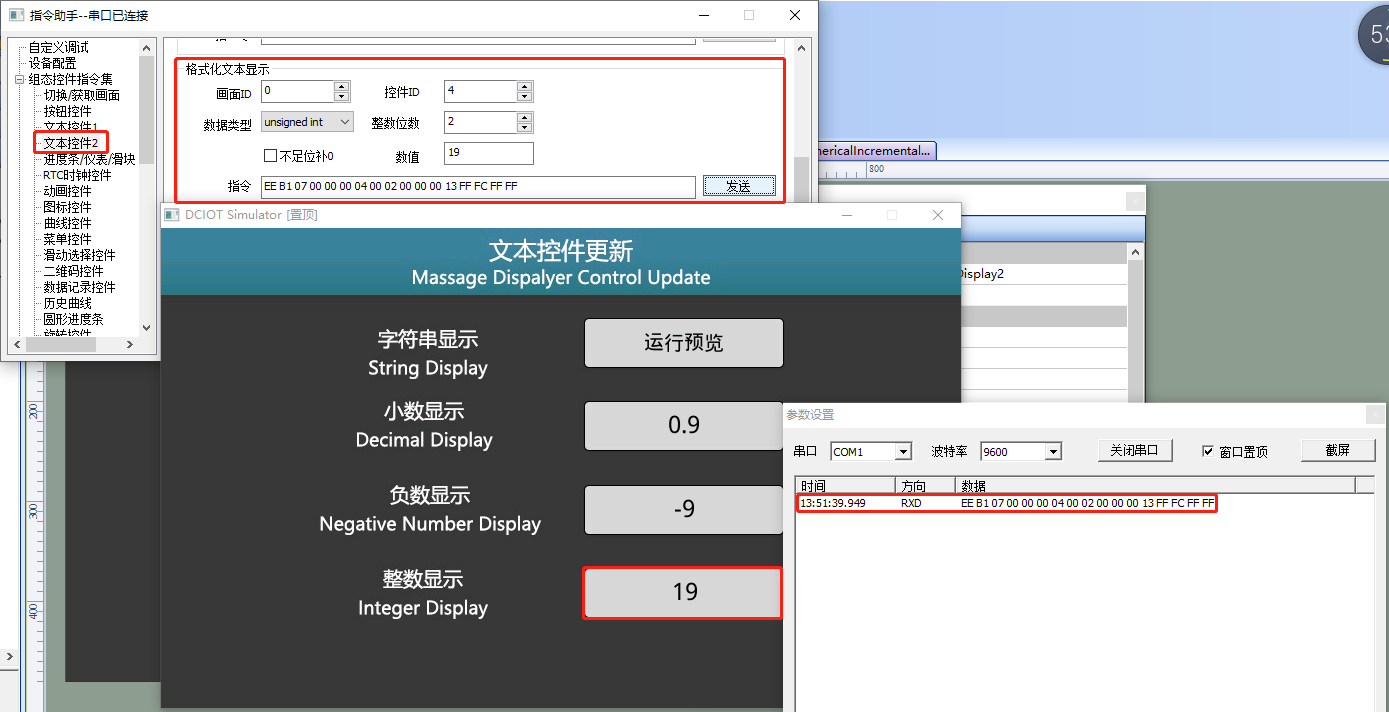
External MCU control
Refer to the function declaration in the him.dever. h file in the Keil program of the development package and Definition in him.dever.c file
MUC controls text string display
For example, if a user needs to implement a "string bar display bar" to display "run preview", they can directly call the text library string display function SetTextValue(), as shown in the following code
/************************************************************************

** Function name:    void SetTextValue(uint16 screen_id,
                                       uint16 control_id,
                                       uchar *str);
** Descriptions:    设置文本字符串显示
** input parameters:  screen_id: 画面ID
**                   control_id: 控件ID
**                          str: 显示的字符
** output parameters           : 无
** Returned value              : 无
************************************************************************/
{
    ……
    SetTextValue(0, 1, “运行预览”) //画面ID0,控件ID1,显示字符串“运行预览”
    ……
}
MUC controls the display of positive and negative integers
. For example, if a user needs to implement a "negative display bar" to display "-9" and a "positive display bar" to display "19", they can directly call the text library string display function SetTextExtended(), as shown in the following code
/************************************************************************

** Function name:    void SetTextInt32(uint16 screen_id,
                                       uint16 control_id,
                                       uint32 value,
                                       uint8 sign,
                                       uint8 fill_zero);
** Descriptions    : 设置文本为正/负整数
** input parameters: screen_id:  画面ID
**                   control_id:  控件ID
**                   value:  显示的整数
**                   sign:  0-无符号,1-有符号
**                  fill_zero:  数字位数,不足时左侧补零
** output parameters: 无
** Returned value   : 无
************************************************************************/
{
    ……
    SetTextInt32 (0, 3, -9,1, 0) //设置画面ID0控件ID3,显示-9
    SetTextInt32 (0, 4, 19, 0, 0) //设置画面ID0控件ID4,显示19
    ……
}
MUC controls the display of decimals
. For example, if a user needs to implement a "decimal display bar" to display "-0.9", they can directly call the text library string display function SetTextFloat(). Okay, the code is as follows
/************************************************************************
** Function name:    void SetTextFloat(uint16 screen_id,
                                       uint16 control_id,
                                       float value,
                                       uint8 precision,
                                       uint8 show_zeros);
** Descriptions    : 设置文本单精度浮点值/小数
** input parameters: screen_id:  画面ID
**                  control_id:  控件ID
**                       value:  显示的浮点数
**                   precision: 小数位数
**                  show _zero: 为1时,显示末尾0
** output parameters:  无
** Returned value   :   无
************************************************************************/
{
    ……
    SetTextFloat (0, 3, 0.9,1,1) //设置画面ID0控件ID2,显示0.9
    ……
}
2.3 Text Control Keyboard Input Application
【 The "Text Control Input" screen introduces clicking on the text control on the serial port screen to pop up the keyboard, enter data, and actively send data to the user. The
screen configuration
Import the corresponding artwork image for the "Background Image" on the [Text Control Input] screen. Add two text controls (Control IDs: 1 and 2) to the screen, as shown below
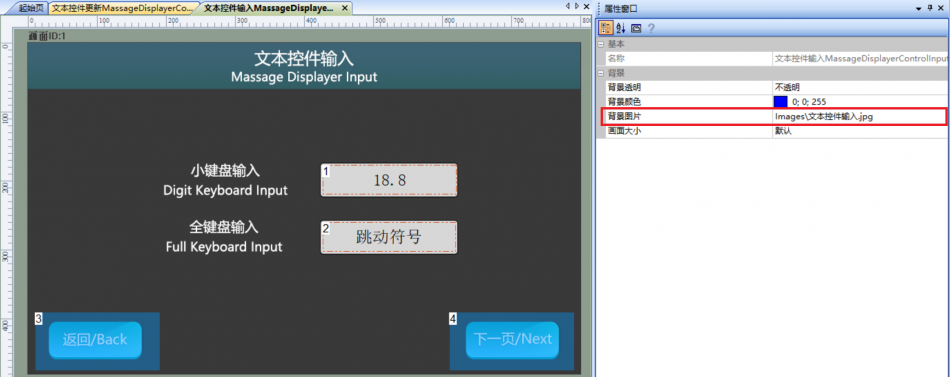
Property Configuration
Taking the control ID 1 as an example, set the [Text] to "18.8", [Font] to "ASC_CHS_24", [Vertical Alignment] to "Centered", [Input Method] to "Pop up system keyboard input (user host can input)", [Keyboard Type] to "Small keyboard", [Keyboard Position] to "Specified", coordinates to "(300,220)", and [Numerical Limit] to "Yes", with a limit range of "0-100". The configuration is shown below
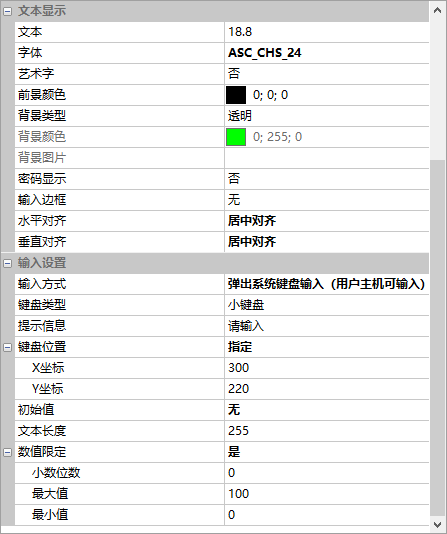
Similarly, for the configuration of full keyboard input, simply change the "Keyboard Type" to "Full Keyboard", and configure other parameters according to your needs.
Run Preview
Run Virtual Screen, click the text control (Control ID: 1) in the screen (Screen ID: 1), a keyboard pops up, enter "66", and press Enter. The virtual screen will issue the corresponding command, and the operation effect is shown as follows
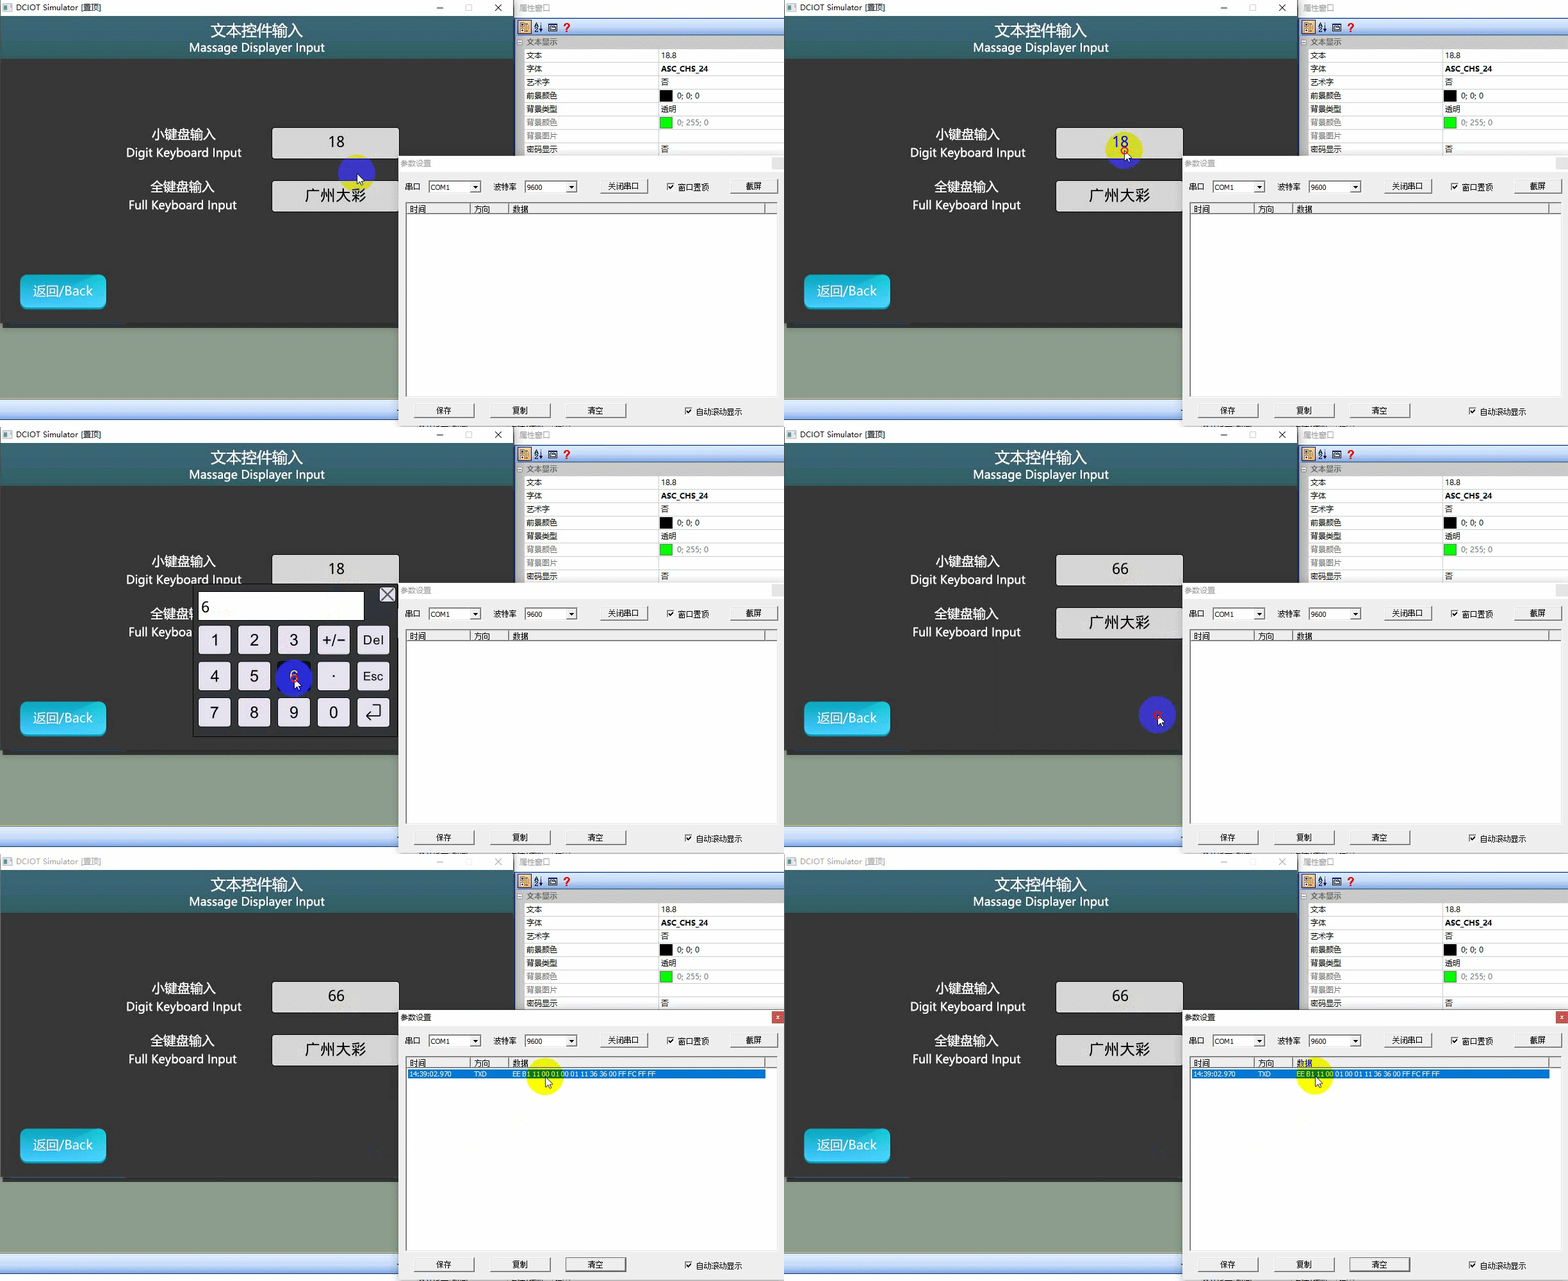
2.4 Artistic Word Display Application
[Artistic Font Display] To achieve an artistic font display effect, first generate the corresponding ICON file. In the property panel window of the text control, add the ICON file to the "Icon File" configuration option
Screen Configuration
Import the corresponding artwork image for the "Background Image" in the [Artistic Word Display] screen. Add one text control (Control ID: 1) to the screen
Artistic Word Generation
There are two ways to create an icon file
- Icon Generation
- Artistic Word Generation
Icon Generation
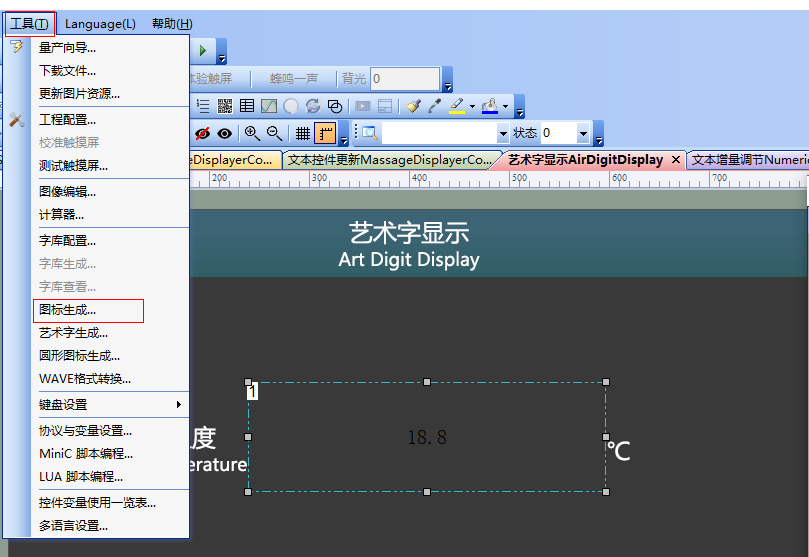
- To open the icon generation interface, select "Tools" → "Icon Generation" from the menu bar of the VisualTFT software, as shown below
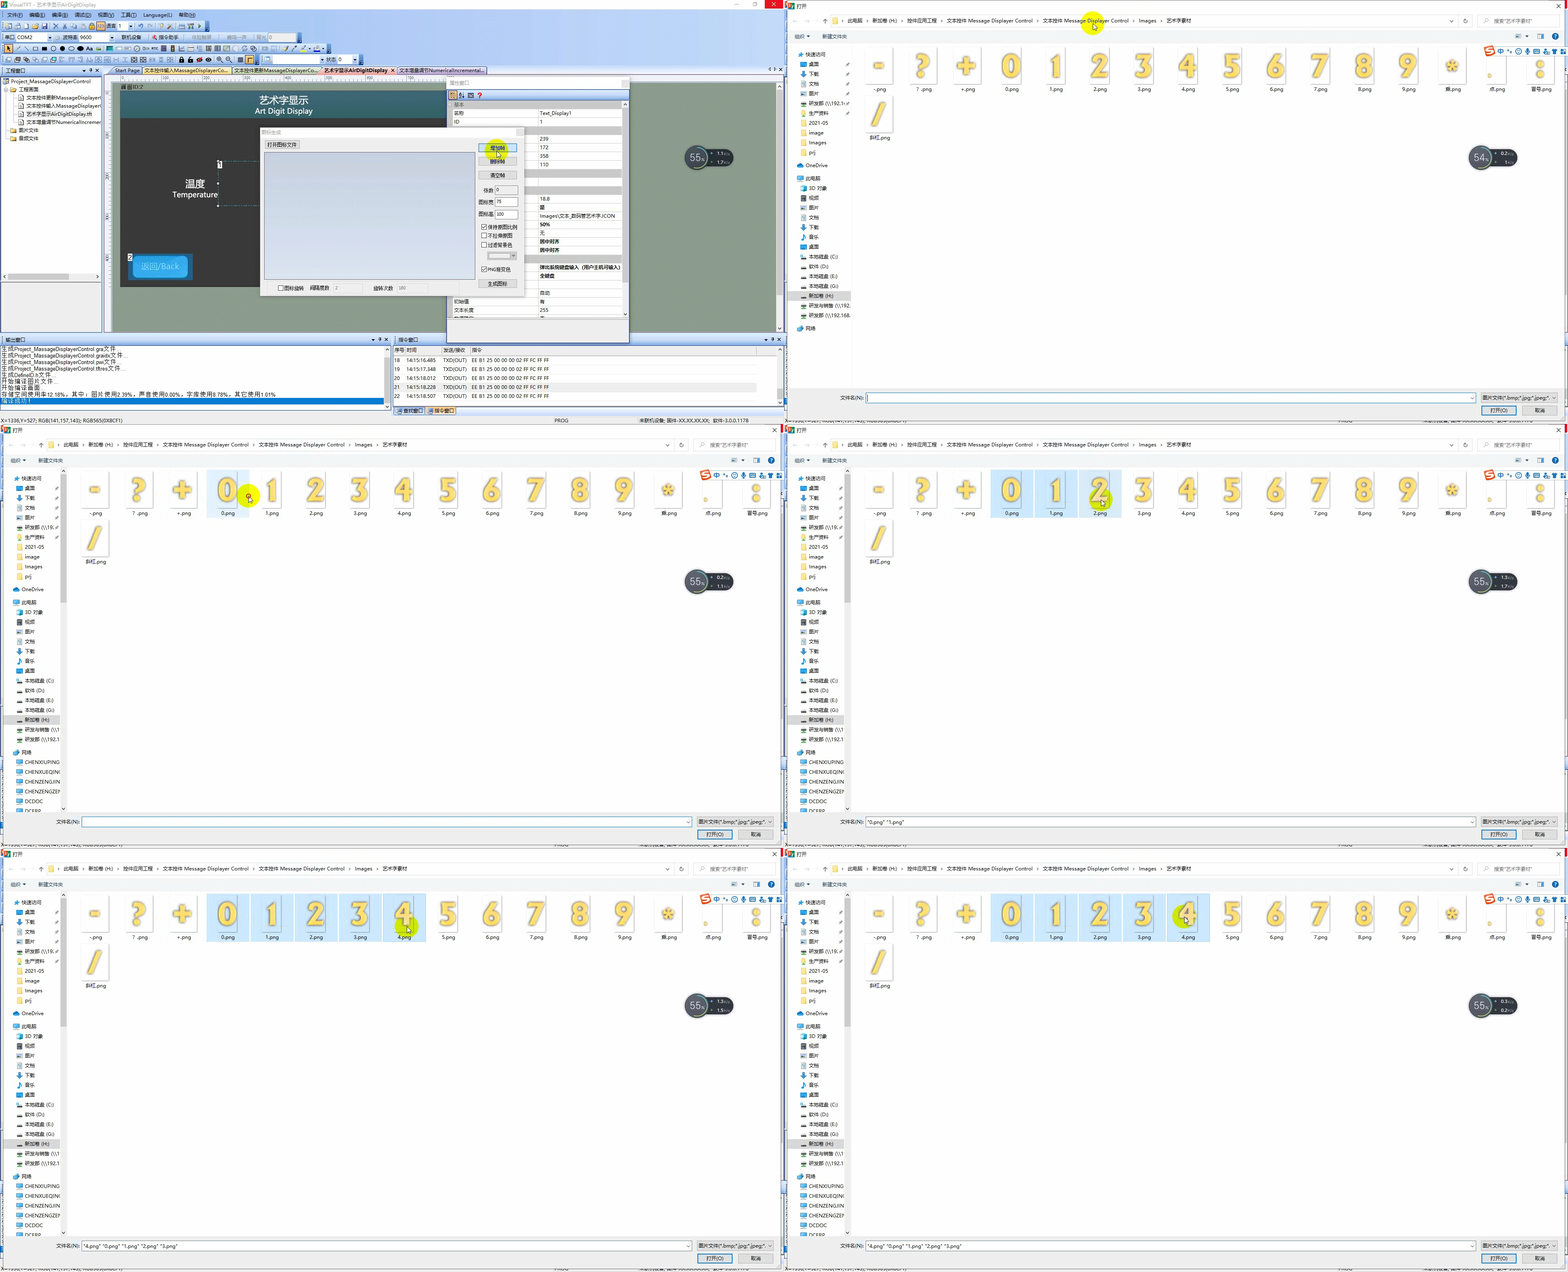
- To create an icon, click "Add Frame" and add the prepared materials strictly in the order of "[0-9], [: . * - + ? /], [A-Z], and [a-z]", otherwise it will result in display errors. By default, the image imported by the user will be displayed in its original width and height. You can also make fine adjustments to the width and height, and drag it freely to adjust its position. Finally, click "Generate Icon". The operation is as follows:
Artistic Word Generation
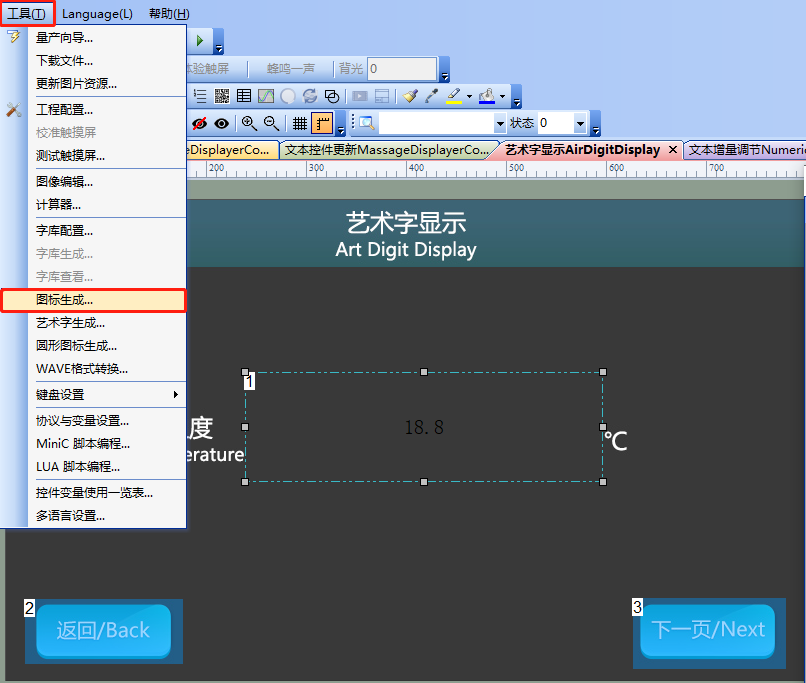
- Open the Artistic Word Generation Interface. In the VisualTFT software menu bar, select "Tools" → "Icon Generation", as shown below:
- Artistic Word Creation
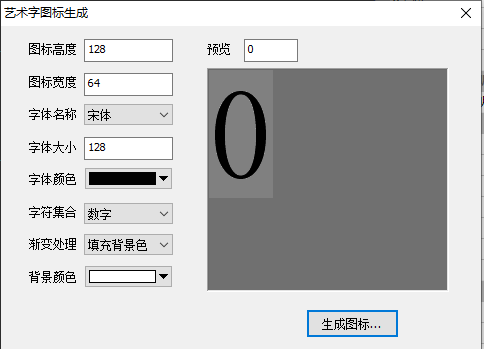
- Set the size of the icon: height and width to 128*64
- Font Name: Select the corresponding TFT font file according to the display effect. You can download it online.
- Font Size: The default font size displayed.
- Font Color: Set the color of the font display.
- Character set: There are 3 types, as follows: 1) Numerals: Numerals 0~9 2) Numerals and symbols: Numerals 0~9, characters [:.*+-?/]. 3) Numerals/symbols/letters: Numerals 0~9, characters [:.*+-?/], uppercase A~Z, lowercase a~z
- Gradient Processing: Disable Gradient, Fill Background Color, ALPHA Channel.
- Background Color: Display the default background color of the font.
The settings are as follows. Click "Generate Icon" to complete the icon generation
Attribute Configuration
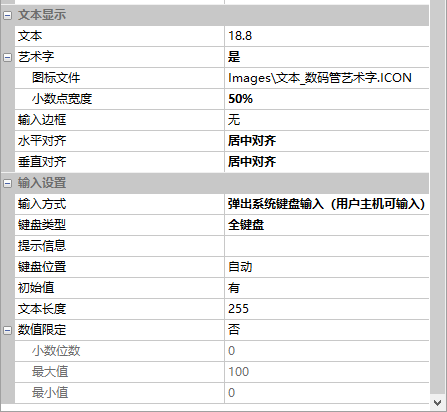
Set [Artistic Word] to "Yes", [Icon File] to insert "Artistic Word.icon file", [Decimal Point Width] to "50%", [Vertical Alignment] to "Center Alignment", and [Input Method] to "User Host Input". The configuration is as follows:
Run Preview
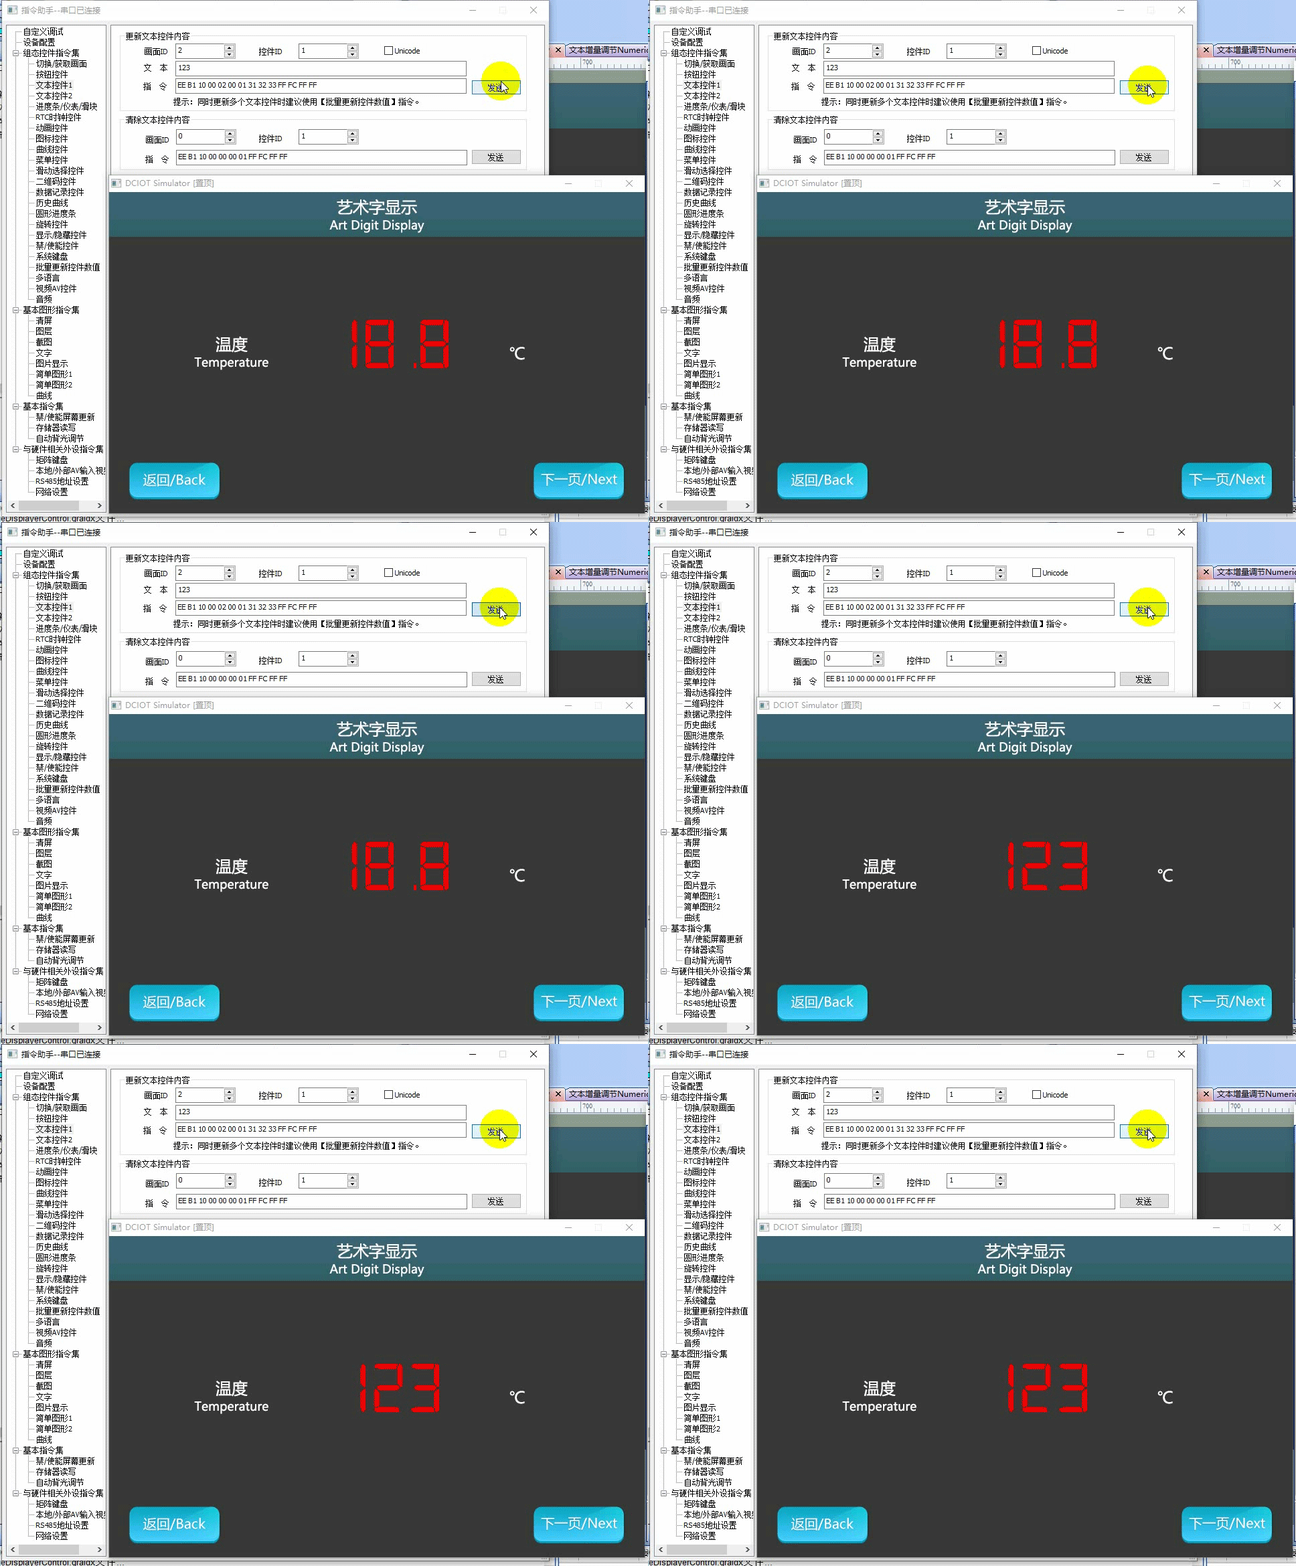
Run the virtual screen, and establish a connection between the VisualTFT software and the virtual screen using "Virtual Serial Port". Open the "Command Assistant", select "Text Control 1" from the left navigation bar, and set the "Update Text Control" command parameters. As in the example routine, control the text control (control ID: 1) in the screen (screen ID: 2), fill in "Text" as "123", and click "Send". Then, the text control 1 on the virtual screen will display from the default "18.8" to "123". The running effect is shown below
2.5 Text Incremental Adjustment Application
Control the display value of the text control through button controls to perform "self-increment" or "self-decrement" operations. If the adjustment step size is an integer, the incremental adjustment operation can be achieved within the screen; if the adjustment step size is a decimal, string (time), etc., it requires MCU data interaction or LUA script implementation (not explained here)
Integer Adjustment
Screen Configuration
Import the corresponding artwork image for the "Background Image" in the "Text Increment Adjustment" screen. Add one text control (Control ID: 3) and two button controls (Control IDs: 1 and 2) to the screen, as shown below
Attribute Configuration
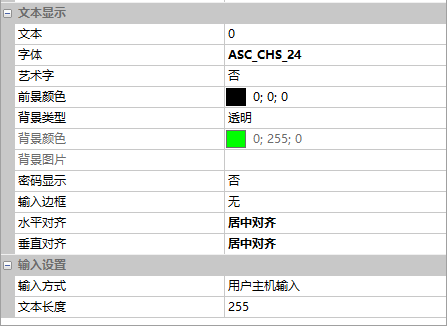
- For the text control with Control ID 3, set the text to "0", font to "ASC_CHS_24", vertical alignment to "Centered", and input method to "User Host Input". The configuration is shown below
- Button control properties 1). Fill in the button incremental adjustment internal command: Select the button control (control ID: 1) 2). [Internal Command] in the property bar → "Button pressed" 3). Pop up the command filling box 4). Select "Command Assistant", and in the Command Assistant interface, select [Text Control 2] on the left navigation bar, and set the command parameters in the "Incremental Adjustment" area. As in the routine, control the text control ID in the screen ID3 to decrement by 1 within the range of 0-100. 5). Fill in the command to the corresponding button
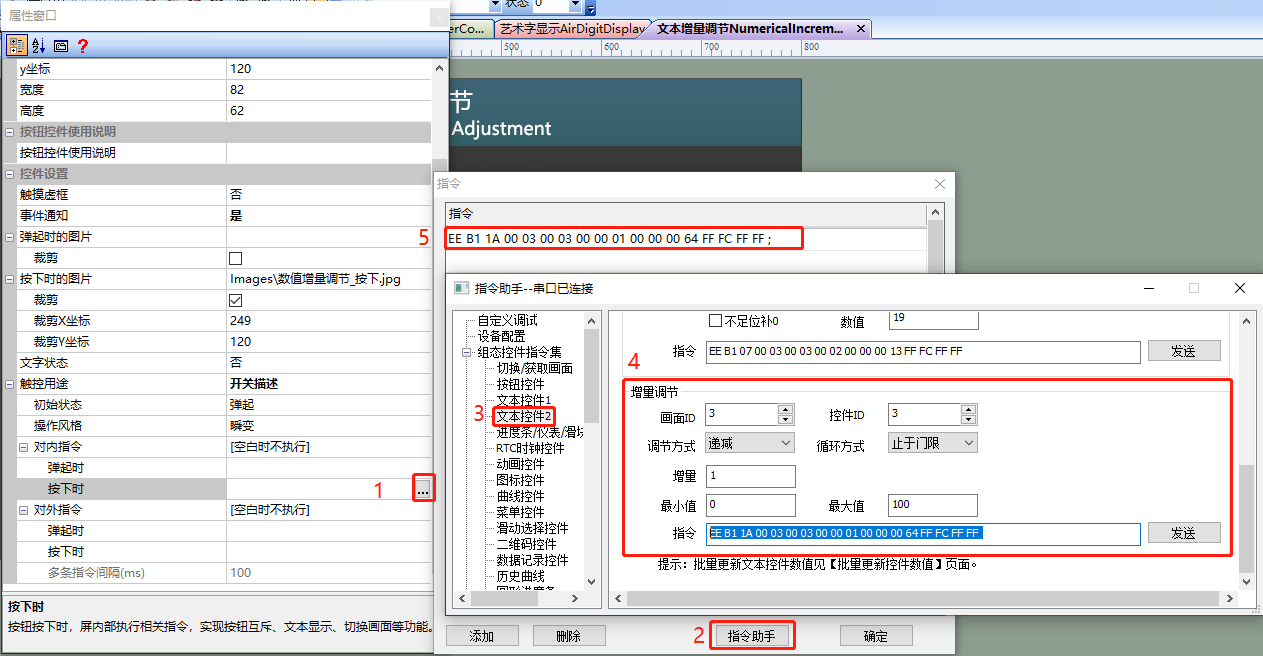 Similarly, to perform an incremental operation, simply modify the "Adjustment Method" to "Incremental". Note: This method of incremental adjustment for internal instructions is only suitable for adjustment steps that are integers and does not support decimal values
Run Preview
Run Virtual Screen, click the button control (control ID: 1 or 2) in the screen (screen ID: 3), adjust the value of the text control with a step size of 1. The running effect is shown below. Refer to the function declaration in the him.dever.h file and the definition in the him.dever.c file in the development package Keil program.

Decimal Adjustment
Screen Configuration
In the "Text Increment Adjustment" screen, add one text control (control ID: 6) and two button controls (control IDs: 4 and 5)
Attribute Configuration
For the text control with control ID 6, set the text to "0", font to "ASC_CHS_24", vertical alignment to "Center", and input method to "User Host Input". The configuration is shown below.
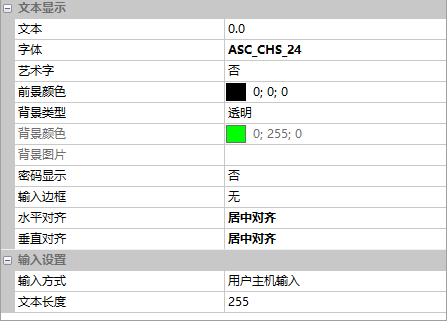
Implementation Method
The M/F/W series that supports LUA scripting can be processed in the script, which is not explained in this section. This mainly elaborates on the general method for user microcontroller interaction implementation.
- When the increment button (control ID: 5) is pressed, the screen sends the button control instruction to the microcontroller.
- After the microcontroller parses the button control instruction, if it determines that the button control (control ID: 5) has been pressed, it sends an instruction to obtain the value of the text control (control ID: 6). The relevant code is shown below
/********************************************************************** ** Function name: NotifyButton(uint16 screen_id, uint16 control_id, uint8 state) ** Descriptions : 当按钮状态改变(或调用GetControlValue)时,执行此函数 ** input parameters: screen_id: 画面ID ** control_id: 控件ID ** state: 按钮控件的状态,0弹起、1按下、2长按 ** output parameters: 无 ** Returned value : 无 **********************************************************************/ void NotifyButton(uint16 screen_id, uint16 control_id, uint8 state) { …… //按下画面ID3控件ID5的按钮控件 if(screen_id == 3 && control_id == 5 && state == 1) { /******************************************************************* ** Function name: GetControlValue(uint16 screen_id, uint16 control_id) ** Descriptions : 获取控件值 ** input parameters: screen_id : 画面ID ** control_id: 控件ID ** output parameters: 无 ** Returned value : 无 *******************************************************************/ GetControlValue(3,6); //获取画面ID3,控件ID6的文本控件值 } …… }Copy
The value obtained from the text control is a string by default. Call the C library function sscanf to convert the string into a single-precision floating-point number (decimal), perform an increment operation by 0.1 units, and update the text control value to be displayed on the serial port screen. The code is shown below
void NotifyText(uint16 screen_id, uint16 control_id, uint8 *str)
{
    float TestValue = 0.0;
    ……
    if(screen_id == 3 && control_id == 6)  //画面ID2:文本设置和显示
    {
        sscanf(str,"%%.1f",&TestValue);  //把字符串转换为浮点数
        TestValue += 0.1;  // 文本值自增
        /*********************************************
        ** Function name:    void SetTextFloat(uint16 screen_id,
                                               uint16 control_id,
                                                float value,
                                                uint8 precision,
                                                uint8 show_zeros);
        ** Descriptions:    设置文本单精度浮点值/小数
        ** input parameters:  screen_id:  画面ID
        **             control_id:  控件ID
        **             value:  显示的浮点数
        **             precision:  小数位数
        **             show _zero:  为1时,显示末尾0
        ** output parameters:  无
        ** Returned value:   无
        *****************************************************************/
        SetTextFloat(3,6,TestValue,1,1);//设置画面ID3、控件ID6每次自增的数值
    }
    ……
}
Time adjustment
Increment adjustment of time. Users can refer to the method of decimal increment, and complete data interaction with the user's host computer. The user's host computer only needs to call the string processing function accordingly.
[wshop_downloads]


Leave a Reply