
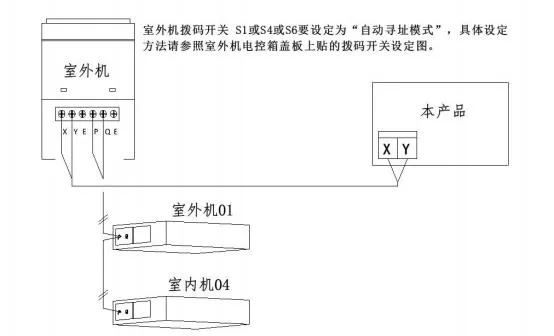
I. Wiring Method
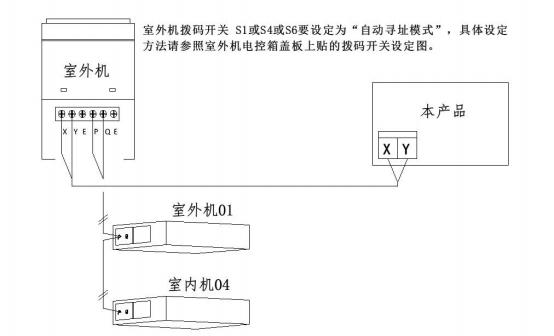
Figure 1 System Wiring Diagram of This Product
The communication cable between the indoor and outdoor units of the air conditioner is the responsibility of the air conditioning construction party. Like the refrigerant copper tube
between the indoor and outdoor units of the air conditioner, it is part of the air conditioning system and does not require consideration by the weak current integration party.
This product is connected to the outdoor or indoor unit of the air conditioning system through a 2-core cable, thereby communicating with all indoor units within the air conditioning system for monitoring purposes. The shielded twisted-pair cable from the air conditioning outdoor unit to this product requires a wire diameter of 0.75mm2 or larger and a total length of no more than 1000 meters, which can be reserved by the air conditioning construction party or added later. The communication between this product and the weak current integration system is also achieved using twisted-pair cables or network cables. The parameter requirements and construction details of this communication line should be determined based on the location between the module and the weak current integration system.
This product needs to be installed indoors, either in or near the smart home control box.
Precautions for Wiring Operations
Please note the following points when performing wiring operations
● The input terminals for different control methods are different.
● The cable for the LAN port should be controlled within 80 meters.
● Please use a DC12V power supply produced by a reputable manufacturer.
● Incorrect wiring may cause damage to this product.
● If the power supply of this product is left on during wiring operations, it may cause malfunctions. Therefore, when performing wiring operations
, be sure to disconnect the power supply of this product and the air conditioner.
● Please do not route all signal cables alongside power cables or other signal cables, as this may cause malfunctions due to interference. If parallel routing is necessary, please maintain a distance of 15cm from the wiring for air conditioner communication and a distance of at least 30cm from other wiring, or enclose the cables in a metal protective tube and ground one end of the tube. Thebox must be grounded as Type D.
● If the power cable is mistakenly connected to the signal transmission terminal block, the fuse will blow to protect the printed circuitboard. In this case, please contact the manufacturer and do not attempt to disassemble or repair it yourself.
1. The wiring specifications for this product are as shown in
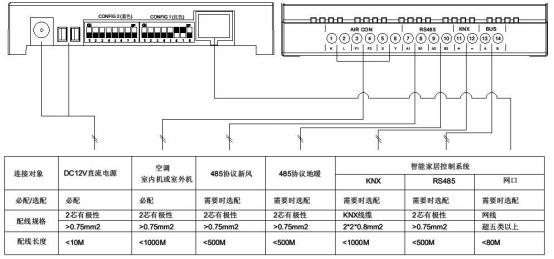
Figure 2. Wiring terminals and wiring specifications
2. Wiring locations for air conditioning equipment
For Midea air conditioners, the 2-core cable connected to this module should be crimped onto the wiring terminals marked "X, Y" on the outdoor unit (with polarity distinction, where the air conditioner X terminal connects to the gateway X terminal, and the air conditioner Y terminal connects to the 1 terminal).Note: Some air conditioning models have different polarity than usual
, requiring the air conditioner Y terminal to connect to the gateway X terminal and the air conditioner X terminal to connect to the gateway Y terminal. If the normal connection method cannot be found on the air conditioner, please reverse the polarity.
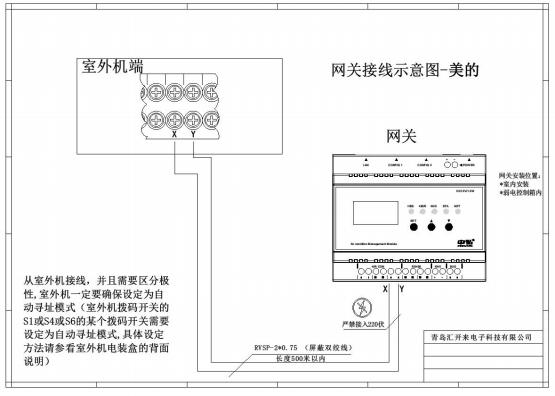
Figure 3 Wiring Location of Midea Air Conditioner
II. Air Conditioner Address Setting
1. Method for Setting the Air Conditioner System Address
In order to accurately locate and monitor each indoor unit, it is necessary to set an address for the indoor unit of the VRV air conditioner.
1.1 Setting the Indoor Unit Address via Infrared Remote Control
The remote control model is RM05/BG(T)-A
. 1. As shown in Figures 1.1.1 and 1.1.2, long press the "LOCK" button for 5 seconds to start setting
. 2. As shown in Figure 1.1.3, power on the indoor unit
. 3. As shown in Figures 1.1.4 and 1.1.5, query the current indoor unit address
. 4. As shown in Figures 1.1.6 and 1.1.7, set the indoor unit address code and press the "Wind Speed" button to confirm the address
. 5. As shown in Figure 1.1.8, long press the "LOCK" button for 5 seconds to return to the initial state
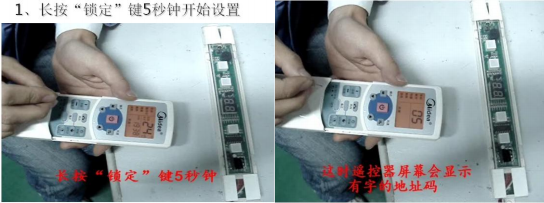
Figure 1.1.1
Figure 1.1.2

Figure 1.1.3
Figure 1.1.4
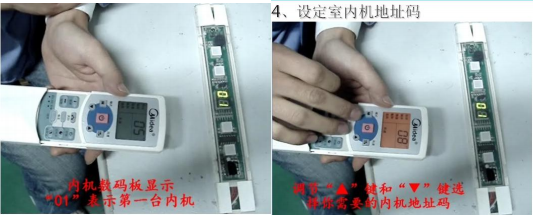
Figure 1.1.5
Figure 1.1.6
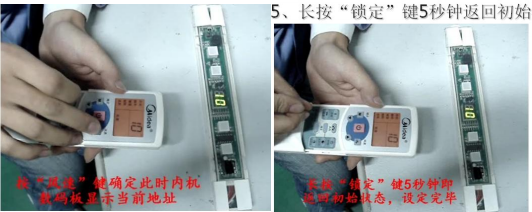
Figure 1.1.7
Figure 1.1.8
1.2 Set the address through the indoor unit dialing
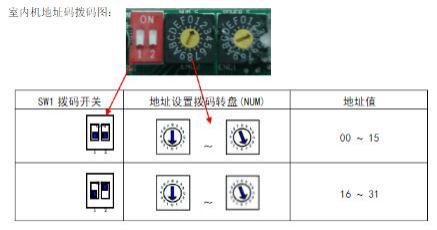
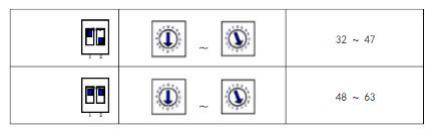
For any matters not covered, please refer to the air conditioning manufacturer's instructions for setting the air conditioning address
The available or searchable range of air conditioning addresses for Midea air conditioning is shown in the following table:
|
0, 1, 2 ------63 |


Leave a Reply