
1. Introduction to Time Display
Time display shows the current system time. It is displayed by binding the system time variable to a text control, and can also be modified through the control.
2. Introduction to Time Setting
Time settings can be made through the control or through commands. Time settings can be quickly made through the control - System Time Settings (shortcut), which is easy to operate and easy to get started. Time display can also be set through custom parsing commands.
3. How to Set Time Display
Time display can be made by binding the system time variable to a text control. The specific steps are as follows.
1How to Add a Text Control
Click the text icon in the Common Controls module to add the corresponding control, as shown in Figure 3.1.
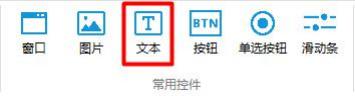
Figure3.1 Add Text Control
2How to Set Text Control Variable Binding
Select the text control, click Variable Binding in the property window on the right → click Add → the bound control property is "Text 1" → data source binding "System Time — — SysTime" → conversion mode "One-way" → conversion method "Date Time" → conversion parameter "yyyy- MM-dd-hh-mm-ss", as shown in Figure 3.2.(Note: yyyy represents year, MM represents month, dd represents day, hh represents hour, mm represents minute, ss represents second, and the dash "-" between them can be changed freely; spaces are not allowed as separators)
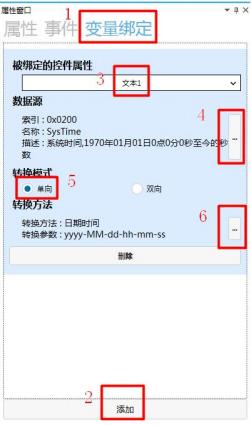
Figure3.2 Variable Binding
Note: The variable "System Time - SysTime" bound to the data source is shown in Figure 3.3
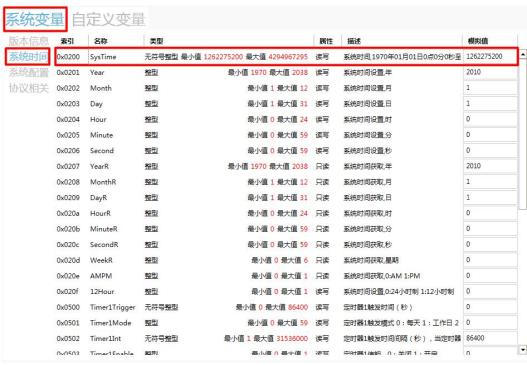
Figure3.3 System Time Display
3, Simulation Demonstration
Click the Simulation Run button to pop up the simulation run window, displaying the system time. The system time defaults to 2019-01-01-09-00-00, as shown in Figure 3.4
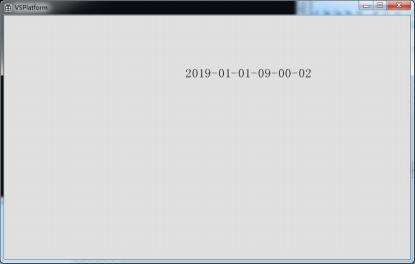
Figure3.4 System Time Display
4. How to Set the Time through System Time Settings (Shortcut)
1, How to Add System Time Settings (Shortcut)
Click the General Template in the Toolbox, click the System Time Settings (Shortcut) icon, and add System Time Settings (Shortcut), as shown in Figure 4.1
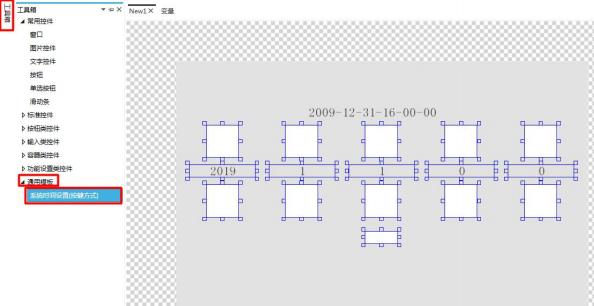
Figure4.1 Add System Time Settings (Shortcut)
2, How to Add Text Display for System Time Settings (Shortcut)
The buttons on the top row of the System Time Settings (Shortcut) are the increase buttons, the buttons on the bottom row are the decrease buttons, and the button at the bottom is the confirm button. After setting the system time through the System Time (Shortcut), you need to click the confirm button to implement the change; otherwise, the setting is invalid. The increase button adds the text "+", the decrease button adds the text "-", and the confirm button inputs "Confirm". The specific setting method is detailed in "How to Add Text Display" in "Button Controls", which will not be repeated here, as shown in Figure 4.2
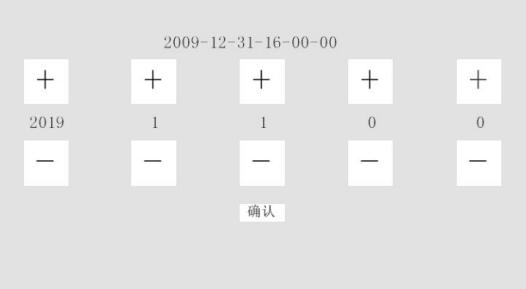
Figure4.2 Text display
3, simulation demonstration
. Click the simulation run button to pop up the simulation run window. Click "Set System Time" and then click "Confirm" to successfully set the system time. The original system time is displayed, as shown in Figure 4.3.
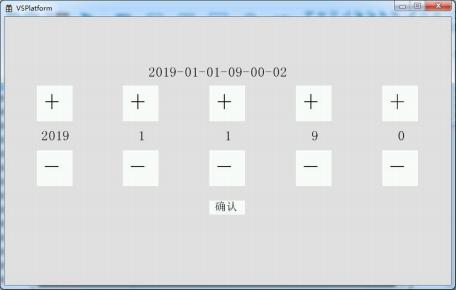
Figure4.3 Original system time
. The modified system time is displayed, as shown in Figure 4.4.
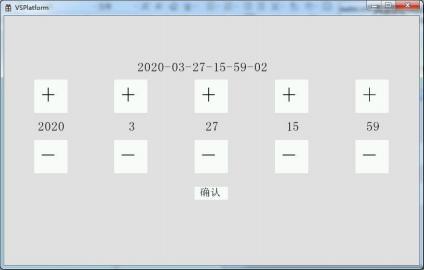
Figure4.4 System time after modification
5. How to modify the system time through commands
1, and how to set the protocol type
. Click "Items" in the menu bar to pop up the items window, click "Protocol Settings" → set the protocol type to "Custom Protocol", as shown in Figure 5.1.
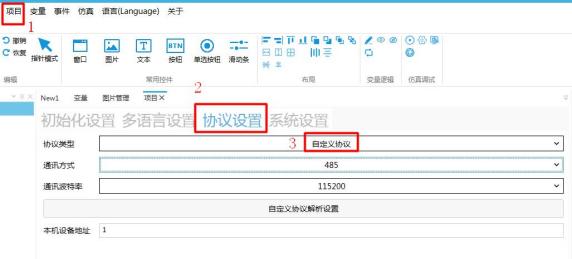
Figure5.1 Set protocol type
2, and how to set "Custom Protocol Parsing Settings"
. Click "Custom Protocol Parsing Settings" to pop up the protocol parsing window, click the "Add" button to add a protocol parsing, as shown in Figure 5.2.
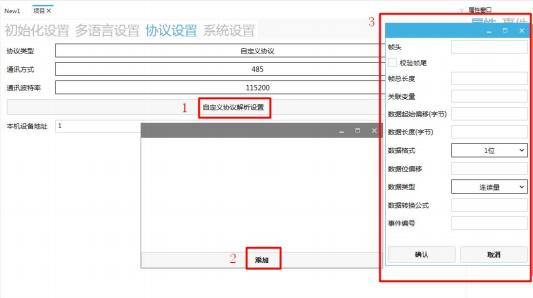
Figure5.2 Add custom protocol parsing
3, How to set custom protocol parsing for year-month-day-hour-minute-second
Specific setting methods and introduction of custom protocol parsing, see "TDFHUI Custom Command Module Description" for details
Custom protocol parsing for year setting, frame header is "23 AA 56 02" → frame tail is "73 65 6F 6B 65 6E 64" → total frame length is "18" → associated variable is "201" → data start offset byte is "8" → data length is "1" → data format is "1 byte" → data type is "continuous quantity" → data conversion format is "@+2000", as shown in Figure 5.3.
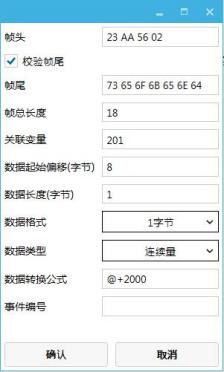
Figure5.3 Custom protocol parsing for year
, Custom protocol parsing for month setting, frame header is "23 AA 56 02" → total frame length is "18" → associated variable is "202" → data start offset byte is "9" → data length is "1" → data format is "1 byte" → data type is "continuous quantity", as shown in Figure 5.4.
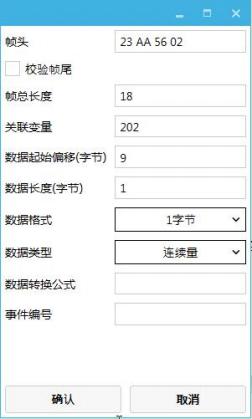
Figure5.4 Custom protocol parsing for month
, Custom protocol parsing for day setting, frame header is "23 AA 56 02" → total frame length is "18" → associated variable is "203" → data start offset byte is "10" → data length is "1" → data format is "1 byte" → data type is "continuous quantity", as shown in Figure 5.5.
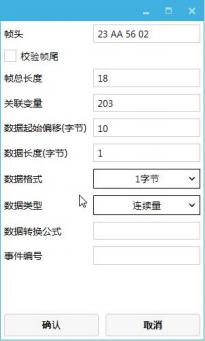
Figure5.5 Custom protocol parsing for day
, Custom protocol parsing for hour setting, frame header is "23 AA 56 02" → total frame length is "18" → associated variable is "204" → data start offset byte is "5" → data length is "1" → data format is "1 byte" → data type is "continuous quantity", as shown in Figure 5.6.
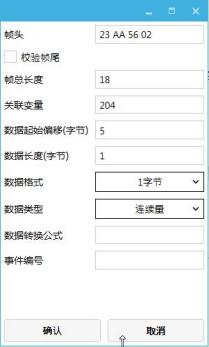
Figure5.6 Real-time custom protocol parsing
The custom protocol parsing set at the time has a frame header of "23 AA 56 02" → total frame length of "18" → associated variable of "205" → data start offset byte of "6" → data length of "1" → data format of "1 byte" → data type of "continuous quantity", as shown in Figure 5.6.
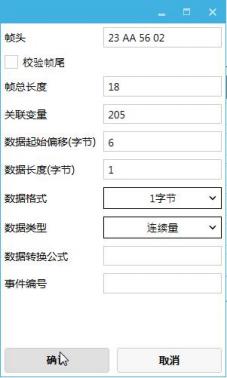
Figure5.6 Custom Protocol Analysis for Minutes
Custom Protocol Analysis for Seconds Setting, with Frame Header "23 AA 56 02" → Total Frame Length "18" → Associated Variable "206" → Data Starting Offset Byte "7" → Data Length "1" → Data Format "1 Byte" → Data Type "Continuous Quantity", as shown in Figure 5.7.
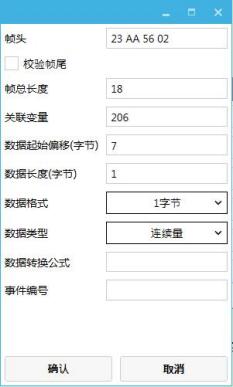
Figure5.7 Custom Protocol Analysis for Seconds
4, Simulation Debugging
Detailed steps for simulation debugging can be found in the "Simulation Debugging" instruction document. Send the command "23 AA 56 02 0B 1B 0a 11 07 02 06 73 65 6F 6B 65 6E 64", with the year, month, day, hour, minute, and second modified to "2017-07-02- 11-27- 10", as shown in Figure 5.8.
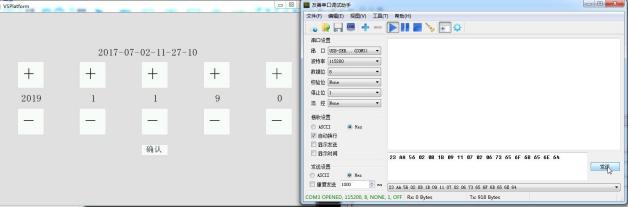
Picture5.8 Simulation Debugging


Leave a Reply