

1. Introduction to Pop-up and Floating Windows
Both pop-up and floating windows are displayed as small windows, serving as prompts or for other purposes, and float above the original window. (Note: Differences between Floating and Pop-up Windows
When clicking other blank areas, floating windows will not automatically close, while pop-up windows will.)
2. How to Add a Window
Open or create a new project file, click the window icon in the Common Controls module to add a window. Modify the window name according to the prompt, as shown in Figure 2.1.
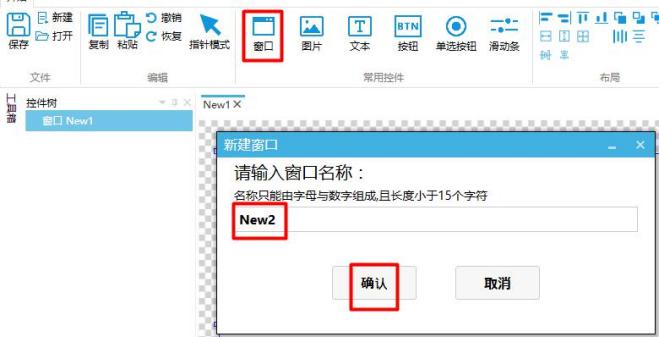
Figure2.1 Add Window
3. How to Set the Position and Size of a Window
Select the added window, NEW2, and modify its size using the mouse or the Public Properties window on the right, as shown in Figure 3.1.
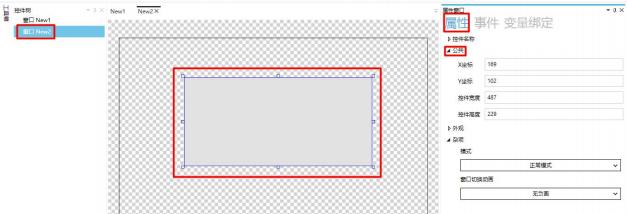
Figure3.1 Modify the Position and Size of the Window
4. How to Set the Mis-Touch Prompt Window via Pop-up/Floating Window
Click the Exit button in window, NEW1, to pop up a prompt window, Prompting, asking whether to exit the interface. Click OK to close the pop-up window and switch to the main interface, main, or click Cancel to close the pop-up window and return to window, NEW1.
1How to add a window
Add two windows and set their names to "main" and "Prompting", respectively. The specific steps are as above, and will not be repeated here. See Figure 4.1.
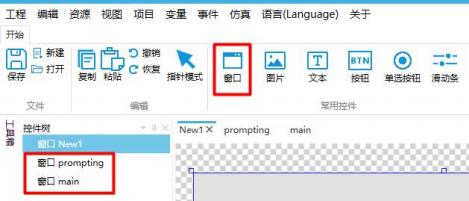
Figure4.1 Add window
2How to set the size and position of a window
Select the "Prompting" window and set its position and size. The specific setting methods and operations are as above, and will not be repeated here. See Figure 4.2.
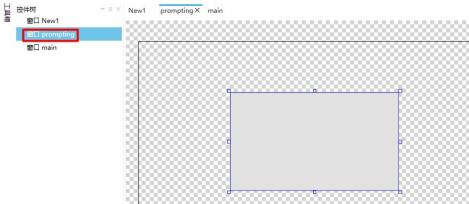
Figure4.2 Set the position and size of the window
3How to add a control
Select window "NEW1" and add a button control in window "NEW1" to serve as the exit button. Add a text control and two button controls in the "Prompting" window. The text control displays the prompt, and the two button controls are the "Confirm" and "Cancel" buttons, respectively. See Figure 4.3.
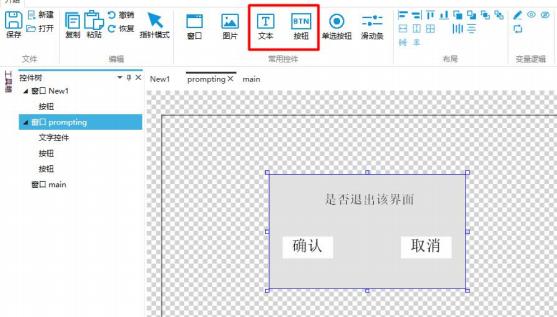
Figure4.3 Add control
Note: The specific text settings for button controls and text controls will not be repeated. For details, please refer to the "Button Control User Manual" and the "Text Control User Manual".
4How to set the window"NEW1"Button Event
Click the button in window NEW1, click on "Events" in the property window on the right, click "Add", set the event to "Click", click the "..." under the handling method to pop up the handling method window, select "Display Pop-up Window" or "Display Floating Window" (here, the display of a pop-up window is exemplified) in the window switching section, and select the "prompting" window as the target window, as shown in Figure 4.4.
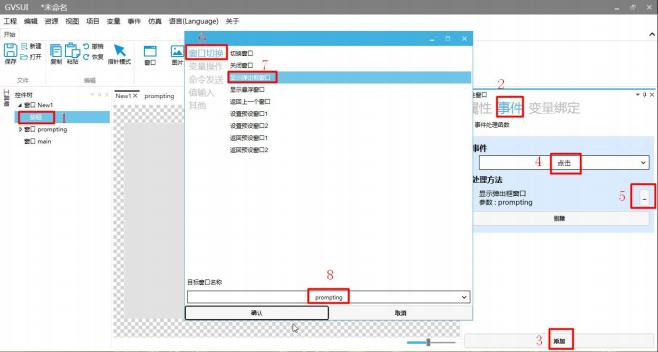
Figure4.4 Set Event
5and How to Set WindowpromptingButton Event
Click the "Confirm" button in the prompting window, click "Events" in the property window on the right, add two events, set both events to "Click", select "Close Window" in the window switching section for the handling method, set the target window to "prompting", and select "Switch Window" in the window switching section for the other handling method, with the target window being "main". The specific setting method is the same as above and will not be repeated here. See Figure 4.5.
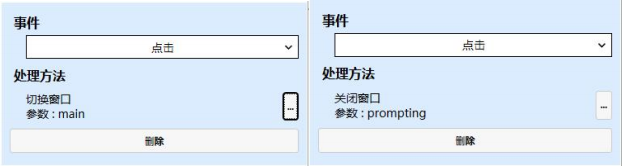
Figure4.5 Confirm Button Event Settings
Click the "Cancel" button in the prompting window, click "Events" in the property window on the right, add an event, set the event to "Click", click the "..." under the handling method to pop up the handling method window, select "Close Window" in the window switching section, set the target window to "prompting", as shown in Figure 4.6.
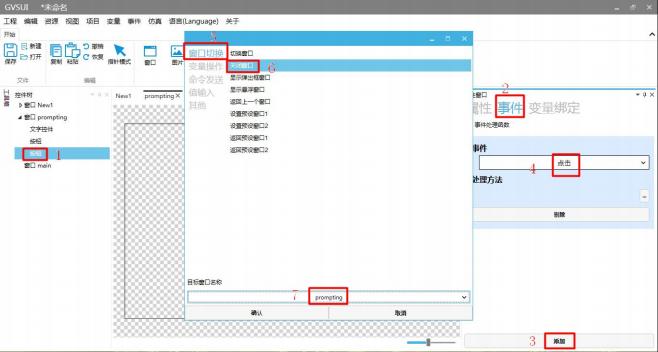
Figure4.6 Cancel Button Event Settings
6and Simulation Demonstration
Click the "Simulation Demonstration" button , and the simulation running window will pop up
Click the "Exit" button in window "new1" to pop up a prompt window, as shown in Figure 4.7.
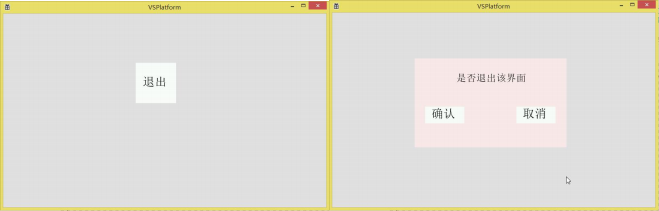
Figure4.7 Click the "Exit" button.
Click the "Confirm" button in the pop-up box to close the pop-up window and switch to the "main" window, as shown in Figure 4.8.
Figure4.8 Switch to themain window.
Click the "Cancel" button to close the pop-up window and return to window "NEW1", as shown in Figure 4.9.
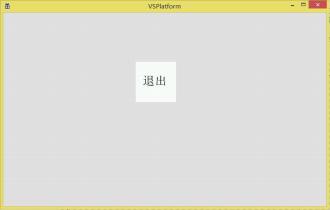
Figure4.9 Switch to window"NEW1" Middle


Leave a Reply