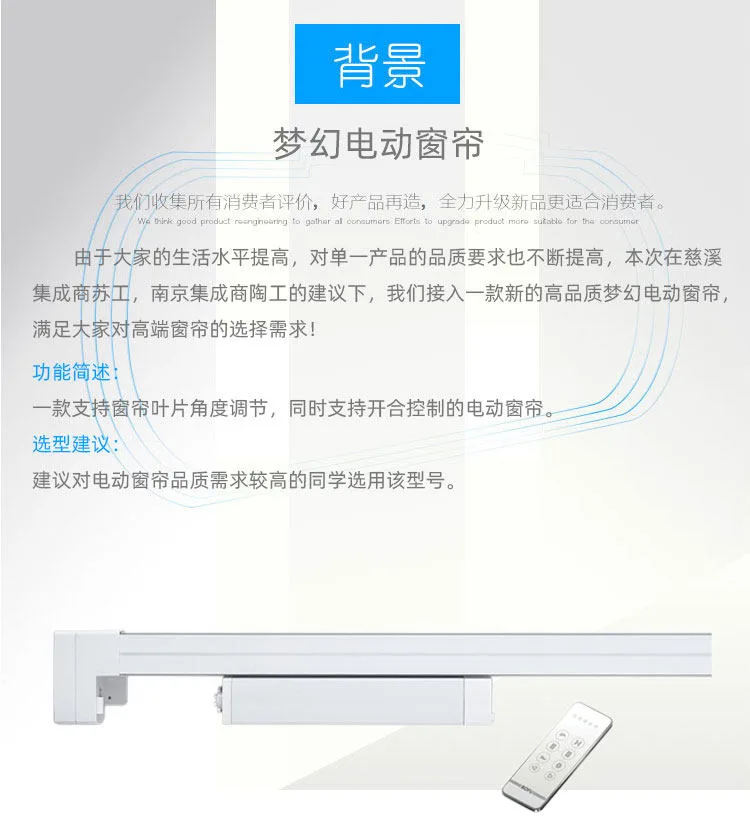
I. Product Introduction
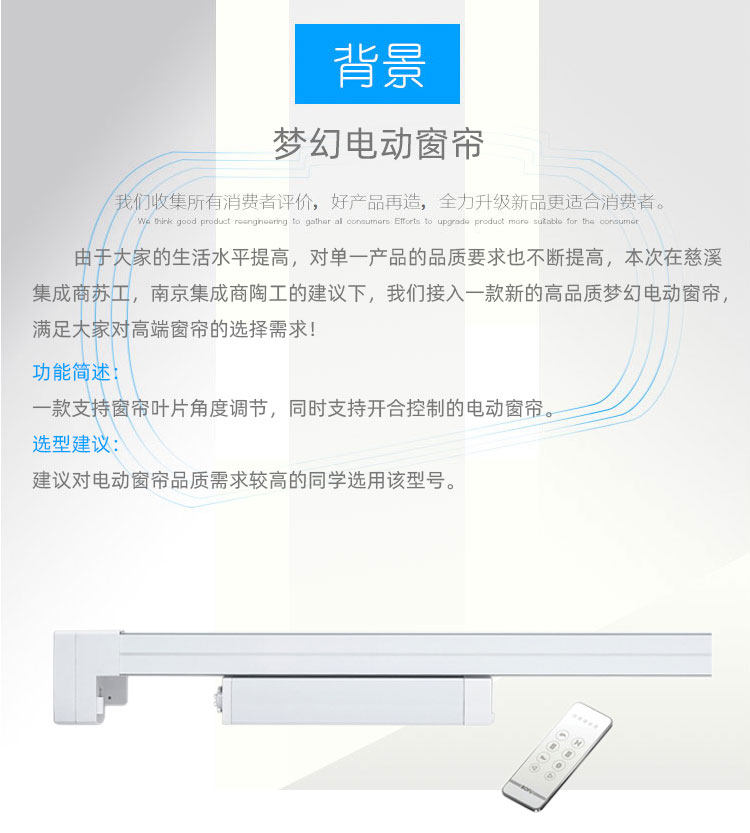
Dreamy Electric Curtain is a high-quality electric curtain product that supportscurtain blade angle adjustment, as well asopening and closing control. Adopting RS485 bus communication method, supporting soft start function, equipped with 433MHz wireless remote control.
Applicable scenarios:Smart homes, offices, hotel rooms, sunrooms, and other places with high requirements for shading and dimming. It is recommended that users with high quality requirements for electric curtains choose this model.
II. Core Features
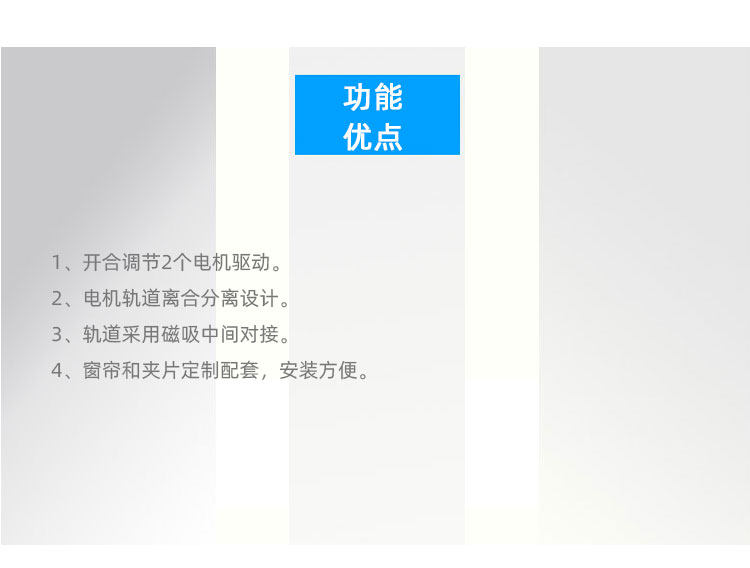
- Dual motor independent drive- Opening and closing adjustment and blade angle adjustment are respectively driven by two independent motors, which do not interfere with each other and run more stably
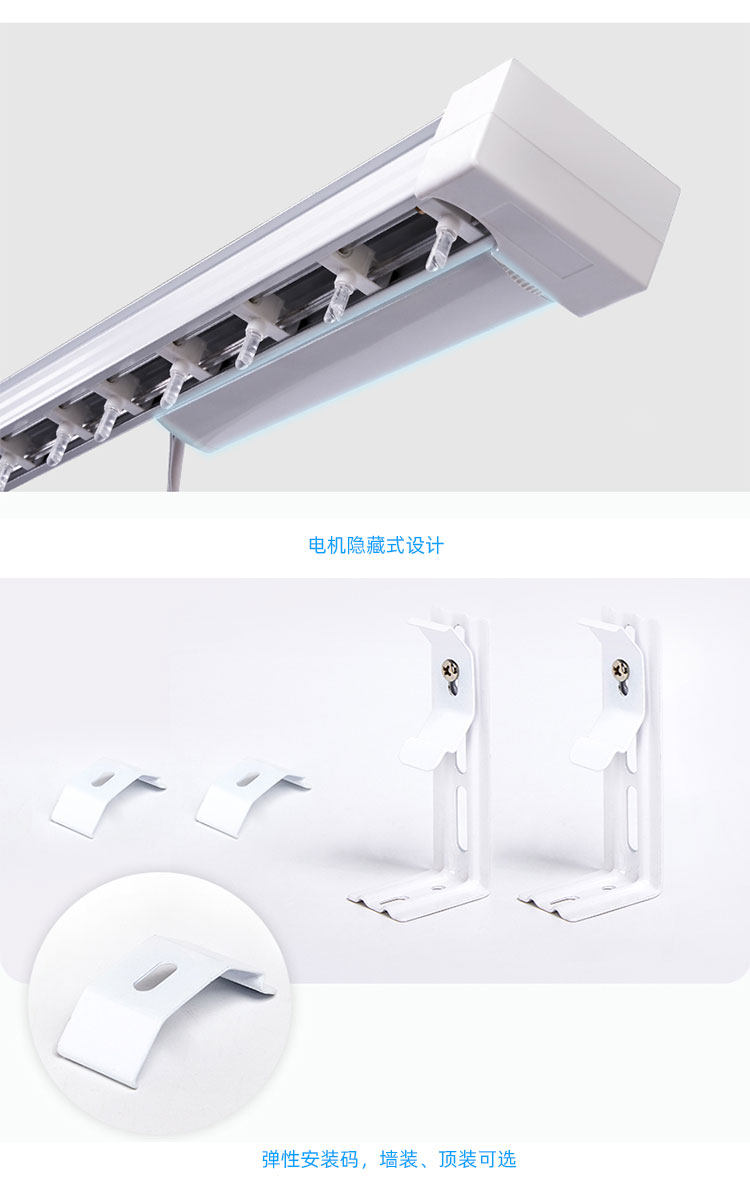
- Motor track separation design- The motor and track adopt a separate structure, making installation and maintenance more convenient. Replacing the motor does not require dismantling the entire track
- Magnetic suction intermediate docking- Magnetic suction intermediate docking is used at the track joint, ensuring stable and reliable connection of multiple tracks
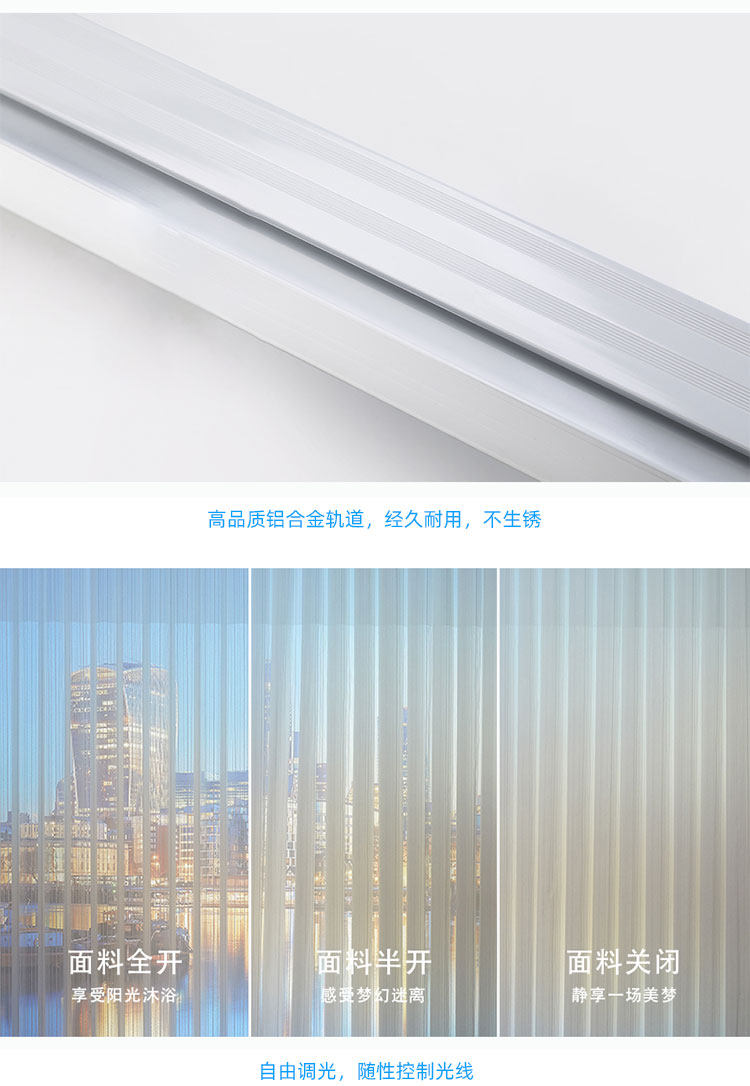
- 170 ° wide range dimming- The blade can be adjusted left and right up to 170 °, accurately controlling indoor light from fully closed to fully open
- Multiple communication methods- Supports RS485 bus communication, 433MHz wireless remote control, wired control, and flexible access to various intelligent systems
- Soft start protection- Soft start algorithm is used when starting the motor to reduce mechanical impact and extend service life
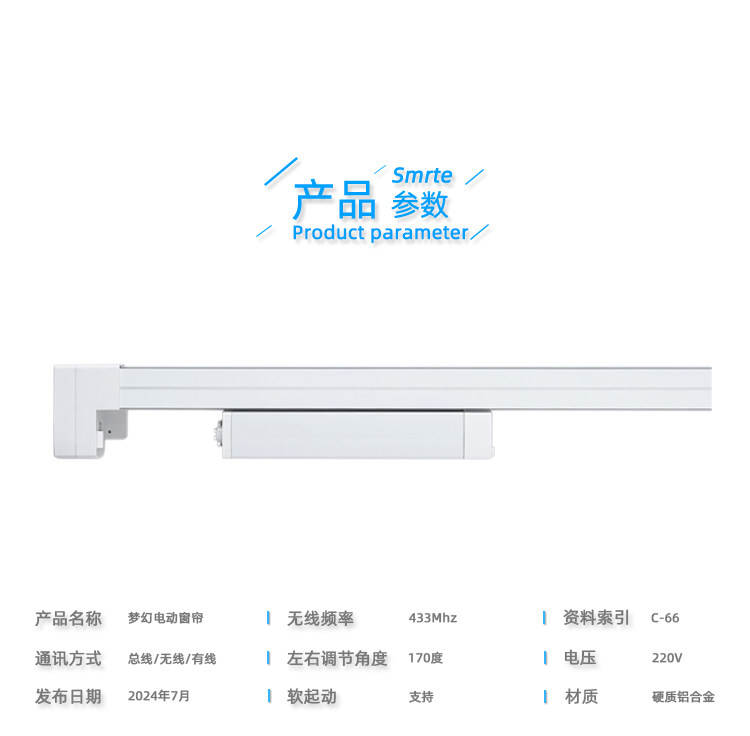
3, Technical parameters
| parameter items | Parameter value | Parameter Project | Parameter Values |
| Product Name | Dreamy Electric Curtain | Wireless Frequency | 433MHz |
| Communication Method | Bus/Wireless/Wired | Data Index | C-66 |
| Release Date | July 2024 | Adjust the angle left and right | 170° |
| Working Voltage | 220V AC | soft start | Support |
| Material | Hard aluminum alloy | ||
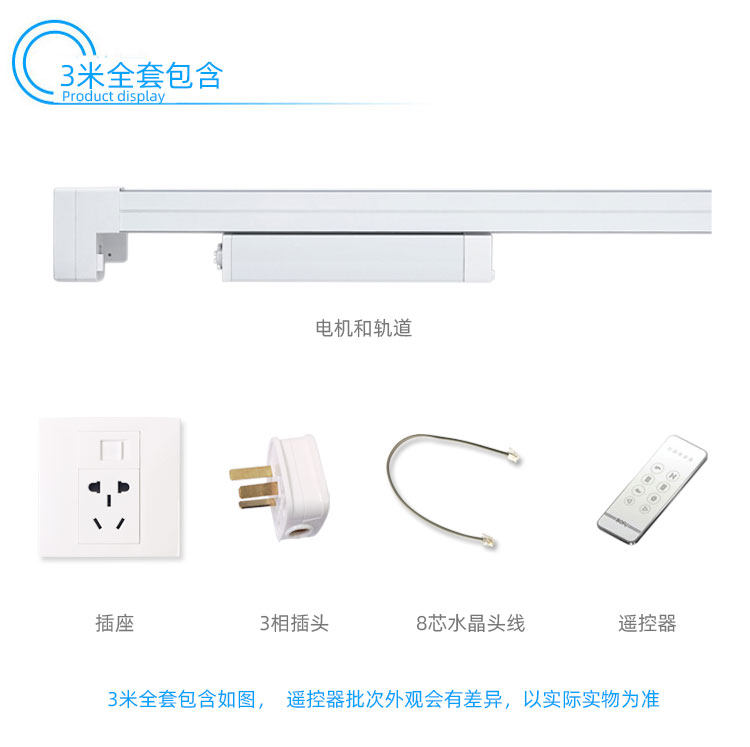
4, Complete accessory list (taking 3 meters as an example)
- Motor and track——1 set (including built-in dual motors)
- Wall socket——1 (86 type panel socket)
- Three phase plug——1 (220V power connector)
- 8-core crystal head wire——1 (RS485 bus communication line)
- Remote control——1 (433MHz wireless remote control, note: there may be slight differences in batch appearance, subject to actual product)
Tip: There may be slight differences in the configuration of curtains of different lengths, please refer to the actual shipment for details.
V. Wiring Instructions
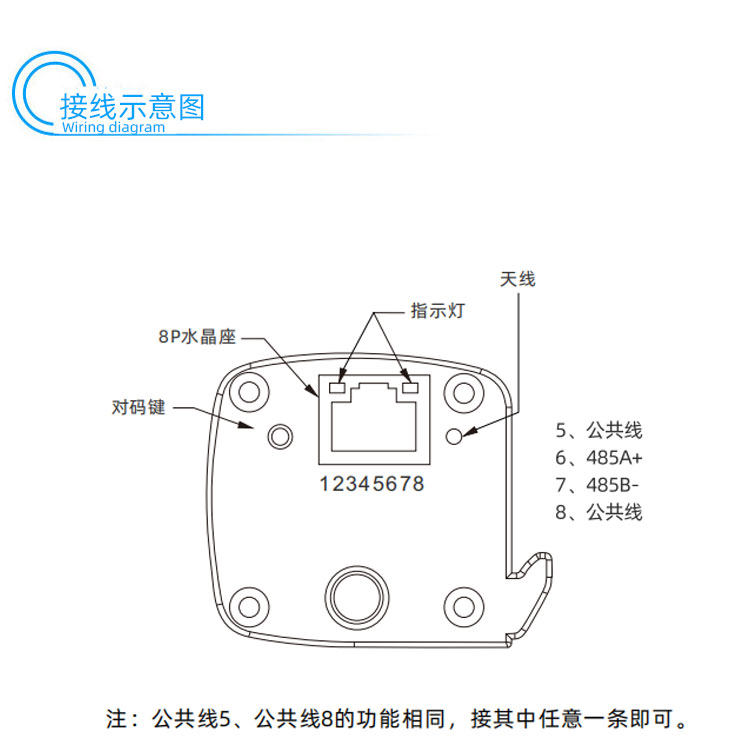
The Dream Electric Curtain uses an 8P crystal holder (RJ45 interface) for wiring, with pin definitions as follows:
| Pin Number | Function Definition |
|---|---|
| Antenna | Wireless Antenna Interface |
| Indicator Light | Status Indicator Light (for pairing observation) |
| Code Matching Button | Remote Control Code Matching Button |
| 5 | Common Line |
| 6 | 485A+(RS485 signal positive pole) |
| 7 | 485B -(RS485 signal negative pole) |
| 8 | Common Line |
Note:The functions of common line 5 and common line 8 are the same. Connect either of them, and there is no need to connect both at the same time.
6. RS485 Bus Control Protocol
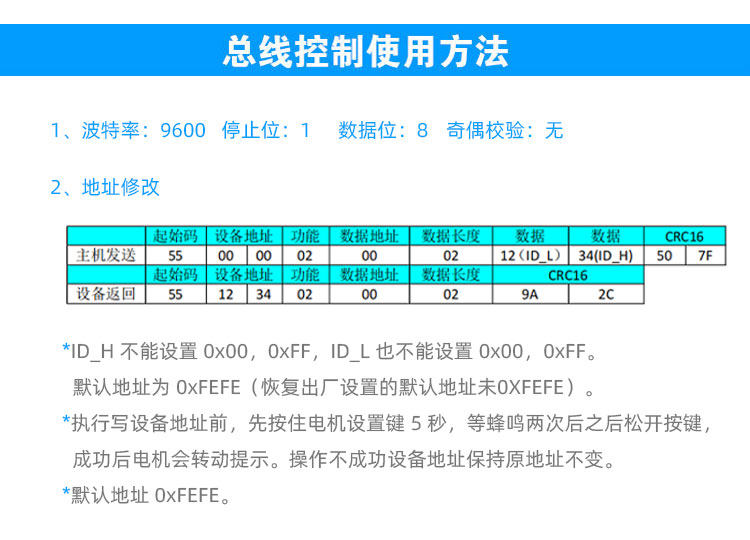
6.1 Basic Communication Parameters
- Baud Rate:9600 bps
- Stop Bit:1-bit
- Data Bit:8-bit
- Parity Check:None
6.2 Address Modification
The default device address is0xFEFE(i.e. 0XFEFE). The instruction format for modifying device address is as follows:
| Direction | Start Code | Device Address | Function | Data Address | Data Length | Data | CRC16 | |||
|---|---|---|---|---|---|---|---|---|---|---|
| Host Send | 55 | 00 | 00 | 02 | 00 | 02 | 12 (IDUL) | 34 (IDUH) | 50 | 7F |
| Device Return | 55 | Start Code | Device Address | Function | Data Address | Data Length | CRC16 | |||
| 55 | 12 | 34 | 02 | 00 | 02 | 9A | 2C | |||
Important note:
- IDH_ cannot be set to 0x00 or 0xFF; ID_L cannot be set to 0x00 or 0xFF
- . Before writing the device address, press and hold themotor setting button for 5 seconds, wait for two beeps, and then release the button. After success, the motor will rotate and prompt
- . If the operation is unsuccessful, the device address will remain the same as the original address
- . Restore the default address to 0xFEFE
6.3 Control Protocol Instruction Set
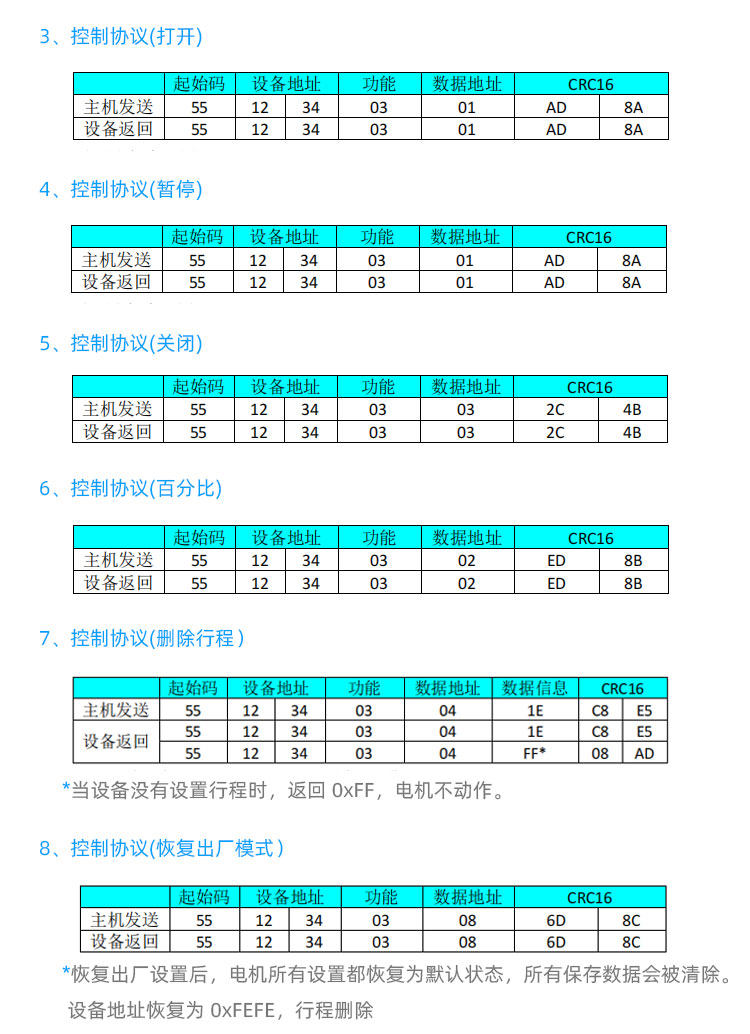
(1) Control Protocol - Open Curtains
| Direction | Start Code | Device Address | Function | Data Address | CRC16 |
|---|---|---|---|---|---|
| Host sends | 55 | 12 34 | 03 | 01 | AD 8A |
| Device returns | 55 | 12 34 | 03 | 01 | AD 8A |
(2) Control Protocol - Pause
| Direction | Start Code | Device Address | Function | Data Address | CRC16 |
|---|---|---|---|---|---|
| Host sends | 55 | 12 34 | 03 | 01 | AD 8A |
| Device returns | 55 | 12 34 | 03 | 01 | AD 8A |
(3) Control Protocol - Close Curtain
| Direction | Start Code | Device Address | Function | Data Address | CRC16 |
|---|---|---|---|---|---|
| Host Send | 55 | 12 34 | 03 | 03 | 2C 4B |
| Device Return | 55 | 12 34 | 03 | 03 | 2C 4B |
(4) Control Protocol - Percentage Control
| Direction | Start code | Device address | Function | Data address | CRC16 |
|---|---|---|---|---|---|
| Host sends | 55 | 12 34 | 03 | 02 | ED 8B |
| Device returns | 55 | 12 34 | 03 | 02 | ED 8B |
(5) Control Protocol - Delete Trip
| Direction | Start Code | Device Address | Function | Data Address | Data Information | CRC16 |
|---|---|---|---|---|---|---|
| Host Sending | 55 | 12 34 | 03 | 04 | 1E | C8 E5 |
| The device returns | 55 | 12 34 | 03 | 04 | 1E/FF * | 08 AD |
* When the device has not set the travel, it returns 0xFF and the motor does not operate.
(6) Control Protocol - Factory Reset Mode
| Direction | Start Code | Device Address | Function | Data Address | CRC16 |
|---|---|---|---|---|---|
| Host sends | 55 | 12 34 | 03 | 08 | 6D 8C |
| Device returns | 55 | 12 34 | 03 | 08 | 6D 8C |
* After resetting to factory settings, all motor settings are restored to their default state and all saved data is cleared. The device address is restored to 0xFEFE and the itinerary is deleted.
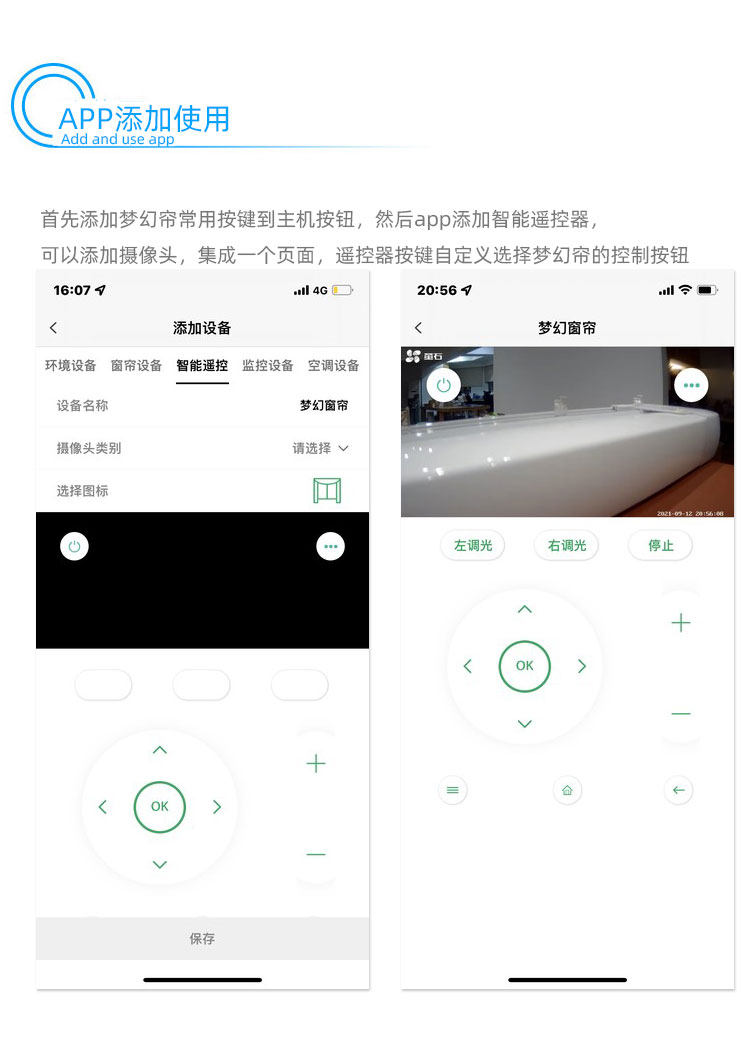
7. Adding and Using Mobile APP
Dreamy Electric Curtains Support Remote Control and Automated Management through Mobile APP. The steps for adding are as follows:
- First, add the commonly used buttons for Dreamy Curtains to the host button
- , then enter the APP to addSmart Remote ControlDevice
- In the "Add Device" interface, select:Environmental equipment → Curtain equipment → Intelligent remote control
- Fill in the device name (such as "Dream Curtain")
- You can choose to add a camera and integrate it into one page for unified management
- The remote control buttons can be customized to select the control buttons for the dreamy curtain (left dimming, right dimming, stop, etc.)
- Click Save to complete the addition
After adding, remote opening and dimming control can be achieved through the APP.
8, Selection of opening and closing methods
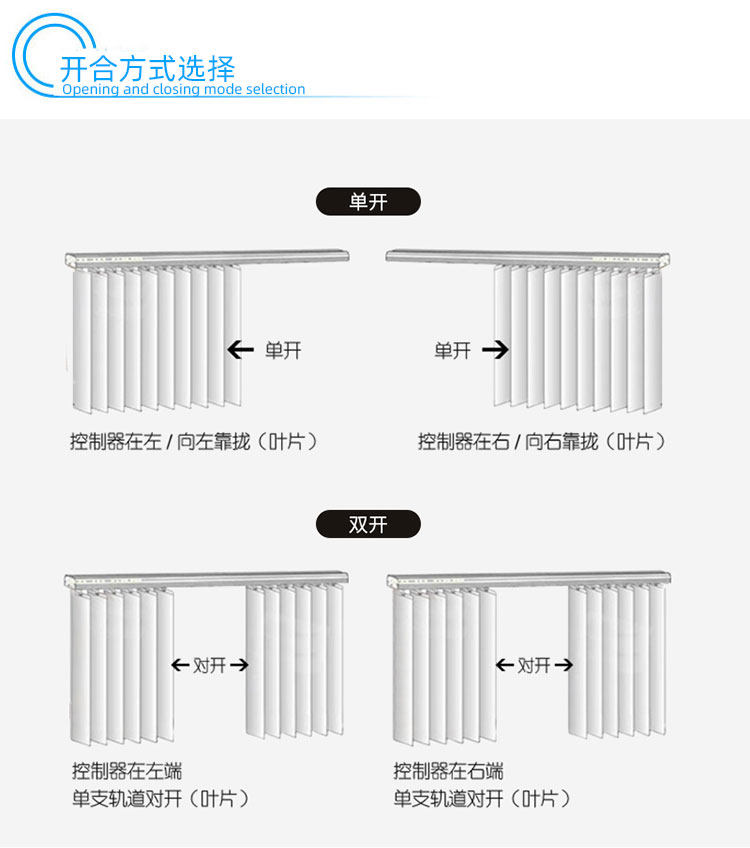
Dreamy electric curtains support two opening and closing modes. Please confirm the window position before placing an order:
8.1 Single Open Mode
- Controller moves closer to left/left——The curtains are folded from right to left (with the blades folded to the left), suitable for situations where the controller is installed on the left side
- Controller moves closer to the right/right——The curtains are folded from left to right (with the blades folded to the right), suitable for situations where the controller is installed on the right side
8.2 Dual Open Mode
- The controller is on the left end——A single track opens symmetrically from the middle to both sides (with blades expanding towards both sides)
- Controller on the right end——A single track opens symmetrically from the middle to both sides (with blades expanding towards both sides)
Note: Double opening explanation refers to the opening or closing of the curtain from the center of the track, like on both sides of a window, which is a conventional curtain opening and closing design scheme. Single opening interpretation refers to the closure or opening of the curtain from one side to the other, applicable to curtains with a width of less than 1.5 meters for single-sided windows.
9, Installation method (detailed graphic and textual tutorial)
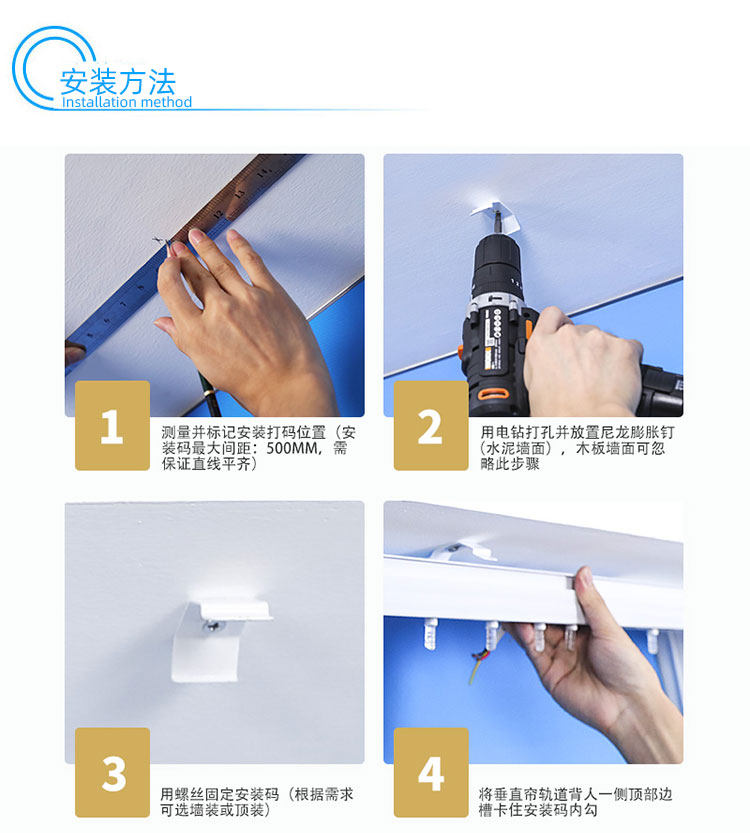
The following is the standard installation process for Dreamy Electric Curtains, consisting of 10 steps:
Phase 1: Fixed Installation Code
- Measure and mark the installation coding position——Measure the ceiling or wall with a tape measure, mark the installation code with a maximum spacing of 500mm, and ensure that the straight line is level
- Drill holes with an electric drill and place nylon expansion nails——Expansion nails can be used for cement walls, while this step can be omitted for wooden walls
- Fix the installation code with screws——According to installation requirements, wall mounted (side mounted) or top mounted methods can be selected, and the elastic installation code can be fixed in place with screws
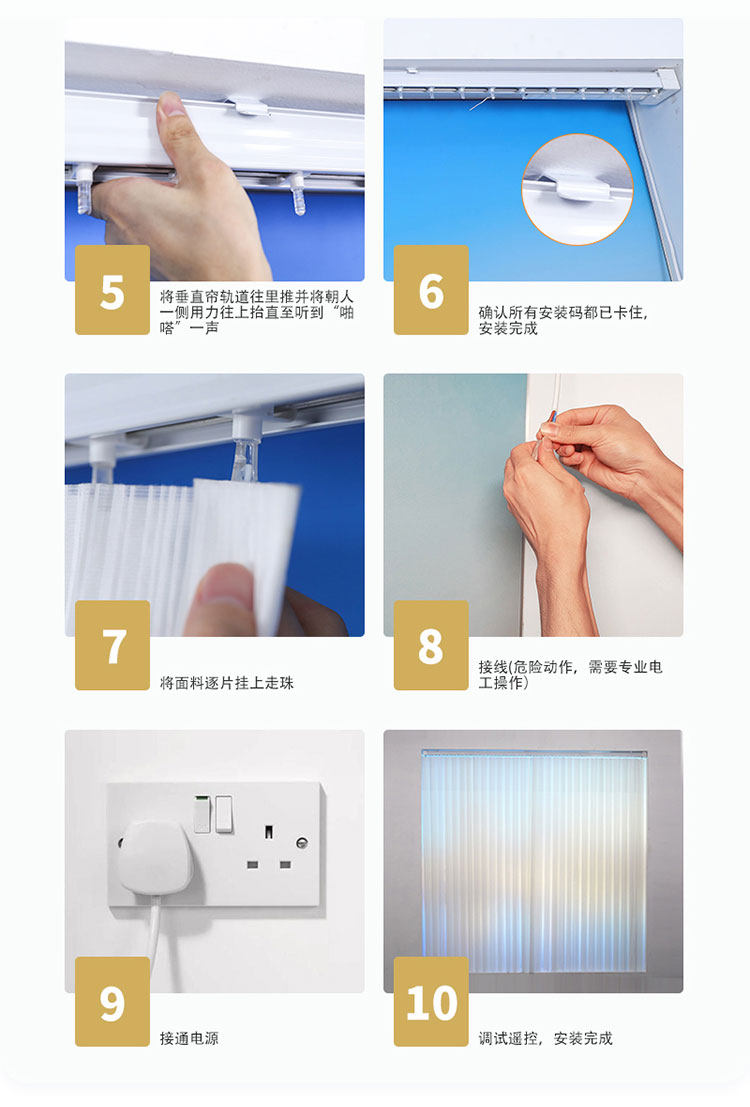
- Push the vertical curtain track into the lock——Insert the track into the hook slot of the installation code along one side of the top edge groove, and confirm that it is securely fastened
- Push hard inside to the bottom——Push the track inward with your hands and lift it upwards with force towards the person's side until you hear a "click" sound, indicating that it is firmly stuck
- Confirm that all installation codes are stuck——Check each installation code one by one to ensure that it is fully engaged
Phase 2: Hanging cloth and wiring
- Hang the fabric piece by piece with beads——Mount the dreamy curtain fabric pieces piece by piece onto the track beads in order
- wiring——Dangerous action! Professional electrician operation is requiredPlease connect the power cord and RS485 communication cable according to the wiring instructions in Section 5
- Power on——Insert the power plug into the reserved socket
- Debugging remote control——Test the opening, closing, and dimming functions using the remote control, confirm everything is normal, and then complete the installation
10, Remote control usage method
10.1 Remote Control Button Instructions
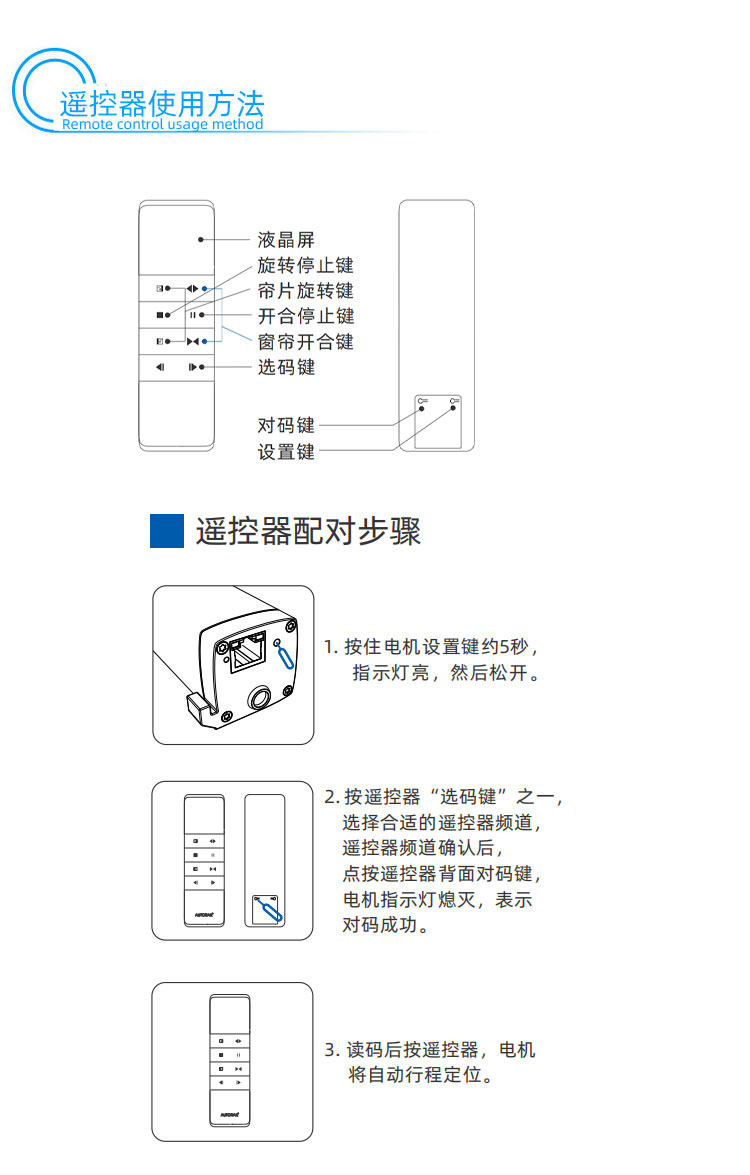
The dreamy electric curtains are equipped with a dedicated wireless remote control, and the functions of each button are as follows:
- LCD screen——Display current status information
- Rotation stop button——Rotate and adjust the blade angle, press to immediately stop the current action
- Curtain rotation key——Independently control the flipping angle of the curtain (blade)
- Open and close stop button——Control the curtain opening and closing movement, press again to stop
- Curtain opening and closing button——One click full open or full close
- Code selection key——Used for selecting remote control channels (in conjunction with pairing code)
- keyboard key(Back) - Paired and bound with motor
- settings key(Back) - Enter the setting mode (travel setting, speed adjustment, etc.)
10.2 Remote control pairing steps
- Press and hold the motor setting button for about 5 secondsAfter hearing the buzzing sound, the indicator light will turn on, and then release the button
- Press one of the "code selection keys" on the remote controlChoose the appropriate remote control channel. After confirming the remote control channel, click on the button on the back of the remote controlkeyboard keyAt this point, the motor indicator light goes out, indicating successful code pairing
- Read the code and press the remote controlThe motor will automatically operate and position itself
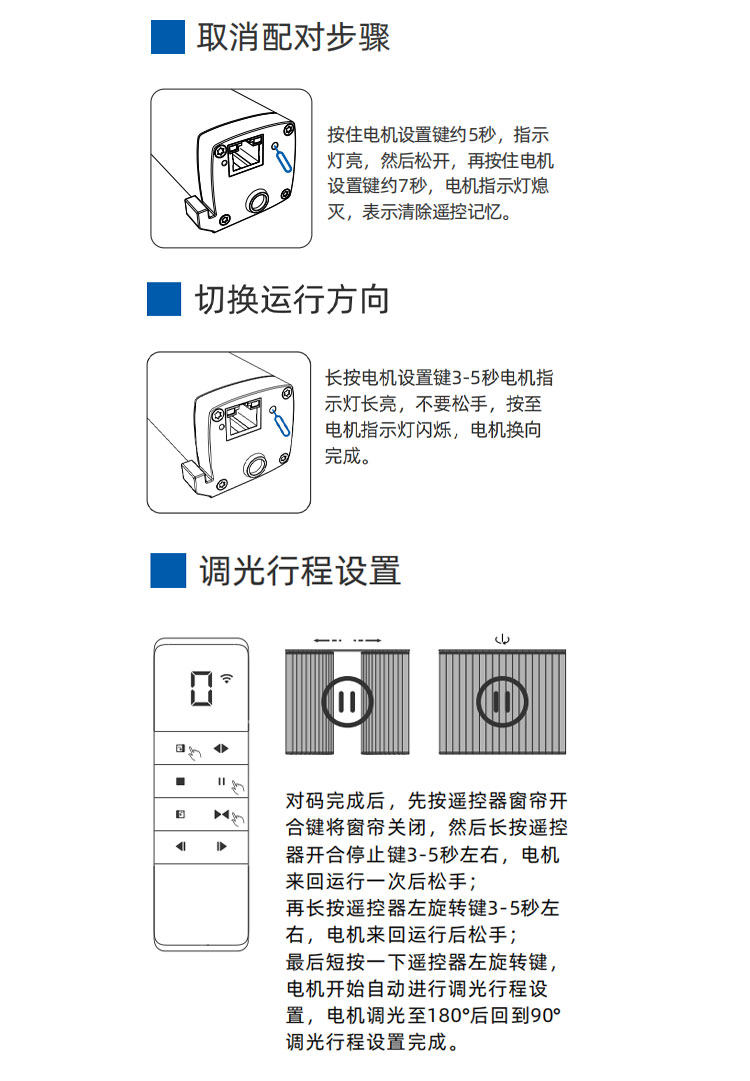
10.3 unpaired steps
To unbind the remote control from the motor:
- Press and hold the motor setting button for about 5 seconds, the indicator light will turn on, and then release it
- Press and hold the motor setting button for about 7 seconds, and the motor indicator light will turn off, indicating that the remote control memory has been cleared
10.4 Switching Operating Direction
If the opening and closing direction of the curtains is opposite to what is expected:
- Press and hold the motor setting button for 3-5 seconds, and the motor indicator light will turn on
- Don't let go, keep holding down until the motor indicator light flashes once
- After releasing, the motor commutation is completed
10.5 Dimming stroke setting
After completing the coding, set the blade dimming (flipping) stroke according to the following steps:
- Press the remote control firstCurtain opening and closing buttonClose the curtains
- Long press the remote controlOpen and close stop buttonAfter running the motor back and forth for about 3-5 seconds, let go
- Press and hold the remote control againLeft turn keyAfter running the motor back and forth for about 3-5 seconds, let go
- Finally, press the remote control brieflyLeft turn key, the motor starts automatic dimming stroke setting
- The motor dims to 180 ° and returns to 90 °, and the dimming stroke setting is completed
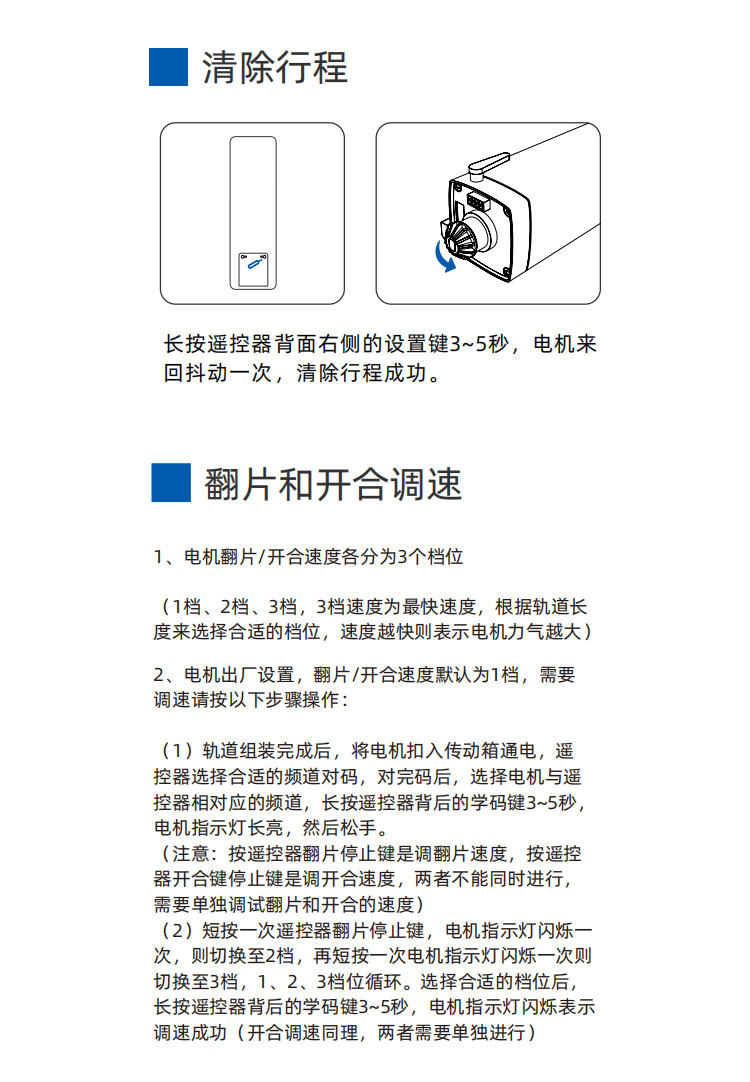
10.6 Clear stroke
Long press thesetting keyon the right side of the remote control back for 3-5 seconds, and the motor shakes back and forth once. The clear stroke is successful.
10.7 Adjustment of flipping speed and opening/closing speed
Motor flipping/opening speed is divided into3 gears:
- 1 gear- slowest speed
- 2nd gear——Medium speed
- 3 levels——The fastest speed (choose the appropriate gear according to the length of the track, the faster the speed, the greater the motor air force)
The default flipping/opening speed of the motor is set to1st gearThe speed regulation steps are as follows:
- After the track assembly is completed, the motor is fastened into the transmission box and powered on
- . The remote control selects the appropriate channel for code matching. After code matching is completed, select the channel corresponding to the motor and remote control
- Long press on the back of the remote controlLearn code key3-5 seconds, the motor indicator light stays on, then let go
- Attention:Press the flip stop buttonon the remote controlto adjust the flip speed, and press the open close stop buttonon the remote controlto adjust the open close speed. Both cannot be done simultaneously and need to be debugged separately.
- Short press the flip stop buttonon the remote control(or open/close stop button), if the motor indicator light flashes once, switch to gear 2
- Press the motor indicator light briefly again and it will flash once to switch to gear 3
- 1. Cycle selection of gears 2 and 3. After selecting the appropriate gear, long press the learn code button on the back of the remote control for 3-5 seconds. The motor indicator light will flash to indicate successful speed regulation
- (the same applies to opening and closing speed regulation, both need to be done separately)
11, Precautions
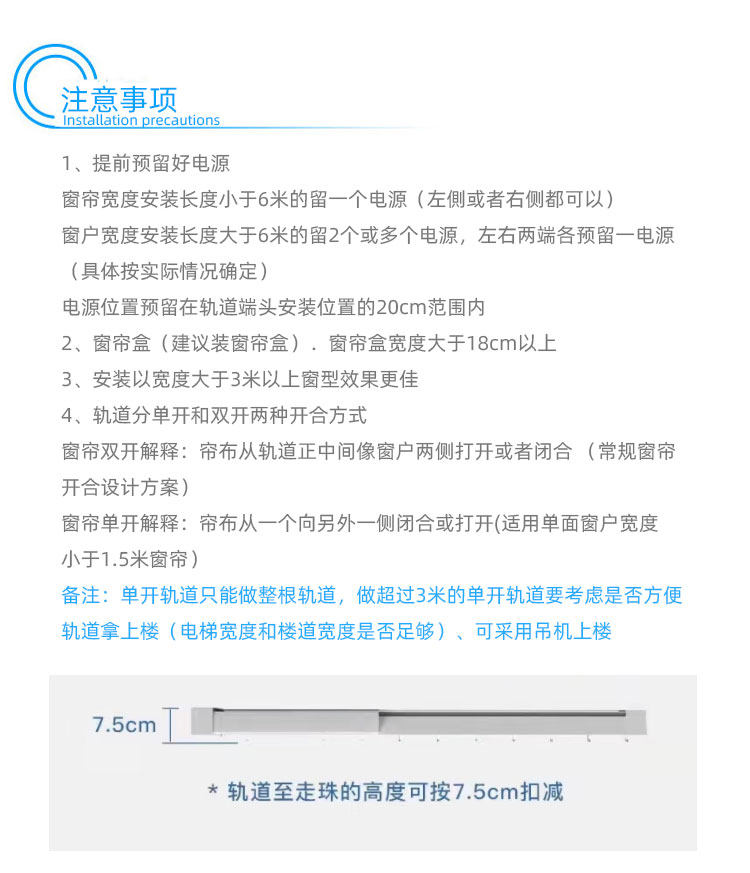
- Reserve power supply in advance
If the width and installation length of the curtains are less than 6 meters, leave one power supply (either on the left or right side);
Install windows with a width greater than 6 meters and leave 2 or more power sources, with one power source reserved at each end
(Specific to be determined according to the actual situation)
Power supply location needs to be reservedWithin 20cm of the installation position at the end of the track - Curtain box requirements——Suggest installing a curtain box with a width greater than 18cm or more
- Best Window Width——Installing windows with a width greater than 3 meters yields better results
- The track has two opening and closing modes: single opening and double opening
• Double opening explanationThe curtain fabric opens or closes from the center of the track like a window on both sides (conventional curtain opening and closing design scheme)
• Single opening explanationThe curtain fabric is closed or opened from one side to the other (applicable to curtains with a width of less than 1.5 meters for single-sided windows) - Transportation reminderA single track can only be used for the entire track. When using a single track that exceeds 3 meters, consideration should be given to whether it is convenient to lift the track up the stairs (whether the elevator width and corridor width are sufficient), and a crane can be used to lift it up the stairs
- Size ReferenceThe height from the track to the ball can be adjusted according to7.5cmDeduction calculation
- Reserved size for curtain box30cm curtain box depth reserved for single track, 50cm curtain box depth reserved for double track
- Customized Product: As curtain fabric and track are both customized products, please accurately measure the dimensions in advance
12. Data Download
Please click the resource address button at the bottom of the page to obtain the download link! Please find the information you need according to the file path.
File path:/Please click on me/2- Post production materials/A, software · protocol · wiring/C-all protocols/C-66 Dreamy curtain code
13. Related video tutorials
Dreamy curtain tutorial on adjusting the vertical curtain bead direction
Dreamy curtain vertical curtain center assembly tutorial
Dreamy curtain on-site installation tutorial
Dreamy curtain 485 debugging explanation video
Dreamy curtain remote control code matching
Dreamy Curtain Fabric Sample Book Display
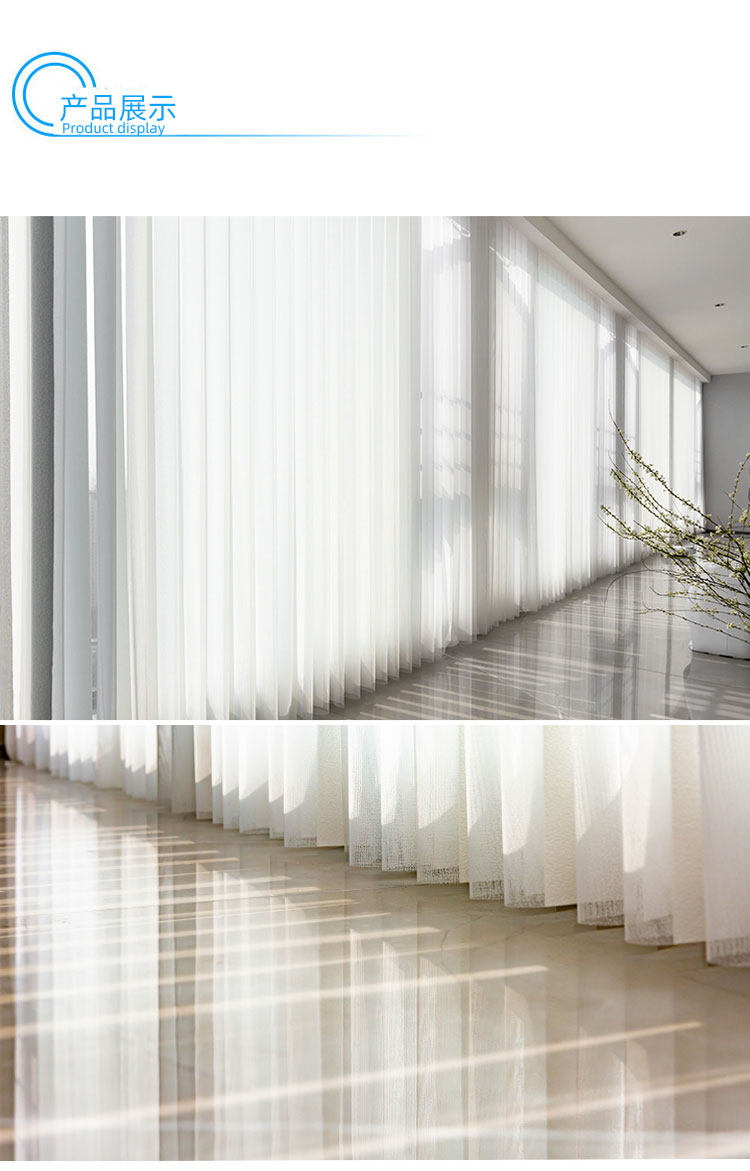
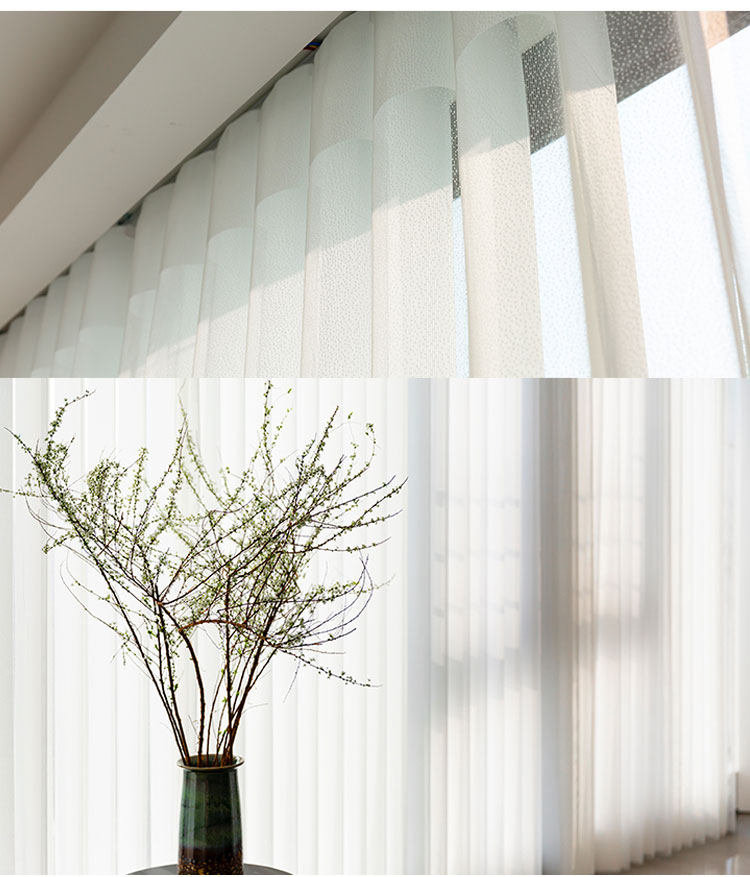
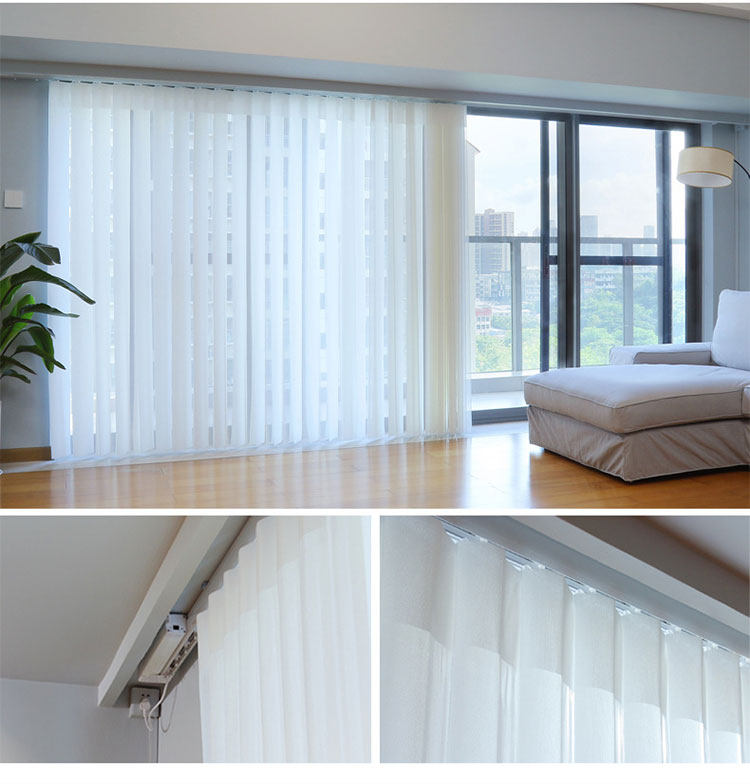
14, Product image display


Leave a Reply