
1. Introduction to Text Control
The text control is used to display values, reminders, time, etc., and has a wide range of application scenarios.
2. How to Add a Text Control
Open or create a project file, click the text icon in the common control module, and add a text control in the window, as shown in Figure 2.1.
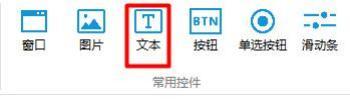 Figure 2.1 Adding a Text Control
3. How to Set the Appearance of the Text Control
Select the control, click →
Figure 2.1 Adding a Text Control
3. How to Set the Appearance of the Text Control
Select the control, click →
 in the property window on the right, and click the add button to add multiple text displays, as shown in Figure 3.1.
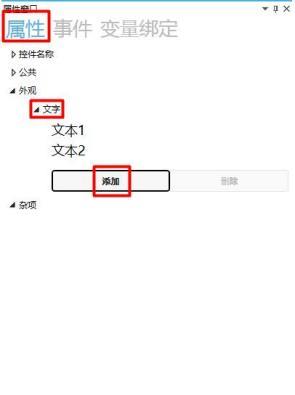 Figure 3.1 Appearance Property Modification
3.1 How to Set Text Form
Click on the text. There are static text and dynamic text. Static text is used for manually entered content under normal circumstances. Enter content in the static text input box, and it will be displayed directly in the window. Dynamic text is used to display the content of variables, as shown in Figure 3.2.
Figure 3.1 Appearance Property Modification
3.1 How to Set Text Form
Click on the text. There are static text and dynamic text. Static text is used for manually entered content under normal circumstances. Enter content in the static text input box, and it will be displayed directly in the window. Dynamic text is used to display the content of variables, as shown in Figure 3.2.
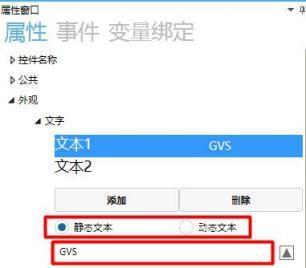 Figure 3.2 Text Form Setting
3.2 How to Modify Fonts
Modifying the font display of dynamic text requires advance settings in the font library management. For specific setting methods, please refer to the "Resource Usage Manual".
Select static text and click the button on the right side of the font to pop up the font modification window. You can modify the font size and other settings according to your needs, as shown in Figure 3.3.
Figure 3.2 Text Form Setting
3.2 How to Modify Fonts
Modifying the font display of dynamic text requires advance settings in the font library management. For specific setting methods, please refer to the "Resource Usage Manual".
Select static text and click the button on the right side of the font to pop up the font modification window. You can modify the font size and other settings according to your needs, as shown in Figure 3.3.
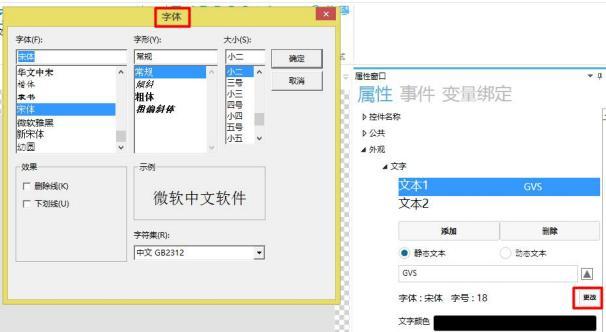 Figure 3.3 Modify Fonts
3.3 How to Modify Text Color
Click the box on the right side of the text color to pop up the color palette. You can modify the text color according to your needs. The default text color is black, as shown in Figure 3.4.
Figure 3.3 Modify Fonts
3.3 How to Modify Text Color
Click the box on the right side of the text color to pop up the color palette. You can modify the text color according to your needs. The default text color is black, as shown in Figure 3.4.
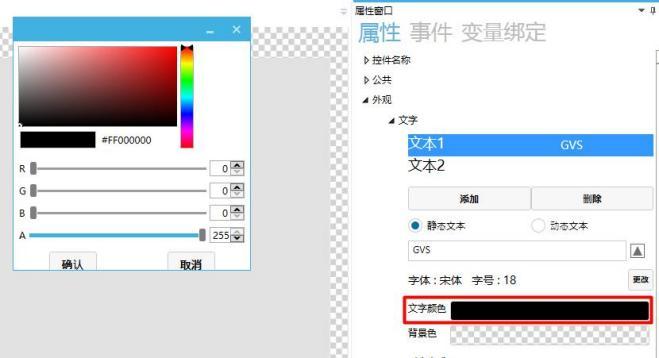 Figure 3.4 Modify Text Color
3.4 How to Modify Background Color
Click the box on the right side of the background color to pop up the color palette. You can modify the background color according to your needs. The default background color is transparent, as shown in Figure 3.5.
Figure 3.4 Modify Text Color
3.4 How to Modify Background Color
Click the box on the right side of the background color to pop up the color palette. You can modify the background color according to your needs. The default background color is transparent, as shown in Figure 3.5.
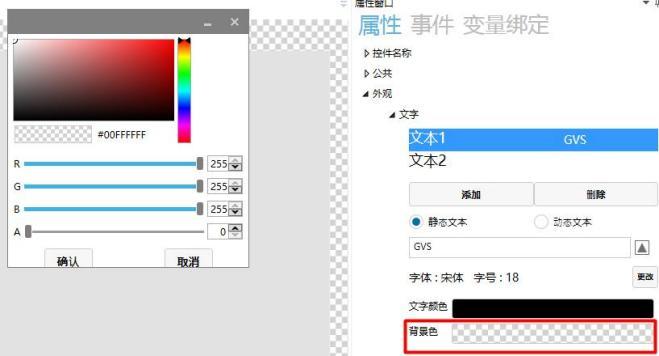 Figure 3.5 Modify Background Color
3.5 How to Modify Alignment
Click the button under alignment. Users can modify the alignment of the input text according to their needs. The default alignment is centered, as shown in Figure 3.6.
Figure 3.5 Modify Background Color
3.5 How to Modify Alignment
Click the button under alignment. Users can modify the alignment of the input text according to their needs. The default alignment is centered, as shown in Figure 3.6.
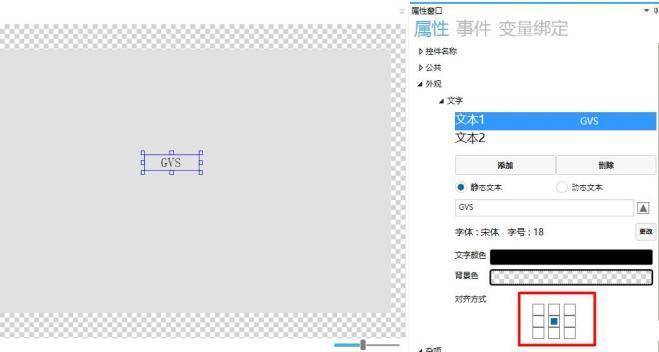 Figure 3.6 Modify Alignment
4. Application Cases
4.1 How to Set Multiple Language Switching
Switch between Chinese and English displays by clicking the radio button. The specific operation method and settings are as follows.
1. How to Add Language Display
Click on the item in the menu bar, select "Multi-Language Settings" → click "Add" → select the newly added language input box and modify the name to "English", as shown in Figure 4.1.
Figure 3.6 Modify Alignment
4. Application Cases
4.1 How to Set Multiple Language Switching
Switch between Chinese and English displays by clicking the radio button. The specific operation method and settings are as follows.
1. How to Add Language Display
Click on the item in the menu bar, select "Multi-Language Settings" → click "Add" → select the newly added language input box and modify the name to "English", as shown in Figure 4.1.
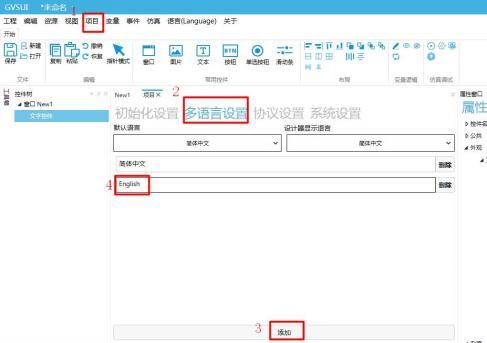 Figure 4.1 Add Language
2. How to Add Controls
Click on the window icon in the Common Controls module, add a window named "NEW2", add a text control and a button control in window "NEW1", and add a radio button in window "NEW2", as shown in Figure 4.2.
Figure 4.1 Add Language
2. How to Add Controls
Click on the window icon in the Common Controls module, add a window named "NEW2", add a text control and a button control in window "NEW1", and add a radio button in window "NEW2", as shown in Figure 4.2.
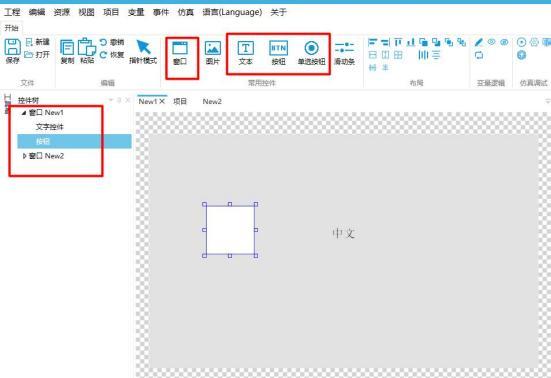 Figure 4.2 Add Controls
3. How to Set Multiple Languages
Select the text control in window "NEW1", click on "Text" in the property window on the right → select "Static Text" → click the button on the right side of the text input box →
Enter text in different languages into the input boxes of the two languages, as shown in Figure 4.3.
Figure 4.2 Add Controls
3. How to Set Multiple Languages
Select the text control in window "NEW1", click on "Text" in the property window on the right → select "Static Text" → click the button on the right side of the text input box →
Enter text in different languages into the input boxes of the two languages, as shown in Figure 4.3.
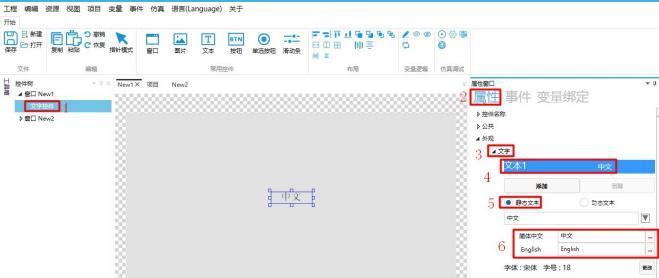 Figure 4.3 Set Multi-Language
4. How to add variable binding
Click the radio button in the window, click Variable Binding in the property window on the right → click Add → the bound control property is "Selected State" → bind the data source to "Language" → set the conversion mode to "Bidirectional" → use the default conversion method, as shown in Figure 4.4.
Figure 4.3 Set Multi-Language
4. How to add variable binding
Click the radio button in the window, click Variable Binding in the property window on the right → click Add → the bound control property is "Selected State" → bind the data source to "Language" → set the conversion mode to "Bidirectional" → use the default conversion method, as shown in Figure 4.4.
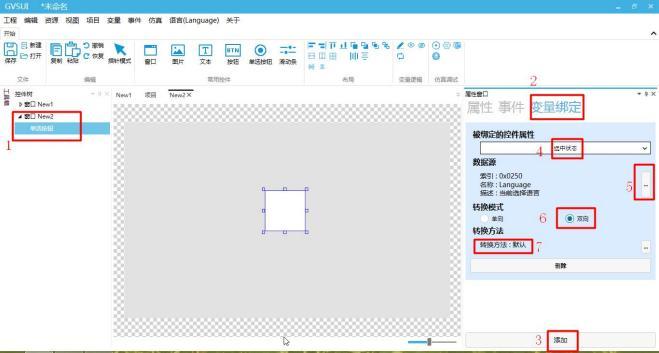 Figure 4.4 Add Variable Binding
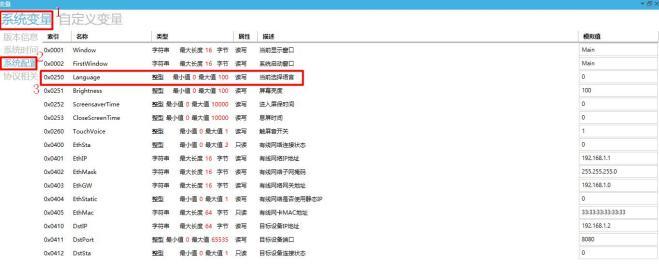
Note: the language variable is
Figure 4.4 Add Variable Binding
Note: the language variable is
 5. How to add events
Click the button control in window NEW1, click Events in the property window on the right → Add Event → set the event to "Click" → click "..." under the event handling method to pop up the handling method window → select "Switch Window" in the window switcher → select "NEW2" as the target window, as shown in Figure 4.5.
5. How to add events
Click the button control in window NEW1, click Events in the property window on the right → Add Event → set the event to "Click" → click "..." under the event handling method to pop up the handling method window → select "Switch Window" in the window switcher → select "NEW2" as the target window, as shown in Figure 4.5.
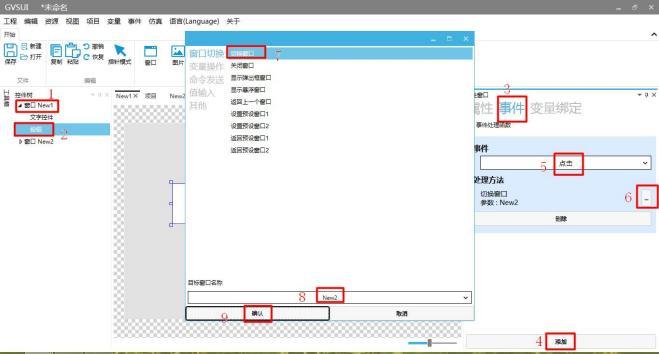 Figure 4.5 Add Event to Button Control
Click the radio button in window NEW2, click Events in the property window on the right → Add Event → set the event to "Selected" → click "..." under the event handling method to pop up the handling method window → select "Switch Window" in the window switcher → select "NEW1" as the target window, as shown in Figure 4.6.
Figure 4.5 Add Event to Button Control
Click the radio button in window NEW2, click Events in the property window on the right → Add Event → set the event to "Selected" → click "..." under the event handling method to pop up the handling method window → select "Switch Window" in the window switcher → select "NEW1" as the target window, as shown in Figure 4.6.
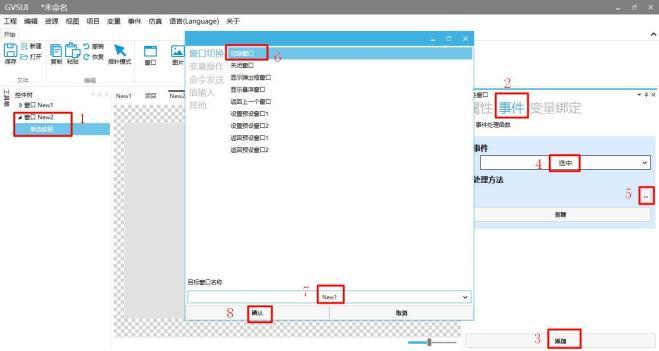 Figure 4.6 Add Event to Radio Button
6. Simulation Demonstration
Click the "Simulation Run" button to pop up the simulation run window. The text control displays in Chinese by default. Click the radio button to display the text control in English, as shown in Figure 4.7.
Figure 4.6 Add Event to Radio Button
6. Simulation Demonstration
Click the "Simulation Run" button to pop up the simulation run window. The text control displays in Chinese by default. Click the radio button to display the text control in English, as shown in Figure 4.7.
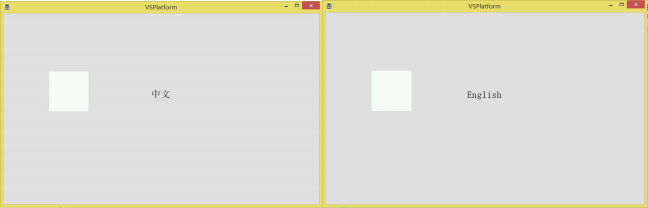 Figure 4.7 Simulation Demonstration
4.2 How to Switch the Display of Text Controls via Buttons
1. How to Add Controls
Click the "Text" and "Button" icons in the "Common Controls" module to add a text control and a button control, as shown in Figure 4.8.
Figure 4.7 Simulation Demonstration
4.2 How to Switch the Display of Text Controls via Buttons
1. How to Add Controls
Click the "Text" and "Button" icons in the "Common Controls" module to add a text control and a button control, as shown in Figure 4.8.
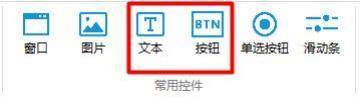 Figure 4.8 Adding Controls
2. How to Set Text Controls
Select the text control and click "Text" in the property window on the right → click "Add" to add multiple texts → click "Text" → select "Static Text" → enter the content to be displayed in the input box, as shown in Figure 4.9.
Figure 4.8 Adding Controls
2. How to Set Text Controls
Select the text control and click "Text" in the property window on the right → click "Add" to add multiple texts → click "Text" → select "Static Text" → enter the content to be displayed in the input box, as shown in Figure 4.9.
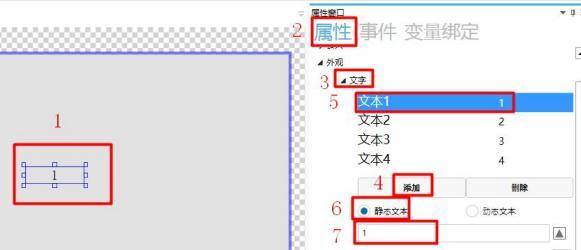 Figure 4.9 Setting Text Controls
3. How to Set Text Control Variable Binding
Select the text control and click "Variable Binding" in the property window on the right → click "Add" → the bound control property is "Text Index" → the data source is bound to "Var0" → the conversion mode is "One-way" → the conversion method is "Default", as shown in Figure 4.10.
Figure 4.9 Setting Text Controls
3. How to Set Text Control Variable Binding
Select the text control and click "Variable Binding" in the property window on the right → click "Add" → the bound control property is "Text Index" → the data source is bound to "Var0" → the conversion mode is "One-way" → the conversion method is "Default", as shown in Figure 4.10.
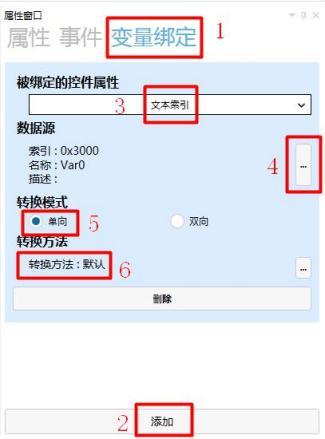 Figure 4.10 Adding Variable Binding
Note: The Var0 variable is
Figure 4.10 Adding Variable Binding
Note: The Var0 variable is
 4. How to set button control events
Select the button control, click on "Events" in the property window on the right → click "Add" → set the event to "Click" → click the "..." under the processing method to pop up the processing method window → select "Variable Loop Increment/Decrement" in the variable operation → select "Var0" as the target variable → enter "1" as the step value, as shown in Figure 4.11.
4. How to set button control events
Select the button control, click on "Events" in the property window on the right → click "Add" → set the event to "Click" → click the "..." under the processing method to pop up the processing method window → select "Variable Loop Increment/Decrement" in the variable operation → select "Var0" as the target variable → enter "1" as the step value, as shown in Figure 4.11.
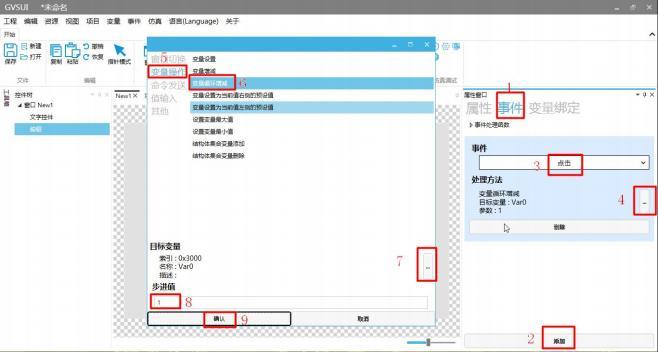 Figure 4.11 Event Settings
5. Simulation Demonstration
Click the simulation run button to pop up the simulation run window, and clicking the button can switch the text display of the text control, as shown in Figure 4.12.
Figure 4.11 Event Settings
5. Simulation Demonstration
Click the simulation run button to pop up the simulation run window, and clicking the button can switch the text display of the text control, as shown in Figure 4.12.
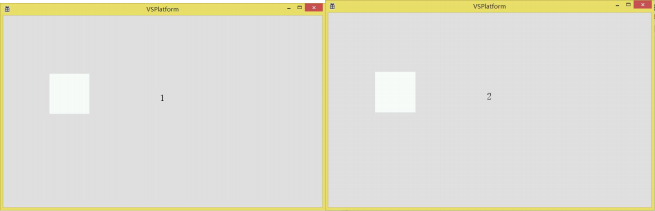 Figure 4.12 Simulation Demonstration
If you find it helpful, please give a thumbs up


Leave a Reply