

1. Introduction to Screen Slide Controls and Screen Slide Sub-Controls
"Screen Slide Controls" are used in a window, but the window size is limited. By adding Screen Slide Controls, paging display can be achieved, allowing for more controls to be stored in the same window.
"Screen Slide Sub-Controls" exist to store various controls and are attached to "Screen Slide Controls". Adding Screen Slide Sub-Control pages on top of Screen Slide Controls can be understood as a special type of overlapping window.
It can be understood that the combined effect of Screen Slide Controls and Screen Slide Sub-Controls achieves paging within the same window, allowing for more controls to be stored in the same window.
2. How to Add Screen Slide Controls and Screen Slide Sub-Controls
Open or create a new project, click on the container control in the toolbox, and click on the Screen Slide Controls and Screen Slide Sub-Controls icons to add the corresponding controls. It is important to note that the Screen Slide Sub-Controls need to be added on top of the Screen Slide Controls, as shown in Figure 2.1.
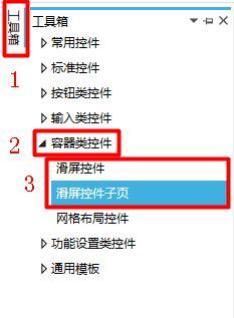 Figure 2.1 Adding Screen Slide Controls and Screen Slide Sub-Controls
Note: Screen Slide Sub-Controls can only be placed on top of Screen Slide Controls, and the number of Screen Slide Sub-Controls added determines the number of pages that can be scrolled.
3. How to Replace Images for Screen Slide Sub-Controls
Select the Screen Slide Sub-Control, click on the image in the property window on the right, and you can replace the image for the Screen Slide Sub-Control. Setting the background sets the background image display for the corresponding page of the Screen Slide Sub-Control, as shown in Figure 3.1.
Figure 2.1 Adding Screen Slide Controls and Screen Slide Sub-Controls
Note: Screen Slide Sub-Controls can only be placed on top of Screen Slide Controls, and the number of Screen Slide Sub-Controls added determines the number of pages that can be scrolled.
3. How to Replace Images for Screen Slide Sub-Controls
Select the Screen Slide Sub-Control, click on the image in the property window on the right, and you can replace the image for the Screen Slide Sub-Control. Setting the background sets the background image display for the corresponding page of the Screen Slide Sub-Control, as shown in Figure 3.1.

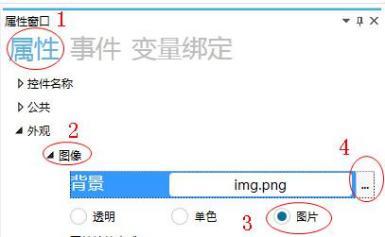 Figure 3.1 Image Replacement
Note: By default, the Screen Slide Sub-Controls are displayed transparently, and before any graphic settings are made, the background image of the window is displayed
During simulation, slide the screen to perform image replacement on the slide screen control sub-page, as shown in Figure 3.2.
Figure 3.1 Image Replacement
Note: By default, the Screen Slide Sub-Controls are displayed transparently, and before any graphic settings are made, the background image of the window is displayed
During simulation, slide the screen to perform image replacement on the slide screen control sub-page, as shown in Figure 3.2.
 Figure 3.2 Image Replacement
The slide screen control sub-page without image replacement, as shown in Figure 3.3.
Figure 3.2 Image Replacement
The slide screen control sub-page without image replacement, as shown in Figure 3.3.
 Figure 3.3 Without Image Replacement
4. How to Set Up the Slide Screen
1. How to Add Slide Screen Controls and Slide Screen Control Sub-pages
Add a slide screen control and two slide screen control sub-pages, as shown in Figure 4.1.
Figure 3.3 Without Image Replacement
4. How to Set Up the Slide Screen
1. How to Add Slide Screen Controls and Slide Screen Control Sub-pages
Add a slide screen control and two slide screen control sub-pages, as shown in Figure 4.1.
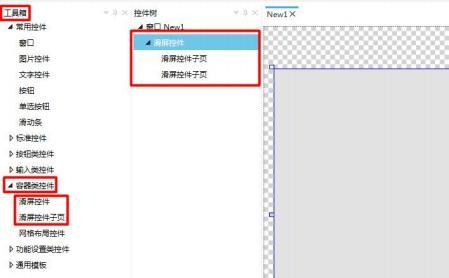 Figure 4.1 Add Controls
2. How to Set the Size of the Slide Screen Control
Select the slide screen control and resize it using the mouse or the common settings in the property window on the right. Setting the size of the slide screen control sets the size of the screen sliding area. The screen can only be slid on the slide screen control, and the size of the slide screen control sub-page will also change accordingly. Controls can only be added to the slide screen control sub-page within the set range, as shown in Figure 4.2.
Figure 4.1 Add Controls
2. How to Set the Size of the Slide Screen Control
Select the slide screen control and resize it using the mouse or the common settings in the property window on the right. Setting the size of the slide screen control sets the size of the screen sliding area. The screen can only be slid on the slide screen control, and the size of the slide screen control sub-page will also change accordingly. Controls can only be added to the slide screen control sub-page within the set range, as shown in Figure 4.2.
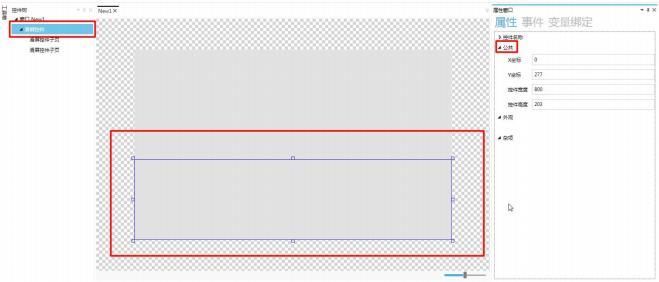 Figure 4.2 Set the Size of the Slide Screen Control
3. How to Add and Set Picture Controls
Select the sliding screen control, click to add an image control, and replace the image in the image control. This step is used to visually view the sliding screen effect, as shown in Figure 4.3.
Figure 4.2 Set the Size of the Slide Screen Control
3. How to Add and Set Picture Controls
Select the sliding screen control, click to add an image control, and replace the image in the image control. This step is used to visually view the sliding screen effect, as shown in Figure 4.3.
 During simulation, the first sub-page of the sliding screen control, namely the first page, is displayed, as shown in Figure 4.4.
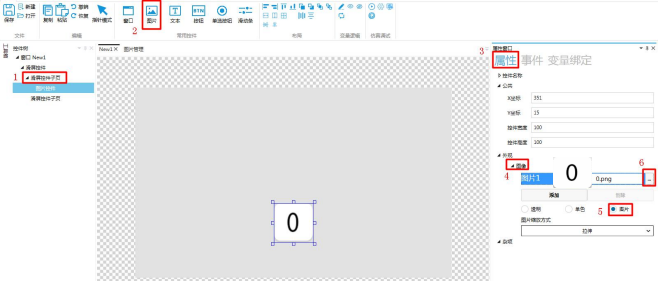
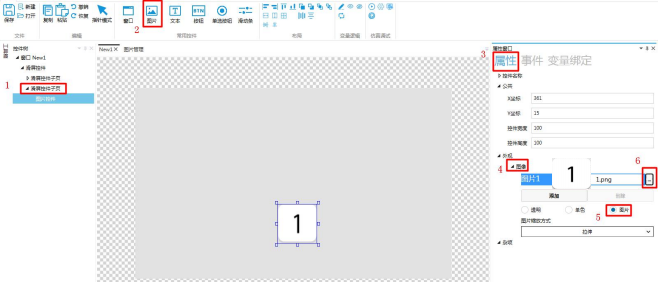 Figure 4.3 Adding an image control
4. How to simulate and run
, pop up the simulation and running window, slide the screen, and view its sliding effect.
Click the simulation and running button
Figure 4.3 Adding an image control
4. How to simulate and run
, pop up the simulation and running window, slide the screen, and view its sliding effect.
Click the simulation and running button
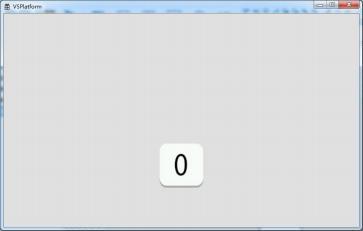 Figure 4.4 First page
Slide within the set size of the sliding screen control to the second page, which is the second sub-page of the sliding screen control (the sliding is cyclic between two pages), as shown in Figure 4.5.
Figure 4.4 First page
Slide within the set size of the sliding screen control to the second page, which is the second sub-page of the sliding screen control (the sliding is cyclic between two pages), as shown in Figure 4.5.
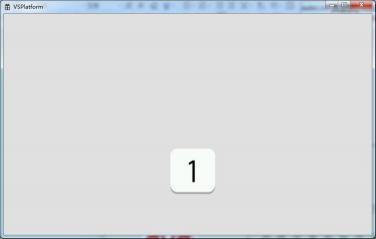 Figure 4.5 Second page
5. Application case
5.1 Event list of sliding screen control sub-pages
The event list is explained in the following table:
Figure 4.5 Second page
5. Application case
5.1 Event list of sliding screen control sub-pages
The event list is explained in the following table:
5.2 How to set up correct page transitions
1. How to add window controls
Click the window icon in the common controls module to add two windows, named 1 and 2, as shown in Figure 5.1.
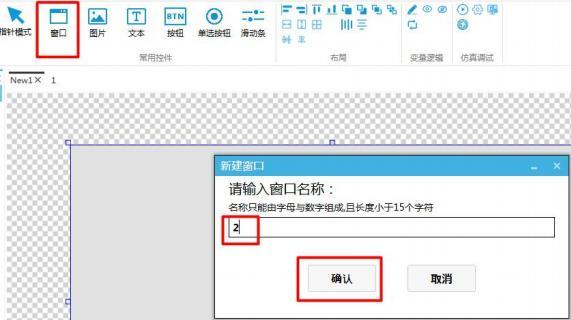 Figure 5.1 Adding windows
2. How to add button controls
Add a button control in each sliding screen control sub-page and the two newly added windows for interface transitions, as shown in Figure 5.2.
Figure 5.1 Adding windows
2. How to add button controls
Add a button control in each sliding screen control sub-page and the two newly added windows for interface transitions, as shown in Figure 5.2.
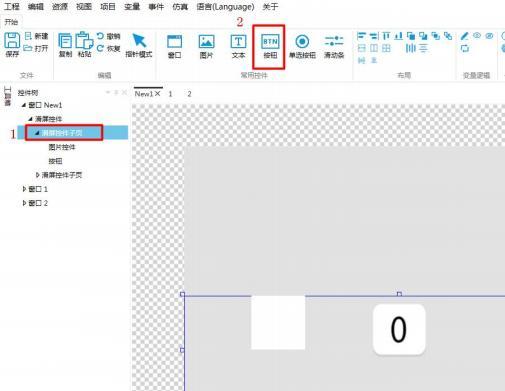 Figure 5.2 Add Button Control
3. How to Set Window Switching
Select the button control and set its event to click, with the processing method being window switching. For specific settings and steps, refer to "Window Switching" in the "Button Control User Manual".
Set the window switching of the button control in the first sliding screen control sub-page to window 1, as shown in Figure 5.3.
Figure 5.2 Add Button Control
3. How to Set Window Switching
Select the button control and set its event to click, with the processing method being window switching. For specific settings and steps, refer to "Window Switching" in the "Button Control User Manual".
Set the window switching of the button control in the first sliding screen control sub-page to window 1, as shown in Figure 5.3.
 Figure 5.3 Event Setting Parameters for the Button Control in the First Sliding Screen Control Sub-Page
Set the window switching of the button control in the second sliding screen control sub-page to window 2, as shown in Figure 5.4.
Figure 5.3 Event Setting Parameters for the Button Control in the First Sliding Screen Control Sub-Page
Set the window switching of the button control in the second sliding screen control sub-page to window 2, as shown in Figure 5.4.
 Figure 5.4 Event Setting Parameters for the Button Control in the Second Sliding Screen Control Sub-Page
Set the button control in window 1 or 2 to switch to window NEW1 (the window with a sliding screen control), as shown in Figure 5.5.
Figure 5.4 Event Setting Parameters for the Button Control in the Second Sliding Screen Control Sub-Page
Set the button control in window 1 or 2 to switch to window NEW1 (the window with a sliding screen control), as shown in Figure 5.5.
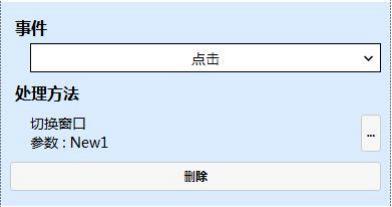 Figure 5.5 Event Setting Parameters for the Button Control in Window 1/2
Note: To better reflect the window switching effect, add a text display to the button controls in window 1 and window 2. For specific operation methods, refer to the "Button Control User Manual".
The button control in window 1 displays the text "1", as shown in Figure 5.6.
Figure 5.5 Event Setting Parameters for the Button Control in Window 1/2
Note: To better reflect the window switching effect, add a text display to the button controls in window 1 and window 2. For specific operation methods, refer to the "Button Control User Manual".
The button control in window 1 displays the text "1", as shown in Figure 5.6.
 Figure 5.6 Button Control Text Display in Window 1
The button control in Window 2 displays the text "2", as shown in Figure 5.7.
Figure 5.6 Button Control Text Display in Window 1
The button control in Window 2 displays the text "2", as shown in Figure 5.7.
 Figure 5.7: Window 2 Button Control Text Display
4. How to set events for the sliding screen control sub-pages
Select the sliding screen control sub-page, click "Events" in the property window on the right → click "Add" → set the event to "Page Switch Occurred" → click the "..." under "Processing Method" → select "Variable Operation - Variable Setting" → bind the target variable to "Var0" → select "Use Constant" for the setting value → enter "0" in the input box (enter "0" for the first sliding screen control sub-page and "1" for the second one), as shown in Figure 5.8.
Figure 5.7: Window 2 Button Control Text Display
4. How to set events for the sliding screen control sub-pages
Select the sliding screen control sub-page, click "Events" in the property window on the right → click "Add" → set the event to "Page Switch Occurred" → click the "..." under "Processing Method" → select "Variable Operation - Variable Setting" → bind the target variable to "Var0" → select "Use Constant" for the setting value → enter "0" in the input box (enter "0" for the first sliding screen control sub-page and "1" for the second one), as shown in Figure 5.8.
 Figure 5.8: Event Settings for Sliding Screen Control Sub-pages
Note: The Var3 variable is
Figure 5.8: Event Settings for Sliding Screen Control Sub-pages
Note: The Var3 variable is
 5. How to set variable binding for the sliding screen control
Select the sliding screen control, click "Variable Binding" in the property window on the right → click "Add" → set the bound control property to "Current Page" → bind the data source to "Var3" → set the conversion mode to "One-way" → set the conversion method to "Default", as shown in Figure 5.9.
5. How to set variable binding for the sliding screen control
Select the sliding screen control, click "Variable Binding" in the property window on the right → click "Add" → set the bound control property to "Current Page" → bind the data source to "Var3" → set the conversion mode to "One-way" → set the conversion method to "Default", as shown in Figure 5.9.
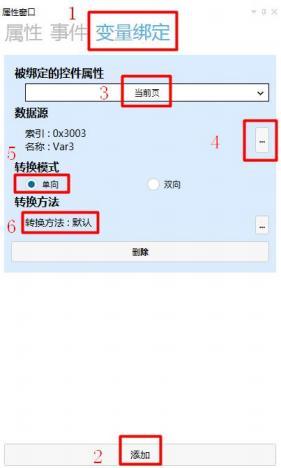 Figure 5.9: Variable Binding Settings
6. How to simulate and demonstrate
Click the simulation run button to pop up the simulation run window.
Click the button control in the first sliding screen control sub-page to jump to Window 1, and click the button control in Window 1 to jump back to the first sliding screen control sub-page. The two interfaces jump back and forth, as shown in Figure 5.10.
Figure 5.9: Variable Binding Settings
6. How to simulate and demonstrate
Click the simulation run button to pop up the simulation run window.
Click the button control in the first sliding screen control sub-page to jump to Window 1, and click the button control in Window 1 to jump back to the first sliding screen control sub-page. The two interfaces jump back and forth, as shown in Figure 5.10.
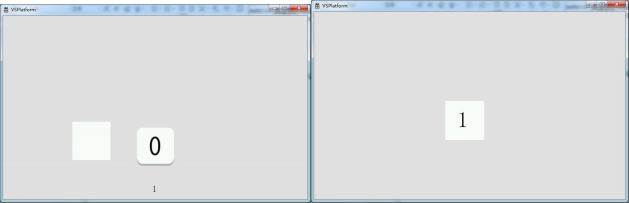 Figure 5.10 Simulation Demonstration
Click the button control in the second slide control sub-page to jump to Window 2, and click the button control in Window 2 to jump to the second slide empty control sub-page. The two pages should be able to jump to each other, as shown in Figure 5.11.
Figure 5.10 Simulation Demonstration
Click the button control in the second slide control sub-page to jump to Window 2, and click the button control in Window 2 to jump to the second slide empty control sub-page. The two pages should be able to jump to each other, as shown in Figure 5.11.
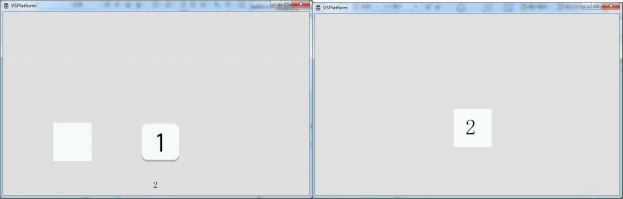 Figure 5.11 Simulation Demonstration
5.3 How to Set Page Number Display
1. How to Add a Text Control
Select Window NEW1 and click the text icon in the Common Controls module to add a text control, as shown in Figure 5.12.
Figure 5.11 Simulation Demonstration
5.3 How to Set Page Number Display
1. How to Add a Text Control
Select Window NEW1 and click the text icon in the Common Controls module to add a text control, as shown in Figure 5.12.
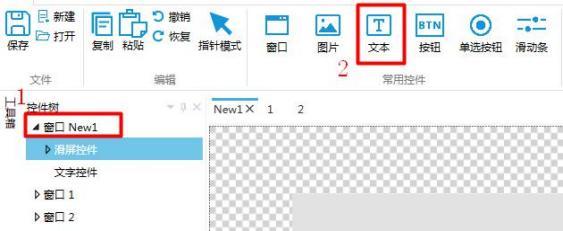 Figure 5.12 Adding a Text Control
2. How to Set Text Control Variable Binding
Select the text control and click Variable Binding in the property window on the right → click Add → set the bound control property to "Text Index" → bind the data source to "Var3" → set the conversion mode to "One-way" → set the conversion method to "Default", as shown in Figure 5.13.
Figure 5.12 Adding a Text Control
2. How to Set Text Control Variable Binding
Select the text control and click Variable Binding in the property window on the right → click Add → set the bound control property to "Text Index" → bind the data source to "Var3" → set the conversion mode to "One-way" → set the conversion method to "Default", as shown in Figure 5.13.
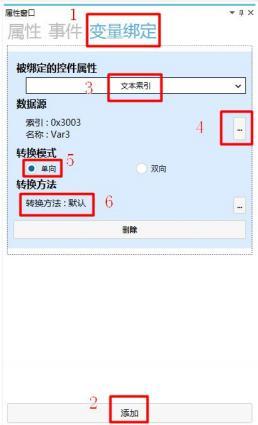 Figure 5.13 Text Control Variable Binding
3. How to Add Text Display
Select the text control, click Properties in the property window on the right → click Text under Appearance → click Add → select Text 1/2 → select "Static Text" → enter "1" in the input box (enter "1" for Text 1 and "2" for Text 2), as shown in Figure 5.14.
Figure 5.13 Text Control Variable Binding
3. How to Add Text Display
Select the text control, click Properties in the property window on the right → click Text under Appearance → click Add → select Text 1/2 → select "Static Text" → enter "1" in the input box (enter "1" for Text 1 and "2" for Text 2), as shown in Figure 5.14.
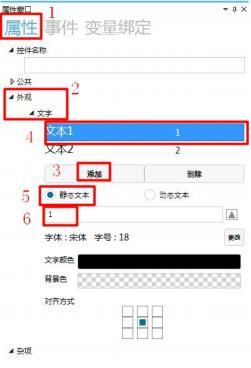 Figure 5.14 Add Text Display
4. How to Set Events for the Screen Slide Control Sub-Page
The specific setting method is the same as in "How to Set Page Navigation to Be the Same" above, and will not be repeated here.
5. How to Set Variable Binding for the Screen Slide Control
The specific setting method is the same as in "How to Set Page Navigation to Be the Same" above, and will not be repeated here.
6. How to Simulate and Demonstrate
Click "Simulate Run" to pop up the simulation run window. The page number displayed below the first screen slide control sub-page is 1, and the page number displayed below the second screen slide control sub-page is 2, as shown in Figure 5.15.
Figure 5.14 Add Text Display
4. How to Set Events for the Screen Slide Control Sub-Page
The specific setting method is the same as in "How to Set Page Navigation to Be the Same" above, and will not be repeated here.
5. How to Set Variable Binding for the Screen Slide Control
The specific setting method is the same as in "How to Set Page Navigation to Be the Same" above, and will not be repeated here.
6. How to Simulate and Demonstrate
Click "Simulate Run" to pop up the simulation run window. The page number displayed below the first screen slide control sub-page is 1, and the page number displayed below the second screen slide control sub-page is 2, as shown in Figure 5.15.
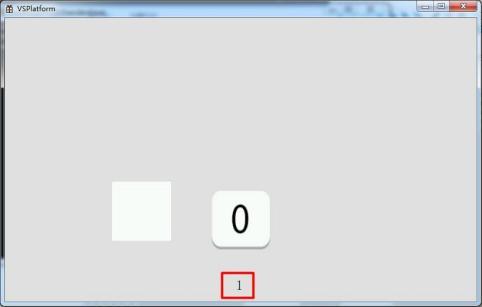
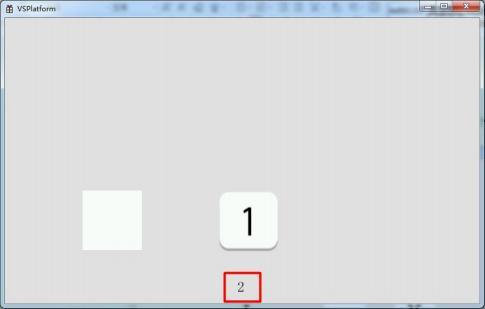 Figure 5.15 Simulation Demonstration
|
Control initialization
|
Trigger event when control is initialized
|
|
Control destruction
|
Trigger event when control is destroyed
|
|
Page switching occurs
|
Trigger event when page switching is complete
|
If you have gained something, please give a thumbs up


Leave a Reply